


8
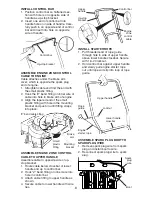
ASSEMBLE SPARK PLUG BOOT TO
SPARK PLUG WIRE
1. Remove spark plug wire from spark
plug and install boot to wire.
2. Reconnect spark plug wire to spark
plug.
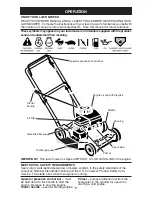
INSTALL CONTROL BAR
1. Position control bar so fl attened sec-
tion with hole is on opposite side of
handle as up-stop bracket.
2. Insert one end of control bar into
handle hole on inside of handle. Care-
fully push in on opposite end of control
bar and insert into hole on opposite
side of handle.
Control bar
Up-stop bracket
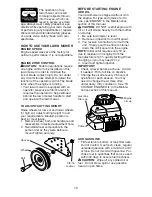
ASSEMBLE ENGINE ZONE CONTROL
CA BLE TO ENGINE
Cable attaches under the brake arm
cover, which is op po site the spark plug
end of engine.
1. Straighten cable and fi nd the end with
the small plastic fi tting.
2. Hook the “Z” bend fi tting on inner wire of
cable into hole in brake arm of engine.
3. Align the tapered end of the small
plastic fi tting with hole in the mount ing
bracket and push in until fi tting snaps
into place.
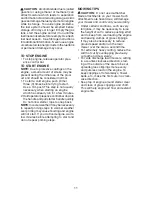
ASSEMBLE ENGINE ZONE CONTROL
CA BLE TO UPPER HANDLE
Assemble cable to opposite side of up-
stop bracket.
1. Route cable below crossbar of lower
handle and up to control bar.
2. Hook “Z” bend fi tting on inner wire into
hole in control bar.
3. Attach cable fi tting to upper handle as
shown.
4. Secure cable to lower handle with wire
ties.
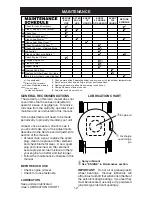
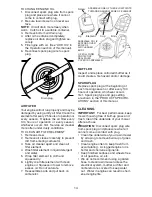
INSTALL STARTER ROPE
1. Put threaded end of rope guide
through hole in side of upper handle
above lower handle crossbar. Se cure
with 1/4-20 locknut.
2. Hold control bar against upper handle
and slowly pull engine starter rope
out until rope will slip into loop of rope
guide.
Upper handle
Engine
starter rope
Rope
guide
Locknut
Lower handle
crossbar
Upper
handle
Control bar
Engine
zone
control
cable
Up-stop
bracket
Boot
Spark
plug
wire
Mounting
brack et
Brake
arm
“Z” bend cable fi tting
Small
plastic
fi tting


