Murray 198933 Скачать руководство пользователя страница 16

16

NOTE: 

 Fuel stabilizer is an acceptable 

al ter na tive in minimizing the formation 
of fuel gum deposits during stor age.  
Add stabilizer to gasoline in fuel tank or 
storage con tain er.  Always follow the mix 
ratio found on stabilizer container.  Run 
engine at least 10 min utes after adding 
stabilizer to allow the stabilizer to reach 
the car bu re tor.  Do not empty the gas tank 
and carburetor if using fuel stabilizer.

ENGINE OIL

Drain oil (with engine warm) and replace 
with clean engine oil.  (See “ENGINE” in 
the Maintenance section of this manual).
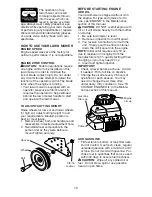
CYLINDER

1.   Remove spark plug.
2.   Pour 29 ml of oil through spark plug 

hole into cylinder.

3.   Pull starter handle slowly a few times 

to dis trib ute oil.

4.   Replace with new spark plug.

Does not start        

1.   Dirty air fi lter.                           1.   Clean/replace air fi lter.

                                2.   Out of fuel.                               2.   Fill fuel tank.
                                3.   Stale fuel.                                 3.   Empty fuel tank and refi ll tank
                                                                                            with fresh, clean gasoline.
                                4.   Water in fuel.                           4.   Empty fuel tank and refi ll tank
                                                                                            with fresh, clean gasoline.
                                5.   Spark plug wire is                    5.   Connect wire to plug.
                                      disconnected.                               
                                6.   Bad spark plug.                       6.   Replace spark plug.
                                7.   Loose blade or broken             7.   Tighten blade bolt or
                                      blade adapter.                                replace blade adapter.  

                                8.   Control bar in released            8.   Depress control bar to
                                      position.                                         handle.
                                9.   Control bar defective.               9.   Replace control bar.
                                10. Fuel valve lever (if so               10. Turn fuel valve lever
                                      equipped) in OFF position.            to the ON position.
                                11. Weak battery (if equipped).     11. Charge battery.
                                12. Disconnected battery               12. Connect battery to engine. 
                                      connector (if equipped).

PROBLEM                 CAUSE                                       CORRECTION 

TROUBLESHOOTING - See appropriate section in manual unless directed 
to a qualifi ed service center.

OTHER

•   Do not store gasoline from one season 

to another.

•   Replace your gasoline can if your can 

starts to rust.  Rust and/or dirt in your 
gasoline will cause problems.

•   If possible, store your unit indoors and 

cover it to protect it from dust and dirt.

•   Cover your unit with a suitable pro tec tive 

cover that does not retain moisture.  Do 
not use plastic.  Plastic cannot breathe, 
which allows con den sa tion to form and 
will cause your unit to rust.

IMPORTANT

:  Never cover mower while 

en gine and exhaust areas are still warm.

 CAUTION:  

Never store the lawn mower 

with gaso line in the tank inside a build ing 
where fumes may reach an open fl ame 
or spark.  Allow the engine to cool before 
storing in any en clo sure.

Содержание 198933

Страница 1: ...ormation is in cluded with the unit This information includes the INSTRUCTION BOOKS the REPLACEMENT PARTS and the WARRANTIES This information must be included to make sure state laws and other laws ar...

Страница 2: ...sale Battery must be maintained in accordance with the instructions furnished 4 The Warranty period for any products used for rental or commercial purposes is limited to 45 days from the date of orig...

Страница 3: ...ckwards unless absolutely necessary Always look down and behind before and while moving backwards Never direct discharged material toward anyone Avoiddischargingmaterialagainst a wall or obstruction M...

Страница 4: ...der the watchful care of another responsible adult Be alert and turn machine off if children enter the area Before and while walking backwards look behind and down for small children Never allow child...

Страница 5: ...A spark arrester for the muffler is available through your nearest authorized service center Never attempt to make wheel height adjustments while the engine is running Grass catcher components are su...

Страница 6: ...lawn mower all parts and hardware you assemble must be tightened securely Use the correct tools as necessary to ensure proper tightness TOOLS REQUIRED FOR ASSEMBLY A socket wrench set will make assemb...

Страница 7: ...ousing All wheels must be in the same height posi tion for even cutting 1 For each wheel assemble shoulder bolt and spacer as shown 2 Assemble 1 1 4 diameter washers rear wheels only and 3 8 16 locknu...

Страница 8: ...Align the tapered end of the small plastic fitting with hole in the mounting bracket and push in until fitting snaps into place ASSEMBLE ENGINE ZONE CONTROL CABLE TO UPPER HANDLE Assemble cable to op...

Страница 9: ...y Com mission The blade turns when the engine is running Operator presence control bar must be held down to the handle to start the engine Release to stop the engine Starter handle used for starting e...

Страница 10: ...or a wide vision safety mask worn over spectacles HOW TO USE YOUR LAWN MOWER ENGINE SPEED Engine speed was set at the factory for optimum performance It is not adjustable ENGINE ZONE CONTROL CAUTION...

Страница 11: ...ture which leads to separation andformationofacidsduringstorage Acidic gascandamagethefuelsystemofanengine while in storage To avoid engine problems the fuel system should be emptied before storage of...

Страница 12: ...tems that have been subjected to operator abuse or negligence To receive full value from the warranty operator must maintain unit as instructed in this manual Some adjustments will need to be made per...

Страница 13: ...ten the blade bolt turning clockwise The recommended tightening torque is 35 40 ft lbs 47 54 N m IMPORTANT Blade bolt is heat treated If bolt needs replacing replace only with approved bolt shown in t...

Страница 14: ...emove excess oil Do not saturate 7 Reassemble parts and put back on carburetor MUFFLER Inspect and replace corroded muffler as it could create a fire hazard and or damage SPARK PLUG Replace spark plug...

Страница 15: ...epair or adjustment IMPORTANT Nevertamperwiththeengine governor which is factory set for proper en ginespeed Overspeedingtheengineabove thefactoryhighspeedsettingcanbedanger ous If you think the engin...

Страница 16: ...spark plug 7 Loose blade or broken 7 Tighten blade bolt or blade adapter replace blade adapter 8 Control bar in released 8 Depress control bar to position handle 9 Control bar defective 9 Replace cont...

Страница 17: ...ope 1 Engine flywheel brake is on 1 Depress control bar to hard to pull when control bar is released upper handle before pulling the starter rope 2 Bent engine crankshaft 2 Contact a qualified service...

Страница 18: ...roducts some adjustments or part replacement may be necessary during the life of your unit For Parts and Service contact our authorized distributor call 1 800 849 1297 For replacement parts have avail...

Отзывы: