


10
BEFORE STARTING ENGINE
ADD OIL
Your lawnmower is shipped without oil in
the engine. For type and grade of oil to
use, see “EN GINE” in the Maintenance
section of this manual.
CAUTION:
DO NOT overfi ll engine with
oil, or it will smoke heavily from the muffl er
on startup.
1. Be sure lawnmower is level.
2. Remove oil dipstick from oil fi ll spout.
3. You receive a container of oil with the
unit. Slowly pour the entire container
down the oil fi ll spout into the engine.
NOTE:
Initial oil fi ll requires only 18 oz.
due to residual oil in engine from the
manufacturers 100% quality testing. When
changing oil you may need 20 oz.
4. Insert and tighten dipstick.
IMPORTANT:
• Check oil level before each use. Add oil
if needed. Fill to full line on dipstick.
• Change the oil after every 25 hours of
operation or each season. You may
need to change the oil more often
under dusty, dirty conditions. See “TO
CHANGE ENGINE OIL” in the Mainte-
nance section of this manual.
The operation of any
lawn mower can result
in foreign objects thrown
into the eyes, which can
result in severe eye dam-
age. Always wear safety glasses or eye
shields while operating your lawn mower
or performing any ad just ments or repairs.
We recommend standard safety glasses
or a wide vision safety mask worn over
spectacles.
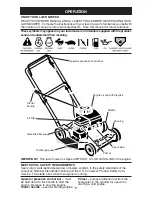
HOW TO USE YOUR LAWN MOWER
ENGINE SPEED
Engine speed was set at the factory for
optimum performance. It is not adjustable.
ENGINE ZONE CONTROL
CAUTION:
Federal regulations re quire
an engine control to be installed on this
lawn mower in order to minimize the
risk of blade contact injury. Do not un der
any circumstances attempt to de feat the
func tion of the operator con trol. The blade
turns when the engine is running.
• Your lawn mower is equipped with an
operator pres ence control bar which
requires the operator to be positioned
behind the lawn mower handle to start
and operate the lawn mower.
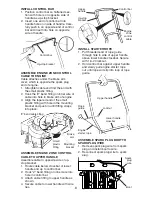
TO ADJUST CUTTING HEIGHT
Raise wheels for low cut and lower wheels
for high cut, adjust cutting height to suit
your requirements. Me di um position is
best for most lawns.
1. Remove wheel, bolt, and hardware and
reassemble in desired ad just ment hole.
2. Reinstall wheel components in the
same order as they were before re-
moval. Tighten securely.
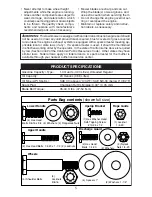
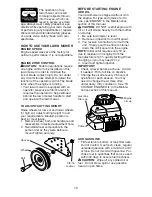
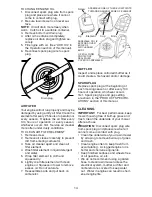
Engine
oil cap
Gasoline
fi ller cap
Primer
Bolt
Spacer
Wheel
3/8-16
Locknut
ADD GASOLINE
• Fill fuel tank to bottom of tank fi ller neck.
Do not overfi ll. Use fresh, clean, regular
unleaded gasoline with a minimum of 87
octane. Do not mix oil with gasoline. Pur-
chase fuel in quan ti ties that can be used
within 30 days to assure fuel freshness.
CAUTION:
Wipe off any spilled oil or
fuel. Do not store, spill or use gasoline
near an open fl ame.


