background image

Bypass Tray priority

If you set the same sized paper to both the paper cassette and bypass tray, and this
mode is turned to on, the machine gives priority to use the paper which is set on the
bypass tray than the paper in the cassette.

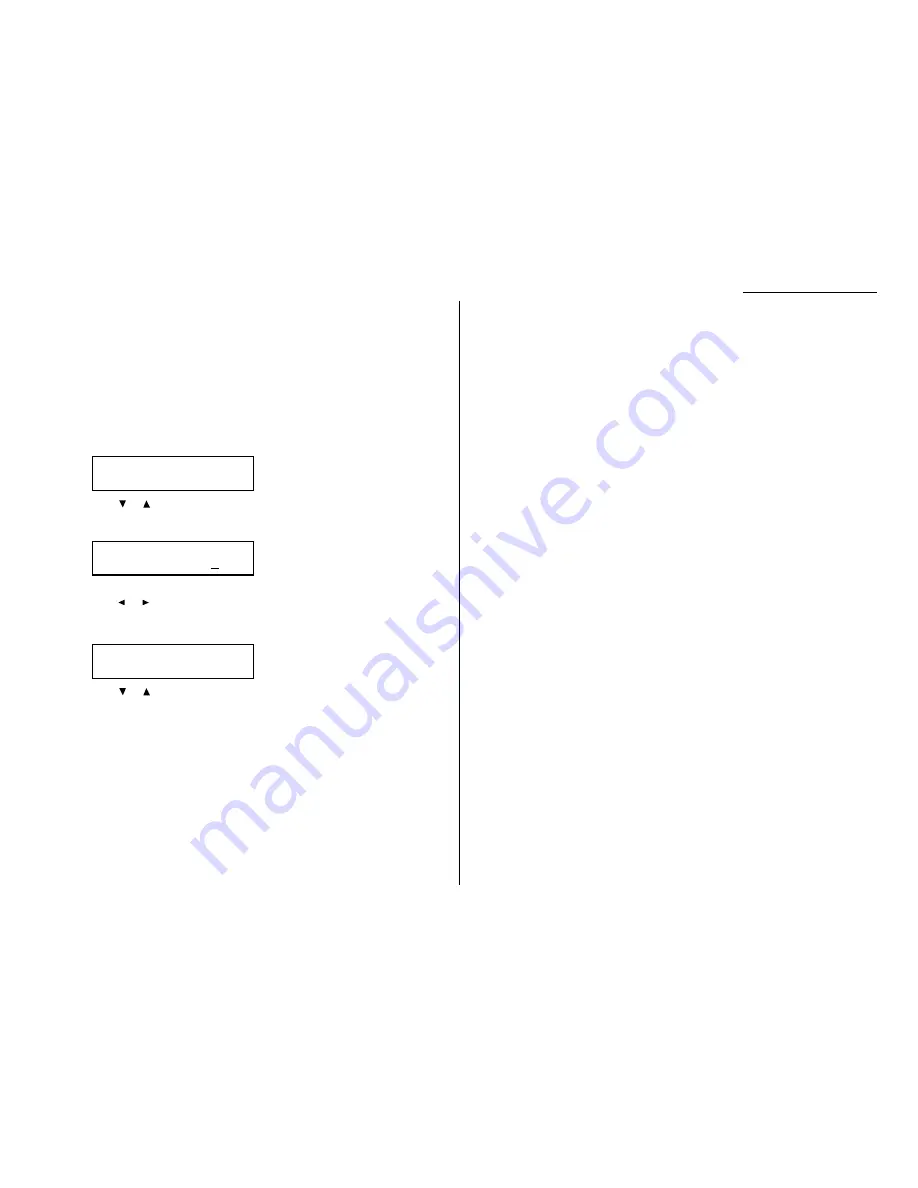
To adjust the copy print settings

Default setting: Copy reduction rate: 100%, Margin: 24 mm, Bypass tray priority: Off

1

Press

MENU

, 2, 3, 2,

ENTER

. The 

LCD

shows the current reduction rate for copy-

ing:

2

Press 

or 

until the reduction setting you want appears.

3

Press 

ENTER

to save the setting. The 

LCD

shows the current print margin:

4

Use the numeric keypad to enter the print margin you want. If necessary,
press 

or 

to move the cursor.

5

Press 

ENTER

to save the setting. The 

LCD

shows the current setting for bypass

tray priority:

6

Press 

or 

until the setting you want appears.

7

Press 

ENTER

to save the setting.

Bypass Priority :Off

$

$

/

#

#

/Enter

Margin
(00-85)        24 mm

Prt Reduc.Rate :100%

$

$

/

#

#

/Enter

Changing the default settings

4.7

Содержание F-320

Страница 1: ...F 320 Operating Instructions Plain paper Digital Fax ...

Страница 2: ...uratec fax machine for your business Before you begin please note that before your fax can be used and before you can turn on power to the unit for the first time there are important precautions to take Please see page 1 5 for more information ...

Страница 3: ...ode the printer will not use its fusing lamp If your machine receives a fax message or if any key is pressed your machine will automatically wake up The time for the machine to enter the Energy saving mode can be selected from 1 to 240 minutes For details see EasyStart page 1 20 Super G3 is an extension of Group 3 fax technology standards allowing the use of high speed ITU T V 34 modems for 33 6 K...

Страница 4: ...dios copy machines air conditioners and computers can generate electronic noise that can interfere with the operation of your fax machine Clean Dust buildup can damage your fax Periodically clean your fax machine as described in the operating instructions Do not use a dust cover which can cause damaging overheating Near a phone jack Your fax machine uses a standard modular tele phone jack also kno...

Страница 5: ...chine outside the country in which you purchased it Doing so may violate telecommunication and safety regulations of that country and variations in electrical and telephone standards can cause poor performance and damage to your fax General Precautions Never disassemble your fax machine Disassembling your fax machine can cause serious injury to you and damage to your fax If service is required cal...

Страница 6: ... your fax machine and to assure the best performance possible follow these guidelines when storing and handling toner and drum cartridges Store the cartridge Store the cartridge at a constant temperature within a range of 32º F to 95º F 0º C to 35º C To avoid dew do not store cartridges in locations subject to extreme fluctu ation of temperature and humidity Do not stand the cartridge on its end a...

Страница 7: ...This page intentionally blank ...

Страница 8: ...your machine It also tells you how to give your machine the kind of easy sensible care that should keep troubles to a minimum Thanks for choosing Muratec Find your serial number and write it down Please note that your machine s serial number is located on the bar code label as shown on the drawing at right Use the blank at the bottom of this column to copy this down before you set up your machine ...

Страница 9: ...ion mode 2 10 If the paper runs out while fax reception 2 10 Making copies 2 11 Guidelines 2 11 How to make copies 2 11 Changing the reduction ratio 2 11 Using the bypass tray 2 12 Memory overflow message 2 12 If the paper runs out while copying 2 12 Using your fax machine as a phone 2 13 Dialing a telephone number 2 13 On hook dialing 2 13 Redial 2 13 Call request 2 13 Changing the dialing type 2...

Страница 10: ...ettings 4 3 Setting the number of rings 4 4 Settings for dialing 4 5 Changing the dialing pause length 4 5 Changing redial settings 4 5 Settings for copying 4 6 Scan settings 4 6 Copy print settings 4 6 Settings for operation 4 8 Setting the silent mode 4 8 Setting Sleep mode Energy saving mode 4 9 Setting the paper source 4 9 Adjusting the machine s clock 4 9 Setting 2 bin tray Option 4 9 Printin...

Страница 11: ... up your machine operating tips and some important settings before you use your machine Packaging contents 1 1 Parts of your machine 1 1 Control Panel Overview 1 3 Setting up 1 5 Operating tips 1 10 Function table 1 13 EasyStart Initial settings 1 18 ...

Страница 12: ...3 1 4 for more details 2 ADF Automatic Document Feeder The ADF automatically feeds original document into the machine one at a time It can hold up to 80 pages of letter sized document 3 Scanner cover release Pull up on this to open the scanner cover 4 Scanner cover Open this cover to remove original document jams 5 Document guides Adjust these to fit the width of the original document so it will f...

Страница 13: ...s about paper capacity of the paper cassette see Specifications page AI 2 17 LINE jack Where you plug in the telephone line cord The other end of the cord plugs into a wall telephone jack 18 PHONE2 jack If you connect a second telephone to your machine this is where you plug in the cord 19 PHONE1 jack Where you plug in the optional handset 20 PRINTER PARALLEL port optional Where you plug in the pr...

Страница 14: ...hear the communication taking place You cannot be heard unless you use a handset optional When sending a fax this key also acti vates the call request feature Soft Key 7 REPORT Press to turn the confirmation report feature on or off for the next fax transmission Soft Key 8 MEMORY TRANSMISSION Selects which transmission mode your fax machine uses whether Memory transmission or Real time transmissio...

Страница 15: ...ws the machine s status and lets you see what you re programming into the machine The display shows 2 lines 20 characters per line If the LCD is blank the machine is off 17 MEMORY RECEIVE light Glows when the machine is receiving an incoming fax document into its electronic memory 18 COMM light Glows when the machine is communicating with another machine 19 ALARM light Glows when a problem occurs ...

Страница 16: ...ditioner Such high consumption appliances can cause draw downs temporary drops in the power available for other equipment on the circuit which could damage your fax machine Use an electrical surge suppressor preferably one which guards both tele phone and electrical lines This device helps to shield your fax machine from damaging high voltage electrical surges Installing the printing supplies Your...

Страница 17: ... Gently install the drum cartridge in the printer making sure the drum cartridge s four pins fit in the slits inside the printer frame 7 Gently clean the LED print head using the cleaning paper included in the toner cartridge carton box For best print quality you should clean the LED head every time you change the new toner cartridge Note Do not use abrasive materials on the LED print head and do ...

Страница 18: ... tone And press or The LCD indicates the volume 2 To turn the volume up press To turn the volume down press 3 Press MONITOR CALL again to hang up Loading paper Acceptable paper size and cassette capacity Paper source Paper type Paper size Capacity Paper cassette Plain paper 1 Letter Legal Half letter 500 sheets Letter Legal Half letter Plain paper 1 2 A4 A5 A6 F4 50 sheets Bypass Tray Executive Cu...

Страница 19: ... sides of the paper are even Do not stack the paper over the limit mark inside of the cassette Place the edges of the top sheet under the metal tabs on the cassette s left and right side 5 Adjust the paper guides to fit the size of paper 6 Gently push the paper cassette back into its original closed position You ll feel a click when it s properly in place 7 Attach the paper size sticker on the cas...

Страница 20: ... such as transparency film use the bypass tray 1 Open the bypass tray on the right side of your machine 2 Pull out the hopper of the bypass tray and raise the flapper release lever 3 Place the paper on the bypass tray Adjust the paper guide to fit the paper and insert the paper until it comes to a stop Then lower the flapper release lever 4 When you load the paper on the bypass tray the LCD will s...

Страница 21: ...n be started by first pressing the MENU key Cursor key Press or to select items in a menu or move the cursor How to operate the machine Most settings and functions are started by first pressing the MENU key Then press three or four digit numbers to select the function In this manual we explain the operation with short cut operations for example we will say press MENU 2 1 0 1 To press 0 zero 1 2 3 ...

Страница 22: ...fter you find the level one function item you want to program press to go to the level two function groups 4 Search the level two function groups using or until your desired item appears 5 After you find the level two function item you want to program press to go to the level three function groups 6 Search the level three function groups using or until your desired func tion appears 7 Press ENTER ...

Страница 23: ...rect letter or digit press CANCEL to erase to the left To change just one character in name and or digit press or to move the cursor to that character or digit Then press CANCEL to erase it Re enter the character or digit correctly To change upper lower case Press CAPS key to toggle upper case and lower case The word Upper means the machine will enter only upper case letters To type a lower case l...

Страница 24: ...gistration in a group number 3 6 2 User Settings 1 Machine Settings 01 Cassette Size Set the size of paper in the paper cassette Letter 1 9 02 Protect Passcode Enter the protection passcode for using the security features 3 42 03 Soft Key Program to turn on or off the function by pressing this key Soft key 1 COMM CANCEL CONFIRM Soft key 5 SPEED DIAL GROUP Soft key 2 BROADCAST Soft key 6 MONITOR CA...

Страница 25: ...1 Security Rx Keep all received fax messages in memory and after print them Off 3 42 12 Separator Page Partition each received documents by inserting the separator page Off 3 21 13 PIN Mode Prevent unauthorized long distance calls Off 3 43 14 DRD Set the ring pattern to use with phone company s Distinctive Ring Off 3 22 service 3 Copy Settings 1 Scan Parameters You can set the following settings f...

Страница 26: ...3 41 This key can reduce several steps to a simple press of a key 2 Erase P One Touch Erase the programming in a programmable one touch key 3 41 5 F Code Box 1 Set F Code Box Create the F Code box 3 24 3 27 2 Erase F Code Box Erase an empty F Code box 3 31 6 Batch Tx 1 Set Batch Box Create the Batch box 3 11 2 Erase Batch Box Erase an empty batch box 3 13 7 Scan Box 4 1 Set Scan Box Create the Sca...

Страница 27: ...ist Print a list of the one touch dial keys 3 2 06 Speed Dial List Print a list of the speed dial numbers 3 4 07 Group List Print a list of the group numbers 3 7 08 BlockJunkFax List Print a list of the blocked numbers 3 46 09 Cover Page Print a cover page 3 22 10 Dept Time List Print a total communication time and printed pages of each 3 48 department code 11 P One Touch List Print a list of the ...

Страница 28: ...User Install Set up the following settings Language on the LCD and Lists English Current Day and Time Automatically Daylight saving time Off Fax reception mode Fax Ready 1 18 1 20 Phone dialing type Tone Subscriber ID your fax phone number Your TTI your name TTI select Time for the machine to enter the sleep mode 5 minutes ...

Страница 29: ...stored settings Before using EasyStart clear your machine s built in user data memory This ensures the memory will hold only your settings Important After you use EasyStart do not clear the memory again unless an authorized technician asks you to do so To clear the machine s memory 1 Press MENU 0 2 The LCD now asks if you want to clear the memory The following two displays will appear alternately ...

Страница 30: ...pears 15 Press ENTER to save the setting and continue 16 The LCD now asks you to enter your fax number as you want it to appear on other fax machines displays or printouts The fax industry term for this number is Subscriber ID 17 Use the numeric keypad to enter the fax number To insert a dash as shown here press PAUSE DIAL OPT once The number may contain up to 20 charac ters numbers and dashes Not...

Страница 31: ...appear usually at the top of faxes you send 27 Press or until desired TTI appears 28 Press ENTER to save the setting and continue 29 The LCD now asks you to enter the time for the sleep mode Your machine will automatically enter sleep mode after your selected idle time has elapsed 30 Enter the time in minutes using the numeric keypad 31 Press ENTER to save the setting Your machine will return to s...

Страница 32: ...1 21 Getting started This page intentionally blank ...

Страница 33: ...Basic Operations This chapter describes the basic operation of the transmission reception and copying Sending faxes 2 1 Receiving faxes 2 9 Making copies 2 11 Using your fax machine as a phone 2 13 ...

Страница 34: ...s or documents with sticky notes attached Cardboard newspaper or fabric Pages with duplicating carbon on either side Credit cards or any small thick items OHP transparency film How to set the document 1 Insert your document s face up top edge first If you re sending a multi page docu ments fan the pages slightly 2 Adjust the document width guide to fit your documents Document mode and contrast Rev...

Страница 35: ...g and voice mail Telephone call waiting signals can stop fax transmission and reception And any service such as voice mail which may intercept your calls can keep your fax machine from receiving fax calls If you use only one line for both phone and fax consult your telephone company to see how you can temporarily disable call waiting or voice mail while using the fax machine Memory transmission Yo...

Страница 36: ... appear on the LCD This appears because 1 too many pages have been stored in the memory or 2 the pages that are stored have too much information on them for your fax machine to remember If this message appears press START to tell your fax to keep as many pages in mem ory as possible or press CANCEL to erase from memory all pages stored during the current operation but not previous operations Note ...

Страница 37: ...cument from memory while at the same time scanning the remaining pages of your document into memory In default setting the Quick Memory transmission is On If you want to turn off this feature see page 4 2 If the fax has been set for the normal memory transmit your fax scans the entire document into memory then dials the other fax When it makes con tact your machine transmits the entire stored docu...

Страница 38: ...aling Automatically fax redialing If your fax call fails your machine automatically redials it In this Auto Redial mode your fax automatically redials the number up to two times at one minute inter vals Note You can change the redial time and interval settings See Changing redial settings page 4 5 While in the Auto Redial mode AutoRedial appears on the first line of the LCD and the machine can con...

Страница 39: ...ies each by a two digit command number from 01 to 99 The Review Commands function gives you the power to check on each job or com mand in your machine s memory It also allows you to cancel a command of fax transaction if you decide not to send the document To see your machine s stored commands or to cancel them 1 Press COMM CANCEL CONFIRM The LCD will show The LCD shows the first command indicated...

Страница 40: ...delayed command list Your machine can print a command list which tells you The command s identification number The phone number or remote location The start time this appears in a DD HH MM format A note telling if the command is a polling or F Code operation see pages 3 14 for more on polling and 3 24 3 32 for more on F Code communication To print a delayed command list press MENU 5 1 0 4 ENTER Pr...

Страница 41: ...te You can print a result of the fax transaction appears on the LCD by pressing ENTER 4 If you wish to exit this mode press STOP Printing all result of daily fax transactions If you want to print all results of fax transactions press MENU 5 1 0 3 ENTER Note You can set your machine to print all results of faxing automatically See Setting the Activity journal on pages 3 19 3 20 for more details Tx0...

Страница 42: ...has five different reception modes Tel Ready Fax Ready Fax Tel Ready Tel Fax Ready and Ans Fax Ready We ll explain each of these in this section Tel Ready mode Use it if You want to use the same line for both fax and phone calls and On that line you re using at least one other phone which is not connected to your fax machine or You have an optional handset installed on your fax machine In this mod...

Страница 43: ... answering machine s outgoing message must be no longer than 10 seconds Detection of silent fax machines Some older fax machines don t send fax tones when transmitting which can cause problems when using an answering machine with your fax But your fax machine can accommodate these silent machines without disrupting your answering machine operation How to select the fax reception mode 1 Press MENU ...

Страница 44: ... is in the Copy mode the LCD shows 2 Place your original document in ADF face up just as you would sending a fax 3 As needed set the following Adjust document mode and contrast Enter the number of copies 4 Press START to start the copying Note When you make multiple copies your machine always sort copies Note To stop the copying press STOP Changing the reduction ratio Your fax machine is capable o...

Страница 45: ... the paper in the bypass tray See the table of Acceptable paper size and cassette capacity on page 1 7 and Loading paper in bypass tray on page 1 9 for more information 3 If necessary select desired document mode contrast reduction ratio 4 Press START to begin the copying process Memory overflow message If you ve stored too much information in your machine s memory a Memory Overflow message may ap...

Страница 46: ...a person answers the call pick up the handset to speak Note If the call fails press MONITOR CALL to hang up Redial 1 Lift the optional handset to get a dial tone 2 Press REDIAL The LCD will show 3 Your machine can remember the latest 10 dial numbers Press or until the dial number you want to redial appears 4 Press START When the other person answers use the optional handset to speak Call request Y...

Страница 47: ...on hanging up the handset Attaching a second phone Want to attach a second phone even a cordless model to your fax machine so they can share the same phone jack No problem Before we go further let s explain the idea You re plugging the second phone s phone line into your machine s PHONE2 jack not the wall phone jack In such a setup only your machine connects to the wall The second phone receives p...

Страница 48: ...2 15 Basic operation This page intentionally blank ...

Страница 49: ...scribes convenient features of your machine Autodialer 3 1 Broadcasting 3 9 Delayed transmission 3 10 Batch transmission 3 11 Polling 3 14 Soft keys 3 15 Special features 3 16 Security features 3 42 Advanced Features ...

Страница 50: ...phabetically Using your EasyDial directory you can look up these numbers by their descriptive names just as if you were using a phone book We ll explain how to store the numbers and location IDs in the next few pages The EasyDial directory is discussed in detail on page 3 7 Special Dialing Characters Your fax machine allows you to enter special dialing characters when programming the autodialer Th...

Страница 51: ...er see Entering character on page 1 12 A number s Location ID may be up to 24 characters in length 7 Press ENTER to save the setting The LCD will display the next empty one touch number If you do want to enter another one touch number go back to step 2 If you do not want to enter any more one touch numbers press STOP to finish Use the autodialer labels in your fax s packaging to write down the sto...

Страница 52: ...t have a Location ID the number appears When the other machine answers your fax transmits the document directly from memory To review Memory transmission see page 2 2 If you specified real time transmission Your fax machine dials the other fax machine The LCD shows the Location ID the document s width and document mode Note If the one touch key doesn t have a Location ID the number appears When th...

Страница 53: ...nge the location ID press CANCEL to erase it and then enter another location ID 6 Enter the Location ID Regarding how to enter the character see Entering character on page 1 12 A number s Location ID may be up to 24 characters in length 7 Press ENTER to save the setting The LCD will display the next empty speed dial number If you do want to enter another speed dial number go back to step 2 If you ...

Страница 54: ...dth and document mode Note If the speed dial number doesn t have a Location ID the number appears When the other machine answers your fax will transmit the document directly from memory To review Memory transmission see page 2 2 If you specified real time transmission Your fax machine dials the other fax machine The LCD shows the Location ID the document s width and document mode Note If the speed...

Страница 55: ...you do want to enter numbers for another group number go back to step 2 If you do not want to enter any more numbers press STOP to return to standby mode Erasing a call group 1 Press MENU 1 3 2 ENTER The LCD shows 2 Press or to select the group number you want to erase Note You can select the group number by directly entering that two digit identifier code When entering the identifier code for gro...

Страница 56: ...e an optional handset attached For a fax call Place the document in ADF And adjust document mode and contrast if necessary 2 Press TEL INDEX The LCD shows the first listing in your fax machine s EasyDial directory The EasyDial directory sorts entries alphabetically in the following order 1 by alphabet 2 by number and 3 by symbol If the listing that appears is the one you want to dial skip to step ...

Страница 57: ... occurs It successfully reaches the other number It has attempted the number of redials programmed and has still not connected see Changing redial settings page 4 5 If it was a regular phone call You ll have to redial manually 1 Lift the optional handset 2 Press REDIAL The LCD will show 3 Your machine can remember the latest 10 dial numbers Press or until the dial number you want to redial appears...

Страница 58: ... a comma after the last fax number Note If you enter characters by mistake press CANCEL to erase them 5 Press START Your fax machine scans the document into memory and then sends it to each number or call group you ve entered Delayed broadcasting What if you want the broadcast to take place later That s the purpose of setting up a delayed broadcast Note Delayed commands are discussed on pages 2 6 ...

Страница 59: ...e month and the time when you want the fax to send the delayed transmission Note Press to move the cursor left or to move it right Here we ve set the transmission to occur on the 11th at 11 05 PM 5 When the date and time are entered press ENTER to save the delayed trans mission The LCD shows 6 Enter the fax number for the delayed transmission document You can either press a one touch key enter a s...

Страница 60: ... to scroll to the left or to scroll to the right 5 When the number appears as you want it press ENTER The LCD now shows 6 Instruct your fax to send from this batch box in one of the following ways Option 1 Once at a certain time on a certain day of the month For exam ple Do this at 5 05 PM on the 30th Use the numeric keypad to enter the date and time 24 hour format the machine should send the docu...

Страница 61: ...t number for the batch box you want to use 4 Press ENTER The LCD shows Note Your machine gives each document in a batch box a file number You will need to know this file number should you later wish to erase or print the stored document Each batch box holds up to 40 files 1 40 6 Press START The machine displays Reserved on the top line of the LCD This means the document is stored in memory Printin...

Страница 62: ... See left column To erase an empty batch box 1 Press MENU 3 6 2 ENTER The LCD shows 2 Use the numeric keypad to enter the number 1 5 of the batch box you want to erase 3 Press ENTER The following two displays will appear alternately Important If you select a batch box which is not empty the machine beeps and briefly shows Erase any documents stored in the batch box see left column then go back to ...

Страница 63: ... for documents it dials the number and upon making con tact with the other machine begins receiving the document as if the other machine had placed the call Being polled Not only can you poll but you can also be polled To set up a document for regular polling 1 If your fax machine is set for Tel Ready reception change it to the reception mode except the Tel Ready Important Your machine can t be po...

Страница 64: ...ng by using the Soft Key it will be available only for the next transmission Once that transmission is complete your machine returns to its default setting If you want to change the default setting see Changing the default settings on page 4 1 4 10 Note When the optional printer controller is installed to your machine one of Soft Keys which was assigned to Memory transmission at the fuctory will b...

Страница 65: ...st of F Code boxes page 3 28 List of documents stored in F Code boxes page 3 28 Batch transmission documents page 3 12 Batch box list page 3 12 List of stored batch documents page 3 12 F Code Box bulletin box documents page 3 29 Macros list page 3 18 Stored polling documents page 3 14 Security receive documents page 3 30 Document storage Regular polling documents page 3 14 F Code Box bulletin box ...

Страница 66: ...erations in the Macro key before you start it press CANCEL here 9 The LCD now shows The machine now asks you to enter the title of this job If you do not want to enter or change it skip to step 11 10 Enter the title by using the numeric keypad If necessary review Entering characters page 1 12 It may be up to 130 characters in length 11 Press ENTER to save the setting Fax dialing with the Macro key...

Страница 67: ...achine will return to step 2 4 Press ENTER to erase the job To erase another Macro key repeat steps 2 4 Or press STOP to return to standby mode Printing a list of your Macro keys Your fax machine can print a list of the Macro keys The list includes 1 each key s Macro key number 2 the name of the job stored in the Macro key To print a list of Macro keys press MENU 5 1 1 6 ENTER Setting the speed fo...

Страница 68: ...cument press STOP The machine returns to standby mode 6 Press START to begin the transmission and copying process Note If you do not wish to make a copy press CANCEL in step 4 The following two displays will appear alternately To cancel the making copy press START The machine will start transmission process without copying the document If you press CANCEL the machine will return to step 4 Setting ...

Страница 69: ...R Your fax machine can print a transmit confirmation report TCR after sending every fax to any Group 3 fax machine The TCR lists the following information for each com munication Date and time of the TCR s printout Remote location called Document mode Starting date and time Duration in minutes and seconds Length in number of pages Result of the call Any special operations For example a fax call ma...

Страница 70: ...eived documents on the separator page select ON 6 Press ENTER to save the settings To return to standby mode press STOP Cover page Your fax machine can store a cover page to send at the beginning of each outgoing fax This page includes the current date and time your Location ID your fax number as stored in the TTI and a message of up to 40 characters in length The informa tion appears in a box sim...

Страница 71: ...between the distinctive patterns of the two rings Your fax machine is also smart enough to tell the difference between two different numbers that are ringing it All you have to do is set up your machine for the OneLine distinctive ring detection DRD feature In order to use OneLine DRD your phone company must set up your distinctive ring service When it does it will assign a ring pattern For exampl...

Страница 72: ...nd then talk or talk first and then fax Important For this feature to work the remote fax machine must have a similar call request capability Your machine must also have an optional handset attached Faxing receiving first then talking To send or receive a fax first and then talk 1 While your fax machine is sending or receiving the fax press MONITOR CALL 2 At the remote fax machine the ringer will ...

Страница 73: ... Accounting department is first delivered to the company s main mailroom Then the mailroom routes the mail to Accounting That s the idea behind sub addressing Your fax and another F Code compatible fax exchange special signals to indicate just where the fax really should go It s as if the sending fax is saying Deliver this to room 48 and the receiving fax does just that Your machine has up to 50 m...

Страница 74: ...n create a new one 6 The machine is now asking you to name this F Code box The LCD shows If you do not want to enter or change this F Code box s name skip to step 8 If you do want to enter or change this F Code box s name go on to step 7 7 Enter the name by using the numeric keypad If necessary review Entering characters page 1 12 An F Code box s name can be up to 16 characters in length 8 Press E...

Страница 75: ...etting is available only when the reception protection Rx pro tect setting is set to off see above On Print the document automatically when the box receives it Off Print the document manually when you want to print it Press or until the mode you want appears Then press ENTER to save the setting and go on to the next one Overwrite Doc Overwriting documents tells your machine if it should overwrite ...

Страница 76: ...ther callers Sender Relay the document with sender unit s TTI don t send your TTI Both Relay the document with both the sender unit s TTI and your TTI Yours Relay the document with your TTI instead of the sender unit s Press or until the mode you want appears 22 Press ENTER to save the settings The LCD shows On Print the document automatically when it s received Off The machine does not print it b...

Страница 77: ...ment and make any necessary adjustments 2 Press MENU 4 1 2 ENTER The LCD shows 3 Use the numeric keypad to enter the two digit identifier number 01 50 of the F Code box where you want to store the document 4 Press ENTER The LCD shows 5 Use the numeric keypad to enter the four digit I D code 6 Press ENTER If you ve entered an incorrect I D code your fax machine rejects the attempt and returns to st...

Страница 78: ... the following before returning to standby mode Erasing a document stored in a bulletin box To erase a stored document 1 Press MENU 4 2 2 ENTER The LCD shows 2 Use the numeric keypad to enter the two digit number 01 50 of the F Code bulletin box that stores the document you want to erase 3 Press ENTER The LCD shows Note If the F Code box is not storing any documents the machine briefly displays th...

Страница 79: ... box is not storing any documents the machine briefly displays the following before returning to step 2 4 Use the numeric keypad to enter your F Code box s four digit I D code 5 Press ENTER If you ve entered the correct I D code your fax machine prints all docu ments in the F Code security box and then erases them If you ve entered an incorrect I D code your fax machine aborts the opera tion and r...

Страница 80: ...e another F Code box repeat steps 2 6 To finish press STOP F Code transmission and polling With F Code your machine can send secure transmissions perform relay broadcast initiations and even poll from other ITU T equipped machines regardless of manu facturer You can do this two ways Using the programmable one touch key see pages 3 36 3 38 Entering the ITU T sub address and password directly which ...

Страница 81: ...appropriate sub address Note If you make a mistake press CANCEL to erase the character then enter the correct number 3 Press ENTER The LCD shows Note If this sub address does not have a password skip to step 5 4 Use the numeric keypad to enter the password 5 Press ENTER The LCD shows 6 Enter the fax number either by pressing a one touch key entering a speed dial number or dialing from the numeric ...

Страница 82: ...first empty programmable one touch number available 2 Press or to select the programmable one touch key in which you want to store or change Note You can select the one touch key by pressing that key on the control panel 3 If you selected the empty programmable one touch key proceed to step 4 If you selected the key already programmed and you want to change it skip to step 6 Note If your previous ...

Страница 83: ...llowing settings choose if you do not want to specify the displayed setting for this programmable one touch key 15 Press ENTER The LCD asks you to select a contrast mode for each programma ble one touch number 16 Press or until the mode you want appears 17 Press ENTER The LCD asks if you want the memory transmission on or off when using this programmable one touch number 18 Press or until the mode...

Страница 84: ...time To view characters beyond those 20 press to scroll to the left or to scroll to the right 8 If you want the broadcast to begin immediately every time you press the key press ENTER and proceed to step 9 If you want to delay the broadcast follow steps 7 9 on page 3 33 Then press ENTER ENTER 9 The LCD now asks if you want to make additional settings for this program mable one touch number If you ...

Страница 85: ...ch box to which you want to transmit To program an F Code transmission into a programmable one touch key 1 Press MENU 3 4 1 ENTER The LCD shows the first empty programmable one touch number available 2 Press or to select the programmable one touch key in which you want to store or change Note You can select the one touch key by pressing that key on the control panel 3 If you selected the empty pro...

Страница 86: ...rk two things must be true The document which you re polling must exist in the remote fax s F Code box ITU T standard sub addressing password box You must know the remote fax s ITU T sub address and password if any for each box you want to poll To program an F Code polling operating into a programmable one touch key 1 Press MENU 3 4 1 ENTER The LCD shows the first empty programmable one touch numb...

Страница 87: ... transmission into a programmable one touch key 1 Press MENU 3 4 1 ENTER The LCD shows the first empty programmable one touch number available 2 Press or to select the programmable one touch key in which you want to store or change Note You can select the one touch key by pressing that key on the control panel 3 If you selected the empty programmable one touch key proceed to step 4 If you selected...

Страница 88: ...ts page 3 12 Macros list page 3 18 To program a programmable one touch key to print a list 1 Press MENU 3 4 1 ENTER The LCD shows the first empty programmable one touch number available 2 Press or to select the programmable one touch key in which you want to store or change If changing a previously stored command skip to step 5 Note You can select the one touch key by pressing that key on the cont...

Страница 89: ...m into the pro grammable one touch 4 Press or until Store Document appears 5 Press ENTER The LCD asks which storing menu you want to program into the programmable one touch 6 Press or until the mode you want appears 7 Press ENTER If you select the Polling Document operation skip to step 12 If you select the F Code Document operation go on to step 8 8 The LCD asks which F Code bulletin box you want...

Страница 90: ...d this key to delay its operation the LCD shows If you programmed this key to perform the operation immediately after you press it the LCD shows the number Printing a list of your programmable one touch keys You fax machine can print a list of the commands you ve stored in your programma ble one touch keys The list includes 1 each key s one touch number 2 the fax telephone number 3 when the comman...

Страница 91: ...Security reception Security reception tells your machine to keep all received faxes in memory but not print them Then you can print them out later at your convenience For example you could use this if you re concerned about workers reading documents intended for your eyes only Important For this feature to work you must have activated the passcode protec tion as described on left column You must a...

Страница 92: ... LED light of the Soft key will be off If you ve entered an incorrect passcode your fax machine will refuse to print and security reception remains on Masking the PIN To prevent unauthorized long distance calls some office telephone systems require you to enter a personal identification number PIN whenever you dial long distance Your fax s PIN mask feature helps you keep that PIN number private Wi...

Страница 93: ...umbers you use must include the PIN This also applies to autodialer numbers used with batch transmission see pages 3 11 3 13 or programmable one touch keys see pages 3 33 3 41 Note If you select either Mode 1 or Mode 2 and will be using batch transmission you must store the PIN access code for the remote unit within the appropri ate batch box If you chose Mode 2 as you autodial load the code In th...

Страница 94: ...ch box page 3 11 Now you can perform batch transmission to this box while the PIN mask is activated Setting Block Junk Fax Your fax machine s Block Junk Fax feature lets you bar the gates against unautho rized incoming faxes junk fax But before you block junk fax first understand how this feature works to determine if it s right for you There are four possible set tings for Block Junk Fax Off The ...

Страница 95: ...specific digit press to move left or to move right until the cursor is under the digit then use the numeric keypad to enter the correct number 7 Press ENTER to save the setting The LCD shows the next slot in the blocked numbers list If you do not want to enter or change a number for this slot go on to step 8 If you do want to enter or change a number for this slot repeat steps 5 7 8 Press STOP You...

Страница 96: ...he four digit department code 0000 9999 To change one digit press to move left or to move right until the cursor is under the digit then use the numeric keypad to enter the correct number 5 Press ENTER to save the setting To enter another department code repeat steps 4 5 To stop entering department codes press STOP to return to standby mode Clearing a department code 1 Press MENU 3 3 2 ENTER The L...

Страница 97: ...opriate four digit department code 7 Press START again Printing the department time list To print the list press MENU 5 1 1 0 ENTER Note If department code operation is protected see left column the fax beeps briefly and then returns to standby mode You will have to turn off the pro tection first then repeat the above The department time list includes the following information for each department ...

Страница 98: ...Advanced features This page intentionally blank 3 49 ...

Страница 99: ...efault settings This chapter describes how to change the settings of your machine Settings for transmission 4 1 Settings for reception 4 3 Settings for dialing 4 5 Settings for copying 4 6 Settings for operation 4 8 ...

Страница 100: ...s DOCUMENT MODE to change the document mode Press CONTRAST to change the contrast Once your document is transmitted your machine returns to its default settings Setting ECM Default setting ON Line noise or static on the line during a call can easily disrupt the flow of data from one fax machine to another That s why your fax machine gives you the option of using Error Correction Mode ECM When two ...

Страница 101: ...ansmission feature must be turned on to use Quick Memory transmission see above To change the default setting of Quick Memory transmission 1 Press MENU 2 2 0 7 ENTER The LCD shows 2 Press or until the mode you want appears 3 Press ENTER to save the setting TTI transmission Default setting ON Every fax page you send arrives at the receiving machine with a single line of text at the very top of the ...

Страница 102: ...b put together your machine prints the message on just one sheet If it s longer your machine prints the message on more than one sheet Note An Auto reduction setting and a reduction margin setting of 40mm will print most incoming faxes as single pages Try this combination first and then only if you have problems with it select different settings Half page reception Half page reception can conserve...

Страница 103: ...from 1 to 9 rings 1 Press MENU 2 2 0 3 ENTER The LCD shows 2 Use the numeric keypad to enter the number of rings you want from 1 to 9 Note If you enter the number except 1 9 the machine will beep briefly to warn you that it can t accept that setting 3 Press ENTER to save the setting Of Rings 1 9 2 times Changing the default settings 4 4 ...

Страница 104: ...ng Number of redial 2 times Redial interval 1 minute It s up to you how many times the fax redials a number and how long it waits between redials that length of time between calls is the redial interval To program the redial settings 1 Press MENU 2 2 0 4 ENTER The LCD shows 2 Use the numeric keypad to enter the number of redials you want Choose from 2 to 15 redials Note Enter a leading zero when e...

Страница 105: ...r copy Print reduction rate for copy Print margin for copy Bypass Tray priority You set these three in the same procedure discussed below Following is an explana tion for each Print reduction rate Copy reduction lets you set the machine to reduce large documents to a size that fits the paper in your machine This setting doesn t affect printing fax message you may receive with your machine Below ar...

Страница 106: ...ENTER The LCD shows the current reduction rate for copy ing 2 Press or until the reduction setting you want appears 3 Press ENTER to save the setting The LCD shows the current print margin 4 Use the numeric keypad to enter the print margin you want If necessary press or to move the cursor 5 Press ENTER to save the setting The LCD shows the current setting for bypass tray priority 6 Press or until ...

Страница 107: ...achine will be quiet Otherwise the machine will ring 5 Press ENTER to save the setting The LCD now asks if you want the alarm turned on or off 6 Press or until the mode you want appears If you want to turn off the alarm select On and the machine will be quiet Otherwise the machine will beep 7 Press ENTER to save the setting The LCD now asks if you want the key tones on or off 8 Press or until the ...

Страница 108: ... when your machine has the optional printer controller kit 1 Press MENU 2 1 0 8 ENTER The LCD shows 2 Press or until the mode you want appears 3 Press ENTER to save the setting The LCD shows 4 Press or until the mode you want appears 5 Press ENTER to save the setting Adjusting the machine s clock You can adjust the machine s clock here 1 Press MENU 2 1 0 7 ENTER The LCD shows 2 Use the numeric key...

Страница 109: ...ing your settings After you ve programmed settings into your machine print a settings list We recommend this particularly if you re sharing the machine with other users who might change the settings With this list you can quickly confirm that all of your settings are correct without having to go back and check them on the machine Or if you do need to undo someone else s changes this list guides yo...

Страница 110: ...Changing the default settings This page intentionally blank 4 11 ...

Страница 111: ...se Tips on caring for your machine What to do if problems occur Glossary Clearing paper jams 5 1 Print quality problems 5 3 Troubleshooting 5 5 Caring for your fax machine 5 11 Common questions 5 13 Glossary 5 16 ...

Страница 112: ...so the Repeat transmission Error on scan at page xx message will be printed out if the document jammed during transmission 2 The LCD will show which page i e which page number is jammed To con tinue scanning from the jammed page forward keeping in mind the Note at the end of step 1 above press START after clearing the jam Note If you wait more than 60 seconds without pressing any key the machine w...

Страница 113: ...e fax immediately wrap it in a thick cloth to protect it from light 4 Remove the jammed paper CAUTION The fuser unit becomes very hot Do not touch the fuser unit when you are removing a paper jam Note Avoid getting unfixed toner on your hands and clothes Open the side cover Raise the jam release lever to remove the jammed paper 5 Reset the toner and drum cartridge 6 Gently close the printer cover ...

Страница 114: ...o light The toner cartridge may be out of toner or the toner may be very low Remove the toner cartridge and shake it a few times to redistribute the toner inside If the problem persists replace the toner cartridge The toner cartridge may be defective Remove the toner cartridge and check it for damage If the problem persists replace the toner cartridge Printouts are too dark The toner cartridge may...

Страница 115: ...ec dealer Printouts have toner smudges The toner may be unevenly distributed inside the toner cartridge Remove the toner cartridge and shake it a few times to redistribute the toner inside If the problem persists replace the cartridge The toner cartridge or drum cartridge may be defective Remove the cartridges and check them for damage If the problem persists replace either or both of the cartridg...

Страница 116: ...to ON then try again What you see on the LCD What it means What to do Check Paper Size The different sized paper which is not same Open Close Top Cover sized paper you told your machine is loaded Set correct sized paper or change the paper size setting see pages 1 7 1 9 Check Paper Source The paper source setting is not proper for the operation you tried to do Set the paper source setting properly...

Страница 117: ... box or Batch box you want to erase then try again Invalid I D Code The F Code box I D code you entered isn t valid Try re entering your F Code box I D code What you see on the LCD What it means What to do Invalid Number You pressed a key which has no function during the current operation Invalid Passcode The protection passcode you entered isn t valid Repeat the operation entering the correct pro...

Страница 118: ...rectly Reset Document or the fax to which you re sending can t handle the document s page length Reset the page and try again What you see on the LCD What it means What to do Please Call Service The printer unit of your fax machine has become inoperable Call your authorized Muratec dealer or Muratec Customer Support Please Supply Paper The paper cassette or bypass tray is out of paper Supply paper...

Страница 119: ... a macro You can enter up to 60 steps into a macro key Errors When sending faxes your machine occasionally runs into communications errors These can be caused by anything from lightning to telephone line interference These same factors cause the static or line noise you sometimes hear on phone calls They also can be caused by problems with the fax machine at the other end of the line Often simply ...

Страница 120: ... errors T 1 1 The remote fax machine didn t respond to your machine Call someone at the remote machine s location T 1 2 Your fax machine s page counter detected a possible document feeder error Carefully put the document back into the feeder and try the call again T 2 1 Either the phone line disconnected during transmission or fax communica tion became impossible due to bad phone line conditions T...

Страница 121: ...mary Error message Possible meanings Check condition of remote fax Remote machine malfunctioned No handshake signals from remote fax Wrong phone number reached Repeat transmission Poor phone line conditions No handshake signals from remote fax Document misfeed or miscount Unable to reach remote machine after attempting specified number of redial tries Line is busy Remote machine s line was busy Re...

Страница 122: ...protect your safety and the machine For cleaning external surfaces such as the cover and handset use a mild clean ing solution sprayed onto a lint free towel or cloth Always use a lint free cloth or swabs moistened with alcohol to gently wipe components inside your machine In areas you can t reach with swabs always use dry dust free compressed air to gently blow away dust and other material Correc...

Страница 123: ...open the printer cover CAUTION The fuser unit becomes very hot Do not touch the fuser unit when you are cleaning the LED print head 4 Using the cloth gently clean the LED print head Note Do not use abrasive materials on the LED print head and do not subject the LED print head to strongly shock If you have unsatisfactory printout quality Your machine automatically cleans its charger and transport r...

Страница 124: ...sion wasn t the number I dialed Why A That number you saw is programmed into the remote fax machine by the user Some users prefer different numbers to appear than the ones they re really using And some people don t know how to change the number once it s set Q Can I transmit and receive at the same time A No Use the call request feature see pages 3 23 3 24 to ask the person at the remote fax machi...

Страница 125: ...tically As long as it hasn t stored more than 99 delayed commands counting automatic redials your machine should still accept commands from you If it has exceeded this quantity and will accept no more commands try canceling one of the delayed commands see page 2 6 If the machine still won t cooperate keep canceling commands until it does Q The specifications page AI 1 list an average per page tran...

Страница 126: ...ng period the more likely it is that the remote fax machine will proceed with the transmission Please create an outgoing message on your answering machine that s no longer than 10 seconds see page 2 10 for a suggestion Polling Q What s the purpose of polling A Polling lets you automatically pull a document which is set in another fax machine You can poll whenever you need to retrieve information a...

Страница 127: ...under 10 due to the presence of margins spaces between words spaces between lines and paragraphs and even spaces within letters However drawings and photographs have a much higher black density sometimes approaching 100 The higher a page s black density the more slowly a fax machine sends it Broadcast A fax transmission in which a single document is sent to more than one loca tion bps Bits per sec...

Страница 128: ...the document over telephone lines to another device This device then reconstructs the signals to produce an exact duplicate of the document Also a machine that performs such communication Fallback Group 3 fax machines operate at the highest transmission speed possible on a given telephone line Muratec systems offer automatic fallback if line quality drops during transmission the fax machine will r...

Страница 129: ...mpresses data in both horizontal and vertical directions and allows for faster transmission when communicating with other Group 3 units regardless of manufacturer See also MH MMR MSE SMSE MMR Modified Modified Read an ITU T Group 3 standard data compression method A two dimensional coding scheme that compresses data in both horizontal and vertical directions and allows for faster transmission when...

Страница 130: ...iver ID See Station ID Redialing The dialing again either manually or automatically controlled of the most recently dialed fax or phone number Automatic redialing follows an unsuccessful dialing attempt and can be done manually or automatically Relay broadcasting Lets some Muratec fax machines store a document in internal mem ory transmit the document to the memory of a remote hub fax and then ins...

Страница 131: ...ng on it have made this method considerably less popular than plain paper fax printing particularly as plain paper fax machines have dropped sharply in price TriAccess Muratec s TriAccess allows a Muratec fax machine to perform three or more tasks simultaneously without slowing TTI Transmit terminal identifier A user programmable line of information sent automati cally with every page a fax machin...

Страница 132: ...Just in case This page intentionally blank 5 21 ...

Страница 133: ...Appendix and index ...

Страница 134: ... dial 144 locations Document input Document set Face Up Original reference position Center Scanning resolution horizontal vertical Transmission Normal 203 dots inch 98 lines inch Fine 203 dots inch 196 lines inch Superfine 203 dots inch 392 lines inch Grayscale 203 dots inch 196 lines inch Copy Normal 300 dots inch 200 dots inch Fine 300 dots inch 300 dots inch Superfine 300 dots inch 400 dots inc...

Страница 135: ...Approx 890 W Maximum Approx 920 W Operating Environment Environmental temperature 10º C to 32º C 50 F to 89 6 F Relative humidity 20 to 80 RH Miscellaneous Weight Approx 43 7 lb 19 8 Kg Dimensions Width 18 3 Depth 20 8 Height 14 2 inches Drum cartridge life Approx 16 000 pages Toner cartridge life Approx 15 000 pages Starter toner cartridge life Approx 3 000 pages Using the ITU T Test Document 1 t...

Страница 136: ...s on programming this information the TTI into your fax machine see pages 1 18 1 20 Type of service Your fax is designed for use on standard device telephone lines The fax connects to the telephone line with a standard line called the USOC RJ 11 Connection to telephone company provided coin service central office implemented systems Connection to party line service is subject to State tariffs If p...

Страница 137: ...ordance with the instructions set forth in or provided with product literature This warranty does not apply to any product which has been subjected to tampering alteration misuse abuse neglect improper installation or transportation damage Nor does it apply to costs for any service requested for demonstration or to confirm proper operation of this product 3 The warranty shall not apply to adjustme...

Страница 138: ...ing 4 5 Pause length 4 5 Redial settings 4 5 for operation 4 8 2 bin tray 4 9 Adjusting the machine s clock 4 9 Paper source setting 4 9 Silent mode 4 8 Sleep mode 4 9 for reception 4 3 Half page reception 4 3 Print reduction rate 4 3 Reduction margin 4 3 for transmission 4 1 Primary contrast mode 4 1 Primary resolution mode 4 1 Quick Memory transmission 4 2 Print your settings 4 10 Contrast 2 1 C...

Страница 139: ...1 13 H Handset 2 13 I Initial settings 1 18 J Jammed paper removing 5 1 L Location ID 3 1 M Machine setting list 1 18 4 10 2 bin 4 9 Service Mode 1 13 Silent mode 4 8 Soft Keys 3 15 Macros 3 16 Printing a list of your Macro keys 3 18 Programming 3 16 Margin 2 11 Memory overflow 2 3 2 12 Memory transmission 2 2 O One touch keys 3 2 Entering or changing 3 2 Erasing 3 2 One touch fax dialing 3 3 One ...

Страница 140: ...ting supplies 1 5 Pick an installation spot 1 5 Soft keys Setting 3 15 Special features Activity journal 3 19 Call request 3 23 Cover page 3 21 Distinctive ring detection DRD 3 22 Fax Copy 3 19 F Code Boxes 3 24 Macro keys 3 16 Programmable one touch keys 3 33 Reports 3 20 Specifications AI 1 AI 2 Speed dial numbers 3 4 Entering or changing 3 4 Erasing 3 4 Fax dialing via speed dial 3 5 Phoning vi...

Страница 141: ...This page intentionally blank Appendix and index AI 8 ...

Страница 142: ...Muratec America Inc 6400 International Parkway Suite 1500 Plano Texas 75093 http www muratec com MAIordernumber OMF320 MMLitemnumber D94 90070 60 Muratec America Inc 2002 Printed in China ...

Отзывы: