background image

MULTI-TASKER™

7

7

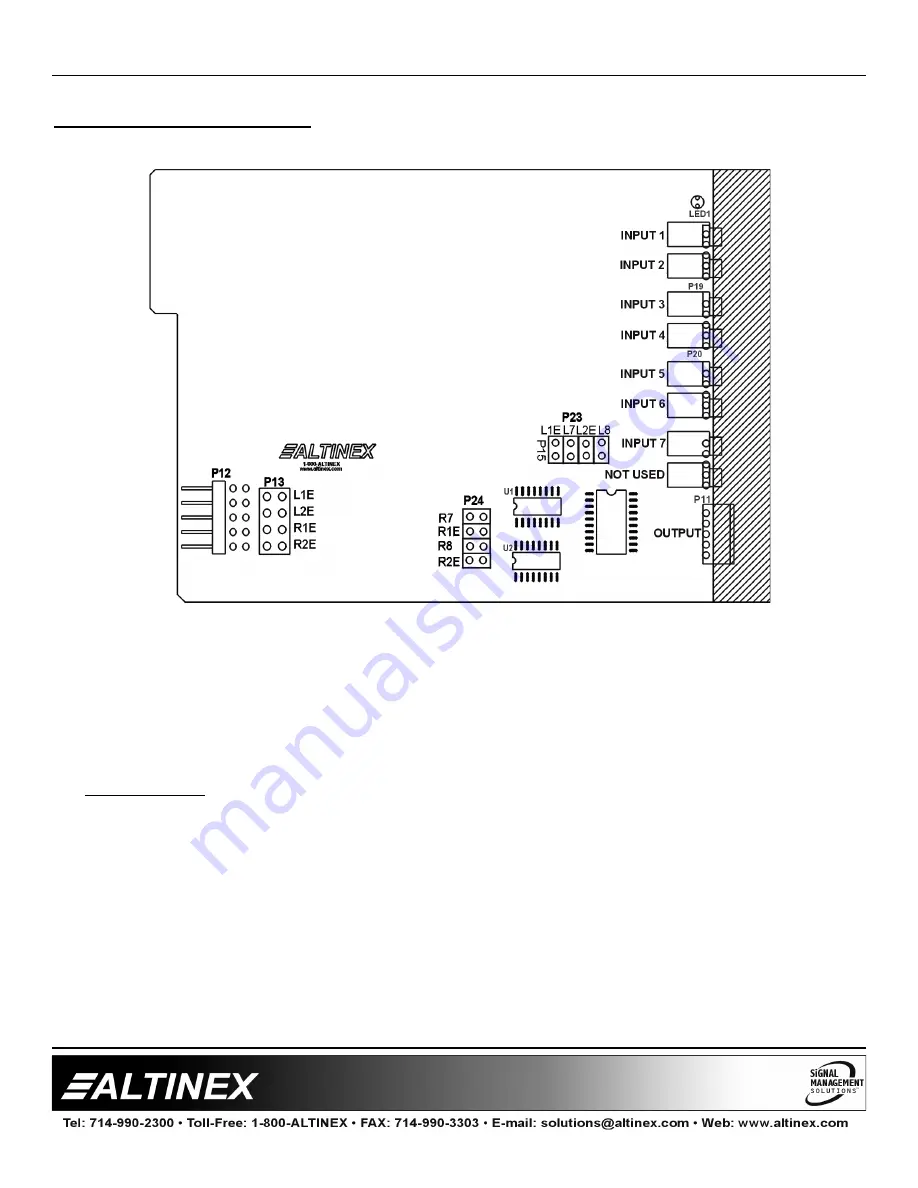
DIAGRAM 3: JUMPER SETTINGS

The

 MT109-100

 has 8 external inputs with 1 internal input and 1 output. The internal input is from the

Expansion card through a 10-pin ribbon cable, which is connected between P12 of the Expansion card
and P12 of the Master card. The 4 external inputs are configured as inputs 1 thru 8.

The 1 internal input is configured as input 7 or input 8. Only one of two internal inputs is used at a time
and it depends on how the jumpers on the Expansion are set.

Setting Jumpers:

1) As an Expansion card: set P13 as port 7 (L1E and R1E) or port 8 (L2E and R2E)
2) As a Master card: set jumpers on P23 and P24 as described below.

If the Expansion card's jumpers on P13 are set on L1E and R1E, the Master card must select internal
input 7 on P23 (L1E) and P24 (R1E).

If the Expansion card's jumpers on P13 are set on L2E and R2E, the Master card must select internal
input 8 on P23 (L2E) and P24 (R2E).

Note: The 

MT109-100

 configuration is 8-in, 1-out stereo audio switcher. For a 15-in, 1-out switcher

configuration, use two 

MT109-100

 cards. One as a Master card and the other as an Expansion

card. (See page 9.)

Содержание MT109-100

Страница 1: ...MULTI TASKER MANUAL PART NUMBER 400 0095 004 MT109 100 8 IN 1 OUT STEREO AUDIO SWITCHER CARD FOR MULTI TASKER USER S GUIDE...

Страница 2: ...GRAM 1 TYPICAL CONFIGURATION 5 DIAGRAM 2 INTERNAL VIEW 6 DIAGRAM 3 JUMPER SETTINGS 7 DIAGRAM 4 15 IN 1 OUT SWITCHER 8 INSTALLING YOUR MT109 100 9 OPERATION 9 RS 232 CONTROL 9 DESCRIPTION OF COMMANDS 1...

Страница 3: ...1 3 CLEANING Clean only the connector area with a dry cloth Never use strong detergents or solvents such as alcohol or thinner Do not use a wet cloth or water to clean the card Do not clean or touch...

Страница 4: ...any of the applicable cards in the enclosure This feature can be used in a variety of ways to expand the capabilities of the card For example two MT109 100 cards can be installed in the MultiTasker an...

Страница 5: ...MULTI TASKER 4 4 DESCRIPTION OF MT109 100 4...

Страница 6: ...MULTI TASKER 5 5 APPLICATION DIAGRAM 5 DIAGRAM 1 TYPICAL CONFIGURATION MT109 100...

Страница 7: ...MULTI TASKER 6 6 DIAGRAM 2 INTERNAL VIEW AUDIO INPUT 7 INPUT 8 EXP 2 EXP 4 INPUT 1 INPUT 2 INPUT 3 INPUT 4 INPUT 5 INPUT 6 EXP 1 EXP 3 POWER OUT...

Страница 8: ...the jumpers on the Expansion are set Setting Jumpers 1 As an Expansion card set P13 as port 7 L1E and R1E or port 8 L2E and R2E 2 As a Master card set jumpers on P23 and P24 as described below If the...

Страница 9: ...MULTI TASKER 8 8 DIAGRAM 4 15 IN 1 OUT SWITCHER...

Страница 10: ...on the top and bottom of the card Step 3 The LED on the card panel will turn red indicating that the card is in full operation A green LED indicates that a signal is present An LED that is blinking r...

Страница 11: ...e VERC3 For Unit ID Zero VERC3Ui For Unit ID other than Zero VERC3 Equivalent to VERC3U0 1 VER This command displays the software version and card type for the card Command Format VERCnUi Cn Card ID n...

Страница 12: ...003C05 IN1C05 VO32C05 VI3232323232323232C05 VM0C05 MT109 100 Card Type VR690 0179 003 Firmware version IN1 Input 1 is the selected input VO32 Output volume is at 32 VI3232323232323232 Input 1 8 volum...

Страница 13: ...volume 8 Input 8 volume v Volume Level from 01 to 32 Cn Card Slot Number Ui Unit ID i from 0 to 9 Example 1 Set the volume level for Input 2 of the card in slot 8 to a level of 16 using the command V...

Страница 14: ...me in seconds divided by 32 Command Format RAMPCnUi Cn Card Slot Number Ui Unit ID i from 0 to 9 Example Display the ramp rate setting for the card in slot 8 by sending the command RAMPC8 The system w...

Страница 15: ...rmat Input Enable ONmCnUi Command Format Volume ONCnUi m Input number m from 1 to 8 n Card ID n from 1 to max slots i Unit ID i from 0 to 9 Example Input Enable There is an MT109 100 card in slot 5 1...

Страница 16: ...sing the commands OFFC6P OFFC7P SW If F is included use the OFFmCnUiPF command or the OFFmCnUiFP command FEEDBACK OPERATION Command Format OFF F After processing a command an OK or ER will be returned...

Страница 17: ...Hold on Power Up to make group settings Command Format WRCn GkUi Cn Card ID n slot from 1 to max slots Gk Group number k from 1 8 Ui Unit ID i from 0 9 Example To group cards 1 2 and 3 as group 5 of...

Страница 18: ...8 ON Output volume ON or select input 19 OFF Turn output volume ON FF 20 S Save the command configuration 21 F Provides feedback upon sending 22 P Sets the path preload for SW 23 SW Switch preloaded o...

Страница 19: ...the ENTER key 5 The system will interrogate the enclosure and return a list cards installed and their slot locations Example 8 Slot 8 MT109 100 NOTE Only cards supporting the MENU feature will be disp...

Страница 20: ...ples following the menus for details CAUTION Pay special attention to the top of the CONTROL menu After selecting the CONTROL menu THIS CARD or a group will be identified at the top of the sub menu Si...

Страница 21: ...5 Group 5 6 Group 6 7 Group 7 8 Group 8 3 STATUS Equivalent to the C command Returns the card status 4 HELP Equivalent to the HELP command Displays a list of commands available for the MT109 100 along...

Страница 22: ...he keystrokes below 3 Displays card status NOTE The status will be displayed followed by the Main Menu being redisplayed TROUBLESHOOTING GUIDE 8 We have carefully tested and have found no problems in...

Страница 23: ...mmands in section 7 If no sound is present see Cause 3 Cause 3 Cable connections to the destination are incorrect Solution Make sure that cables are connected properly Also make sure that the continui...

Страница 24: ...he MT109 100 card from between the source and the destination amplifier If problem persists call ALTINEX at 714 990 2300 ALTINEX POLICY 9 9 1 LIMITED WARRANTY RETURN POLICY Please see the Altinex webs...

Отзывы: