background image

7

Function test

CHECK THE SENSORS BY USING THE DISPLAY

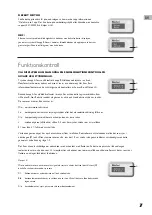
To enter the service menu press down button A followed by button B. Keep both 
pressed down for about 5 sec. The menu will change and you have entered the service 
menu, release the buttons. Here is several options but the most important to check is 
"Sensor B" and "Output C".

Use button A to step forward in the menu. Under Sensor B you will see several letters, 
big letter is activated and small letter is unactivated.

From left to right in second row:

M/m:  Sensor, indicates mixer-motor running time

S/s: 

Sensor for the mixer-motor to start. Is activated after each visit.

C/c:  Sensor for compost level , indicates when the level of the compost is reaching 

the leveling arm.

L: 

Sensor for liquid level (always acticated) the number 0 to 4 indicates the amount 
of liquid in the tray according to the float.

0 = empty tray, 4 = full (and "liquid high" will show)

The liquid indicator and float adapts to the amount of liquid in the tray. Check the
level in the right hand side tube and if there is about 

1

-2 cm (1/2") in the tube, the

sensor should indicate this, with number 

1

-2 behind the "L". When the tray is

empty the level should be at 0.

If there is any problem with the indicator or sensor there is a protection mode in the
software where the sensor will stay at L3 and heaters stays on even if there is no
liquid in the tray.

Output C 
M/m:  Mixer motor, when the motor gets signal and power connects the letter change 

from small to bigoch the mixer should start to work.

F/f: 

Fanmotor, is activated by number of visits and liquid level.

B/b:

Bottom-heater, is activated by liquidlevel or manual setting. If the liquid is L0 
the heater should not be activated .

A/a: 

Main-heater (top),works in the same way as bottom-heater.

A

B

A

BROKEN MIXER-MOTOR

Any other mechanical problems will be shown as "defect motor"(see page 

11

),

contact dealer.

Note! After the problem has been detected and fixed. Confirm by pressing button B. 
For instance "Replace Pin", the information will be turned off.
Otherwise the toilet will continue to remind. After the confirmion, choose "normal" 
or "manual" setting as before.

B

EN

Содержание 55ai

Страница 1: ...Installations och Bruksanvisning BioLet MullToa 55ai och 65ai Installation and User Manual BioLet 55ai and 65ai...

Страница 2: ...nds ska rumstemperaturen vara minst 18 Om du r borta i mer n tv dagar ska du st nga av str mmen och l gga t cklocket i sits ppningen Fukthalten r en viktig best ndsdel i den biologiska processen s det...

Страница 3: ...ter ventilationsr r med 55 mm ytterdiameter T ckr r 1 meter 110 mm ytterdiameter Isolering 2 x 1 meter Reduceringsmuff 55 110mm Takstos samt N thuv Installationspaketet v gg inneh ller 2 x r rb j 55mm...

Страница 4: ...dast n thuv Luften m ste ha fritt fl de ut detta r extra viktigt att t nka p vid byte av toalett fr n annat fabrikat n r de gamla r ren har annan diameter och f r inte bromsas upp Eventuellt regnvatte...

Страница 5: ...l i 2 3 av p sen med BioLet MullToa Specialmull i toaletten p BioLet MullToa 55ai F r BioLet MullToa 65ai skall hela p sen fyllas p Ungef r h lften av Specialmullen g r ner genom gallret och fyller ga...

Страница 6: ...llan spr k med knapp A N r man gjort sitt val s bekr fta med knapp B d refter r spr kvalet klart Vill man ndra b rja om fr n punkt 1 Informationsl gen T M MULL DA N r komposten har n tt vre rakan 22a...

Страница 7: ...siffran st mmer verens Ex st r det 1 2 cm v tska i slangen s indikerar v tskeniv givaren detta genom att ha befinna sig i l ge 1 2 Det finns ven ett skyddsl ge om niv vakten inte har kontakt med flott...

Страница 8: ...r mulltillf rsel och omr rning med mullrakan ofta viktigare n h jning av v rme EXTRA BELASTNINGAR F r att f rbereda extra bes k ver t ex en helg s kan man tillf ra ett par liter extra specialmull Vid...

Страница 9: ...r i tr dg rden F rbered kortare fr nvaro Om du r borta i mer n tv dagar ska du st nga av str mmen och s tta t cklocket i sits ppningen I annat fall kan komposten bli torr och h rd r det mycket v tska...

Страница 10: ...h inv nta att v tskan i slangen sjunker undan samtidigt som man forts tter anv nda toaletten 2 Skulle det t ex efter en g sttopp kommit v tska i den v nstra slangen 27 s har l dan sv mmat ver r hela s...

Страница 11: ...ft av verdelen Lossa 4 skruvar som h ller motorpaket 18 p plats Lossa snabbkontakten f r str mf rs rjning Lyft upp motorpaketet L gg axeln mot ett h rt underlag och knacka ur resterna av den gamla spr...

Страница 12: ...t svenskt f retag med ver 50 rs erfarenhet av komposterings separeringstoaletter och gr vattenfilter Vi har utveckling och egen tillverkning av flera innovativa produkter i Sverige Komposterings toale...

Страница 13: ...Installation and User Manual BioLet 55ai and 65ai E s t a b l i s h e d 1 9 7 0...

Страница 14: ...ld be used as an ordinary toilet Controlled air supply and heat as well as regular mixing of the compost accelerates the composting process and converts toilet waste into eco friendly humus This makes...

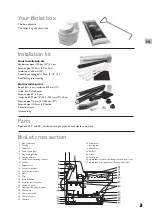
Страница 15: ...sleeve Insect netting Parts Pipebends 30 and 45 insulation straight pipes humus starter extra tray BioLet cross section 1 Pipe connection 2 Display 3 Fan motor 4 Sensor liquid level 5 Plug reprogramin...

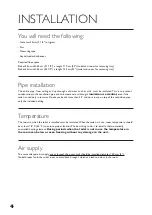
Страница 16: ...is used only in summer Do not use bends more than 45 and no rain cap on top of the ventialtion pipe only the included netting Temperature The room in which the toilet is installed must be insulated W...

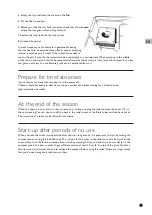
Страница 17: ...oof 10 Fit the insect netting against the stop on the reduction coupling Starting of toilet 1 Put about 2 3 of the bag of the Biolet humusstarter into the toilet except model 65ai where the whole bag...

Страница 18: ...l flash and the language can be selcted with button A Confirm your selection with button B Display EMPTY TRAY When the level of the compost reaches the levelling arm 22a it is time to empty the tray I...

Страница 19: ...n the tray Check the level in the right hand side tube and if there is about 1 2 cm 1 2 in the tube the sensor should indicate this with number 1 2 behind the L When the tray is empty the level should...

Страница 20: ...crease the heat as long as the liquid in the tube do not increase EXTRA GUESTS Add a couple of litres quarts of humus starter Enter the manual mode by pressing button B for maximum evaporation LOW LOA...

Страница 21: ...iquid for example after heavy use you can leave the toilet running for a limited period approximately one week At the end of the season When the season is over and it is time to leave your cottage unp...

Страница 22: ...ing to use the toilet 2 Should liquid also be visible in the left tube 26 the tray overflowed Do not open the frontcover 25 Start by pressing button B and avoid overloading the toilet with too much li...

Страница 23: ...nd sleeve nut 17 Lift the top Loosen the 4 screws holding the mixermotor 18 in place Disconnect the quick connector for power supply Remove the mixermotor assembly Place the shaft against a workbench...

Страница 24: ...fisk design och produktion ADHT Tryck Typoprint 2022 Swedish Ecology AB Klippan 1J S 414 51 G teborg Sweden Tel 46 31 42 29 30 Fax 46 31 42 49 08 info mulltoa com www mulltoa com Designed Manufactured...

Отзывы: