18
IMPORTANT:
Never attempt to move the tractor
manually without first engaging the hydrostatic relief
valve. Doing so will result in serious damage to the
tractor’s transmission.
Headlights
On some models, the lamps are ON whenever the
tractor’s engine is running. On other models, the lamps
are ON whenever the ignition key is moved out of the
STOP position.
On all models, the lamps turn OFF when the ignition
key is moved to the STOP position.
SECTION 6: MAKING ADJUSTMENTS
WARNING:
Never attempt to make any
adjustments while the engine is running,
except where specified in the operator’s
manual.
Leveling the Deck
NOTE:
Check the tractor’s tire pressure before
performing any deck leveling adjustments. Refer to
Tires
on page 24 for information regarding tire pressure.
Front To Rear
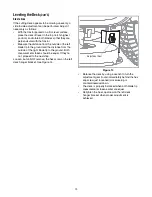
The front of the cutting deck is supported by a stabilizer
bar that can adjusted to level the deck from front to rear.
The front of the deck should be between 1/4-inch and
3/8-inch lower than the rear of the deck. Adjust if
necessary as follows:
•
With the tractor parked on a firm, level surface,
place the deck lift lever in the top notch (highest
position) and rotate the blade nearest the discharge
chute so that it is parallel with the tractor.
•
Measure the distance from the front of the blade tip
to the ground and the rear of the blade tip to the
ground.
•
The first measurement taken should be between
1/4" and 3/8" less than the second measurement.
Determine the approximate distance necessary for
proper adjustment and proceed, if necessary.
•
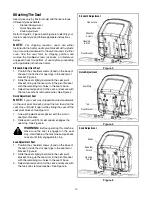
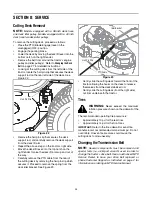
Locate the jam nut and lock nut found on the front
side of the stabilizer bracket. See Figure 14. After
loosening the jam nut:
Tighten the lock nut to raise the front of the deck;
Loosen the lock nut to lower the front of the deck.
Figure 13
•
Retighten the jam nut loosened earlier after proper
adjustment is achieved.
Содержание 791
Страница 29: ...29 NOTES ...
Страница 30: ...30 NOTES ...


