


QM7500 Technical Manual
QM31930/03093 Rev AD
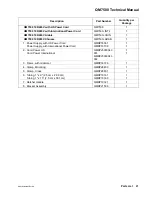
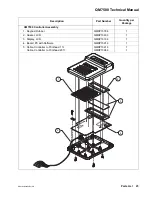
Servicing 11
Backflushing a Valve
1) Prepare the QM7500 for servicing. (See page 6.)
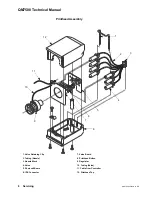
2) Remove the printhead cover by removing the three screws from the bottom of
the printhead. With the unit flat on the workbench, place your thumb on the
regulator and press down lightly as you lift up the top half of the printhead.
Note: Hold the components in place with your finger if necessary. Make
sure the valve/photocell board assembly remains in the printhead base.
Also, avoid unnecessary flexing of the cable between the two boards to
prevent damaging the cable connections.
3) Slide out the photocell board.
4) Locate the valve that needs backflushing. (Valves requiring backflushing can
be identified by a print sample or by drooling or leaking ink.)
5) Disconnect the tubing between the regulator and the valve from the regulator.
CAUTION: Remaining ink pressure may cause ink to shoot out of the
tubing.
6) Remove the tubing between the valve and the nozzle from the valve.
7) Install the cleaner assembly nozzle (from the service kit) on a bottle of solvent.
8) Install tubing (from the service kit) on the cleaner assembly nozzle.
9) Connect the tubing from the cleaner assembly nozzle to the outlet (center) port
of the valve.
10) Place an absorbent cloth around the open end of the other tubing connected to
the valve.
11) Plug in the power supply and purge. (See the Owner's Manual for how to
purge.)
Note: If the QM7500 is not purging, you will not be able to run solvent
through the valve.
12) Spray solvent through the valve for several seconds.
13) Disconnect the solvent bottle from the valve port.
14) Reconnect the tubing from the inlet (off-center) port of the valve to the
regulator; reconnect the tubing from the nozzle to the outlet (center) port of
the valve.
15) Slide the photocell board back into place, photocells facing out.
16) Replace the printhead cover, remount, and purge for several minutes.
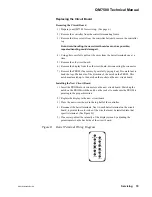
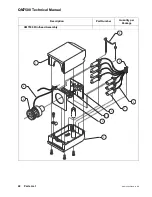
Replacing the Nozzle Block
Removing the Nozzle Block
1) Prepare your QM7500 for servicing. (See page 6.)
2) Remove the printhead cover by removing the three screws from the bottom of
the printhead. With the unit flat on the workbench, place your thumb on the
regulator and press down lightly as you lift up the top half of the printhead.


