background image

7.3 Schedule Recording ................................................................................... 28


7.4 Snapshots................................................................................................... 29


7.5 Play Mode................................................................................................... 29


8. The Remote Control and Keyboard Shortcuts ................. 30


8.1 Remote Control (optional)........................................................................... 30


8.2 Keyboard Shortcuts .................................................................................... 31


Содержание TV@nywhere Duo

Страница 1: ...TV nywhere Duo User Manual Ver 1 8...

Страница 2: ...ify any person or organization of such revision or change In no event shall Micro Star International be liable to you or any third party for any consequential incidental direct indirect special puniti...

Страница 3: ...DTV 8 3 5 Installation of DVD MovieFactory 8 4 DTV 9 4 1 DTV Interface Overview 9 4 2 Scanning for TV Channels Digital 10 4 3 Scanning and editing channels Analog 12 4 4 Scanning for stations FM Radio...

Страница 4: ...7 3 Schedule Recording 28 7 4 Snapshots 29 7 5 Play Mode 29 8 The Remote Control and Keyboard Shortcuts 30 8 1 Remote Control optional 30 8 2 Keyboard Shortcuts 31...

Страница 5: ...TV and Analog inputs Watch both Digital TV and Analog TV or video simultaneously Watch TV in a resizable window or full screen TimeShifting functions Capture still images Listen to DVB radio Listen t...

Страница 6: ...ster 2 4GHz or faster recommended 256 MB RAM minimum 512 MB RAM recommended Microsoft Windows 2000 XP 100 MB available hard disk space for installation additional space required for recording or TimeS...

Страница 7: ...our home antenna or cable for Analog TV FM Connects to FM antenna AV Cable Connect the AV Cable to the 9 pin connector of the TV nywhere Duo S Video S Video input for external devices like VCRs or cam...

Страница 8: ...TV input You can use a house antenna or the included portable antenna for digital TV reception and you can use a house antenna cable TV line or another source for your analog TV input If you use a ho...

Страница 9: ...installation CD and an installation menu should load automatically If the Autostart program does not appear automatically when you insert your Installation CD start it manually by running the Install...

Страница 10: ...es during operation This is usually the PCI slot closest to the AGP slot but always check your mainboard manual 5 Carefully remove the card from its packaging and pick it up by the edges with one hand...

Страница 11: ...the Installation CD into your CD ROM drive Select Install from a list or specific location Advanced and click Next Now select Search for the best driver in these locations make sure Search removable...

Страница 12: ...llow the prompts to install the software 3 5 Installation of DVD MovieFactory DVD MovieFactory is included so you can edit and burn your own DVDs To install it click on DVD MovieFactory and follow the...

Страница 13: ...ip to end 6 Switch to DVB TV 19 Mute on off 7 Start Stop PIP mode 20 Volume bar 8 Start Stop Twin mode 21 Show hide channel list 9 Open Scan settings 22 Snapshot button 10 Switch to Play mode 23 Signa...

Страница 14: ...u can change this setting in DVB Settings in Chapter 5 1 3 Services Information This shows information about the currently selected channel when available During a scan this will show information on t...

Страница 15: ...tton at the top of each column You can uncheck a channel so it does not appear in your channel list or you can select it and click Delete to remove the channel entirely You can also import channel lis...

Страница 16: ...tandard directly by using the dropdown boxes You can change the Input Type to designate whether you use an antenna Air or cable TV Cable You can edit your channel list by using the checkboxes next to...

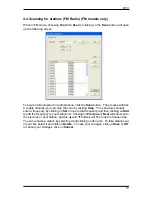
Страница 17: ...Stop You can also manually enter a frequency by clicking on Set to tune to that frequency and then clicking on Add to add the frequency to your station list Clicking on Previous or Next will autoscan...

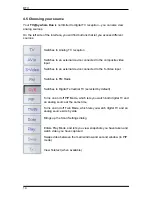
Страница 18: ...al device connected to the S Video input Switches to FM Radio Switches to Digital Terrestrial TV selected by default Turns on and off PIP Mode which lets you watch both digital TV and an analog source...

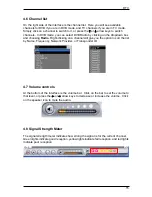
Страница 19: ...icking on a channel will give you the option to sort the list by Name Frequency Network Provider or Transponder ID 4 7 Volume controls At the bottom of the interface is the volume bar Click on the bar...

Страница 20: ...nce it is constantly transferred along with the TV picture via the so called vertical blanking interval of the picture signal Surfing through the pages is conveniently easy thanks to the preloaded tex...

Страница 21: ...used for saved files Either type in the path or click Browse go to the folder you want and click OK You can also choose to always have the DTV window on top of other applications by checking Always on...

Страница 22: ...their frequencies In general most countries have a bandwidth of 7 8 MHz here you can choose the setting that matches your country In case you are in a country that uses 6 MHz Bandwidth like Taiwan fo...

Страница 23: ...ike Brightness Contrast Hue Saturation and Sharpness Clicking on Default will put the settings back to the factory default 5 2 2 Record Settings Record Settings let you adjust how you record files fro...

Страница 24: ...Modify an existing one Duplicate a profile and Remove one or all of the existing profiles Create Profile General Here enter a name for the profile and a comment to help identify it Select MPEG 1 or M...

Страница 25: ...many Channels to use for recorded audio 1 mono 2 stereo Record SYSTEM By selecting SYSTEM in the Record Setting window you can access the codecs already installed in your system such as MPEG 4 or Div...

Страница 26: ...Here you find programs scheduled to be recorded Please refer to Chapter 7 3 for a description how to use the Scheduled Recording 5 2 5 DVB Setting Some countries use a different bandwidth setting for...

Страница 27: ...V settings Select your country and TV standard to get proper reception in your area You can also select whether to receive Mono or Stereo for the currently selected channel and what Language you wish...

Страница 28: ...you click on the PIP Button you will see a second live stream at the bottom right When you are in PIP Mode you can switch between analog TV S Video and AV in sources depending on which connection you...

Страница 29: ...l be locked and cannot be individually resized or moved Clicking on the Swap button will swap the main and second windows so digital TV will be in the second window and your analog source will be in t...

Страница 30: ...pecified in Record Settings Chapter 5 2 2 In FM Radio mode you record to a standard WAV file In all modes recorded files will be saved to the working directory which can be specified in Directory Sett...

Страница 31: ...o Clicking it again will begin playback right where you left it You will see a green bar at the bottom of the screen with a slider that shows your current position You can rewind or fast forward by us...

Страница 32: ...open a second menu First select the Schedule Type from the right side of the screen Click One time if this is a one time only recording To make a weekly recording click on the days you want the progr...

Страница 33: ...Chapter 7 5 7 5 Play Mode You can see the files you have already recorded by clicking on Play on the left side of the interface Here you can select the file you wish to view on the right and it will...

Страница 34: ...nel 9 VOL VOL Decreases increases the volume 10 Enter Confirms a selection 11 PIP Enables disables the PIP Mode and to switch between the main and second window 12 Source Switch between the different...

Страница 35: ...Space Recall Previous Channel M Mute on off T Switch between TV Radio reception A Switch to Second Audio Language Channel Up Channel Down Volume Up Volume Down Enter NumPad Enter Enter Confirm P Enabl...

Отзывы: