7
5.7
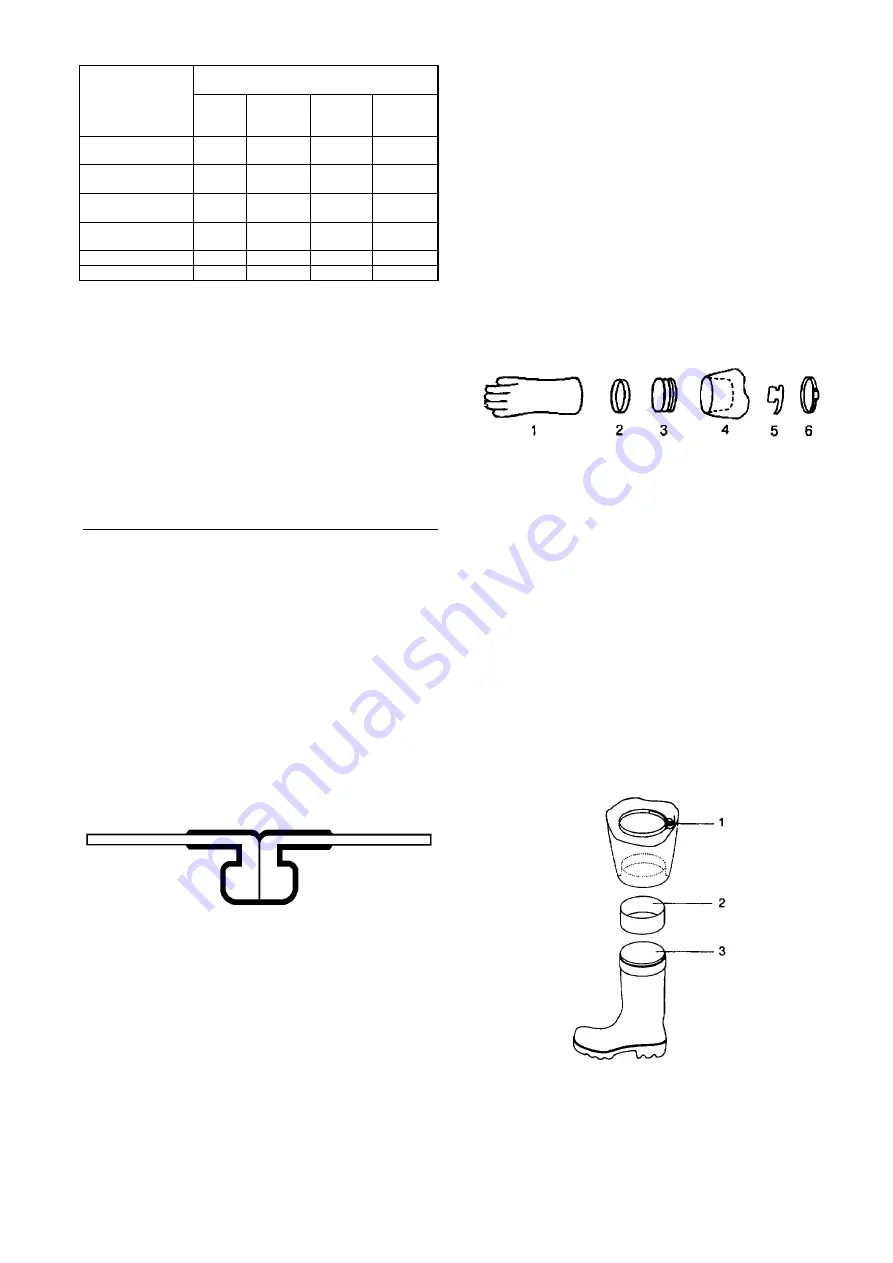
Maintenance Intervals
Work to be
Intervals
performed
Prior to
each
use
After each
use
Semi-
annually
Every two
years
Cleaning, Disinfection
and Maintenance
X
X
Function and
Leak Test
X
X
Valve disc
replacement
X
Slide ring
replacement
X
Check by user
X
Zipper maintenance
X
X
The performed maintenance work should be noted
on the record card.
5.8
Repairs
Repair of suit material and seams as well as re-
placement of the zipper may only be performed by
the manufacturer or by authorized service centers.
Only original MSA AUER spare parts may be used
for repairs.
6
Maintenance Work
6.1
Suit Valves
In case of a leak either the valve disc or the entire
valve assembly must be replaced. To do this, the
threaded ring is unscrewed from the inside of the
suit using the key (see Ordering Information). Re-
gardless of the above measures, it is recommended
to replace the valve discs every 2 years at the latest
(Fig. 1).
6.2
Zipper
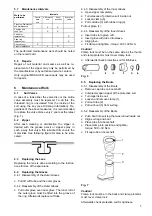
After each cleaning or disinfection the zipper is
treated with the grease pencil or zipper spray in
such a way that only a thin lubricant film covers the
metal links. See following figure for area to be lubri-
cated:
6.3
Replacing the Lens
Replacing the lens is done according to the Instruc-
tions for Use of the spare lens.
6.4
Replacing the Gloves
6.4.1 Disassembly of the Outer Gloves
x
Pull off cuff tube and the outer gloves.
6.4.2 Reassembly of the Outer Gloves
x
Pull outer glove over inner glove. The inner roll of
the outer glove must be fitted into the groove of
the ring. Afterwards replace cuff tube.
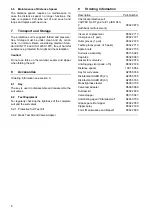
6.4.3 Disassembly of the Inner Gloves
x
Open zipper completely.
x
Turn sleeves of protective suit inside out.
x
Loosen clamp (6).
x
Pull out tube (3) with rubber ring (2).
Pull out glove (1).
6.4.4 Reassembly of the Inner Gloves
x
Insert tube into glove cuff.
x
Insert glove with tube into sleeve.
x
Align glove.
x
Fit clamp and tighten - torque: 400
r
30 Ncm
Caution!
Clamp lock must be on the same side as the thumb
and clamp protector must cover clamp lock.
x
Afterwards check protective suit for tightness.
Fig. 6
6.5
Replacing the Boots
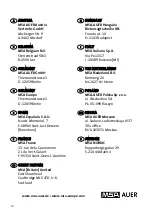
6.5.1 Disassembly of the Boots
x
Remove cap tube on boot shaft
x
Completely open zipper of the protective suit.
x
Turn legs inside out.
x
Loosen and remove clamp (1).
x
Pull out tube (2).
x
Pull out boot (3) from suit leg.
6.5.2 Reassembly of the Boots
x
Push boot into suit leg that was turned inside out.
x
Align suit leg and boot.
x
Place tube into boot shaft.
x
Place clamp into position and tighten -
torque: 500
±
30 Ncm.
x
Fit cap tube on boot shaft
Fig. 7
Caution!
Clamp lock must be in the back and clamp protector
must cover clamp lock.
Afterwards check protective suit for tightness.
Содержание VAUTEX SL-S
Страница 1: ...MSA AUER VAUTEX SL S Type 1a ET pr EN 943 2 Chemikalienschutzanzug D3020039 05 SL ...
Страница 9: ...9 ...
Страница 11: ...MSA AUER VAUTEX SL S Type 1a ET pr EN 943 2 Protective Suit D3020039 05 SL ...
Страница 19: ...9 ...


