background image

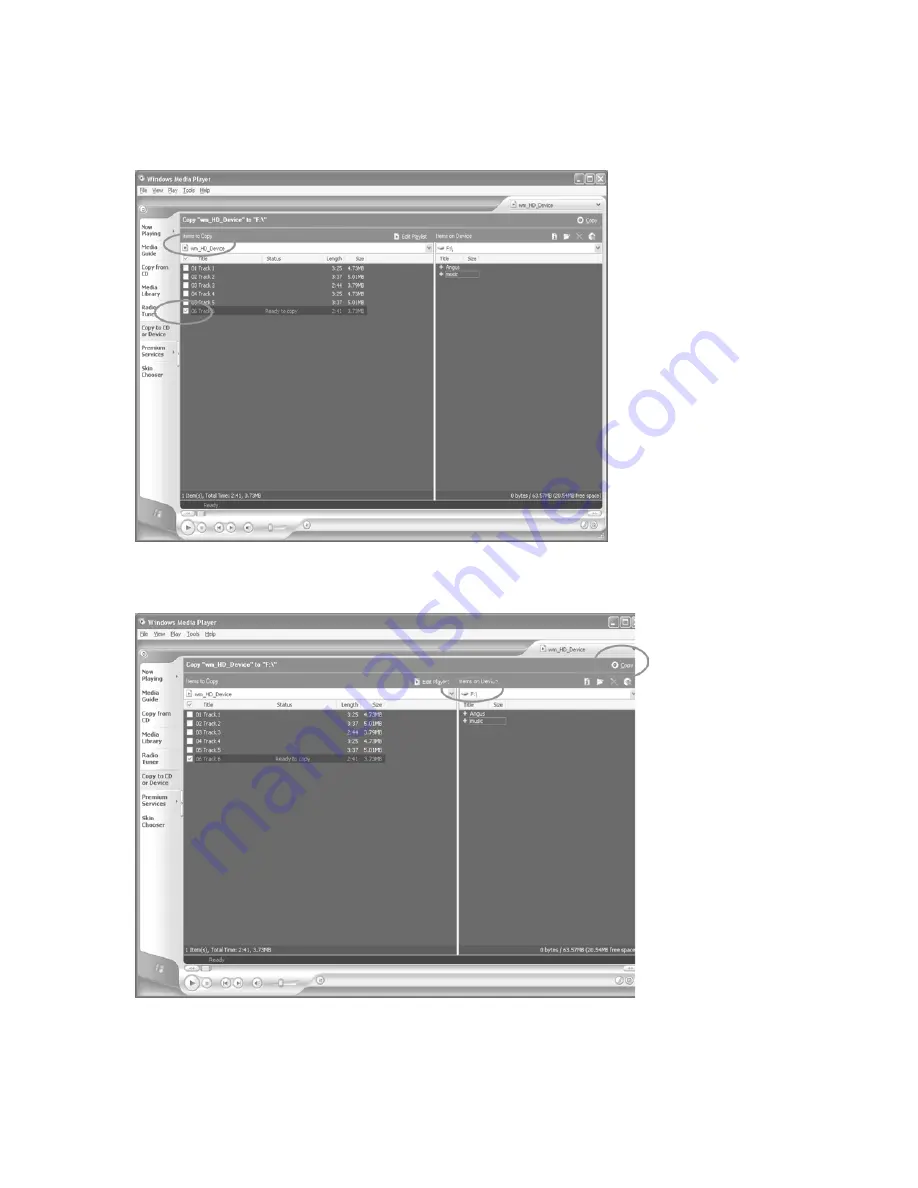
4.  Click on the “Items to Copy” drop down menu to locate  the music files you wish to 

download. Make sure to tick the box next to the files. 


5.  Select, the Portable Device you want to copy to from the “Items on Device” drop down 

menu. Click “Copy” to start transferring the DRM files onto your unit. 


6.  After you have downloaded all the desired files to your unit, follow the “Safely Remove 

Hardware” procedure described in the manual.


11


GB  - 

Содержание MP-FOL6

Страница 1: ...MP FOL6 User s Guide Before operating this product please read these instructions completely www mpmaneurope com ...

Страница 2: ...product for the first time KEY FEATURES Multi format player supports MP3 WMA and WAV files Windows Plug Play support for Windows ME 2000 and XP and Mac OS10 2 8 or higher Windows 98SE compatible Driver required USB Version 2 0 Six different music equalizer levels Voice Recording Power saving feature Firmware Upgradeable PACKAGE CONTENTS The packaging should include the following accessories Digita...

Страница 3: ... Main Menu Press and hold to access into the Settings Menu hold Slide up to lock all keys functions Slide down to unlock all keys functions Record Button Press to record in Voice mode EQ Equalizer Repeat button Press to access into the Repeat mode Press and hold to access into the Equalizer mode Press to select song into playlist in Navigation mode II Press and hold to turn the player OFF Press to...

Страница 4: ...ld downward to decrease the volume rapidly Push upward to increase the volume Push and hold upward to increase the volume rapidly Battery Installation When the bars in the battery indicator in the display become low figure 1 replace the battery as follows 1 Click the button and opens the battery compartment door 2 Insert the battery with the correct polarity as show 3 Close the battery compartment...

Страница 5: ...w the detailed instructions in this section to activate the USB mass storage function so you will be able to transfer files from your computer to your player Installation Procedures for the Player Software For Windows 98SE only When connecting the player to the computer for the first time please follow these instructions 1 Insert the CD ROM into the CD Drive The auto run program will display as sh...

Страница 6: ...2 Follow the on screen instruction to install the software Click Yes to accept the License Agreement 5 GB ...

Страница 7: ...Please install the software under the directory as prompted Warning DO NOT change the installation path Otherwise the Player driver may not run properly Click Next as prompted 6 GB ...

Страница 8: ...ter successfully installing the driver software please click Finish to complete the installation 4 When the installation is completed the new program will be added to your Program menu in the computer 7 GB ...

Страница 9: ... My Computer Open the Removable Disk folder Locate the files you wish to copy from your computer to your player Drag and drop MP3 WMA or WAV files on your computer into the Removable Disk folder These files will now be copied into your DAP Note When you are finished transferring files use the Safely Remove Hardware procedure before disconnecting your player Please see the next section for detailed...

Страница 10: ...indows Media Player 9 on your computer you must go to www Microsoft com to download and install this software Before beginning the procedure please turn the unit ON and connect the USB cable to the unit and to the USB port of your computer 1 Open the Windows Media Player Browser and click on Tools in the menu bar Then click Options 9 GB ...

Страница 11: ...2 Click the Copy Music tab and tick the option Copy protect music in order to copy a DRM music file onto your unit Click OK to save the setting 3 Click Copy to CD or Device 10 GB ...

Страница 12: ...he box next to the files 5 Select the Portable Device you want to copy to from the Items on Device drop down menu Click Copy to start transferring the DRM files onto your unit 6 After you have downloaded all the desired files to your unit follow the Safely Remove Hardware procedure described in the manual 11 GB ...

Страница 13: ...he Stop a Hardware Device window will pop up as shown 3 Click OK A Safe to Remove Hardware window will pop up Now it is safe to remove the USB Cable and the DAP from the computer Remarks If the Safely Remove Hardware icon is not displayed on the task bar please double click on My Computer Right click on Removable Disk left click on eject Then it is safe to remove the DAP from the computer 12 GB ...

Страница 14: ...ion is highlighted and press the Navi button to confirm the selection MUSIC PLAYER To listen to any files or songs stored in your DAP or run the Play List you can select the MUSIC PLAYER mode Using Special Functions Equalizer Mode EQ The current equalizer mode is displayed in the lower right hand corner of the display n in a rectangular block with a black background Changing the EQ mode Press and ...

Страница 15: ... this function NAVIGATION You may search for listen to and program the play list in the Navigation mode Press the mode button and use the or the button to highlight the Navigation Press the Navi button to confirm and access in the Navigation menu All the files are displayed in the Root folder Voice recorded files are stored in the Voice folder Creating a play list Enter into the Navigation menu Pu...

Страница 16: ...he button to highlight the Voice Recorder icon as shown Press Navi to confirm and enter the Voice Recorder mode Recording a Voice Message Press the button to start recording Press the II button to pause recording Press the button to stop recording The recorded file is saved as a WAV format Listening to the Recorded File Press the II button to listen the recorded file Press the button to stop liste...

Страница 17: ...Screen Saver or Language Once your selection is highlighted then press Navi to confirm To exit the SETTING Menu press the mode button Setting Features Play List Setting Push or button to select the desired file Press the button a CLEAR ITEM CLEAR LIST box will appear on the display Push or to select clear item or clear list and press Navi button to confirm Push or button to select Yes No to clear ...

Страница 18: ...Ultra Bass Jazz Pop or Classical Press Navi to confirm the equalizer mode Play Timer Setting Push or to select between ELAPSED and REMAIN time Press Navi to confirm the play timer selection Screen Saver Setting Press the or the button to select the time before the screensaver is activated Press the Navi button to confirm the timer selection NOTE It is recommended to enable the Screen Saver functio...

Страница 19: ...cessive dust or sand moisture or rain On Headphones and Earphones Road Safety o Do not use the headphones earphones while driving cycling or operating any motorized vehicle It may create a traffic hazard and is illegal n some areas It can also be potentially dangerous to play your headsets at high volume while walking especially at pedestrian crossing and potentially hazardous situations Preventin...

Страница 20: ...urtains on the carpet or in a built in installation such as a bookcase Do not expose this unit to direct sunlight or heat radiating sources Make sure all batteries are inserted according to the proper polarity Do not mix old batteries with new ones If the unit is not used for a long period of time more than 1 month remove all batteries from their compartment to avoid possible leaking The player ma...

Страница 21: ...attery Replace the battery is exhausted The earphones Clean the earphones jack jack is contaminated or oxidized Corrupted MP3 or WMA file Download the files again Failed to Download Check whether the battery Replace the battery or Upload of MP3 is exhausted WMA WAV files Check the connection of Re plug the cable at both USB cable ends Damaged USB cable Replace a new USB cable Memory is full Releas...

Страница 22: ...ps 320kbps Tag Info ID3 Tag Dimension 70 8 x 65 x 24 mm Weight Approx 42 g without battery Battery 1 x AAA battery Display Full Graphic OLED USB USB 2 0 Built in Memory 128MB 256MB 512MB Supported OS Win ME 2000 XP and Mac OSX Win 98SE Driver is required Voice Recording Approx 7 8 hours Low resolution Firmware Upgradeable Yes Except Windows 98 and Mac Operating Temperature 23 F to 104 F 5 C to 40 ...

Страница 23: ...his Information for Future Reference The manufacturer reserves the right to make any technical changes without notice in the interest of progress Declaration Our company will not be responsible for any mistakes in this manual Prior notices will not be given in case of any amendments within the manual The corresponding companies own the mentioned trademarks and names Microsoft Windows Media and Win...

Отзывы: