background image

81

Connection

Setting Directory

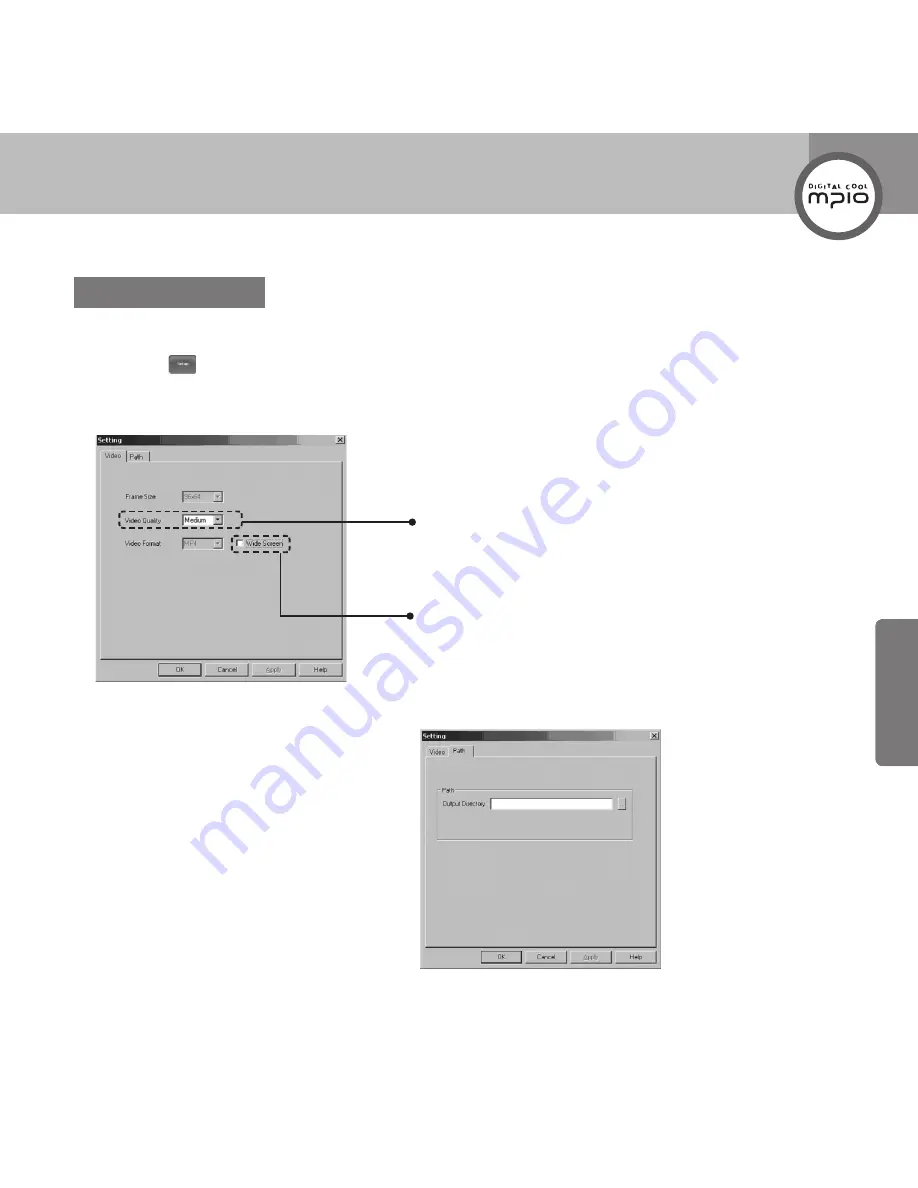
Set the video options, and set the directory for storing the Output File.

1

  Click the (

)button to see the tab dialogue for Video and Directory Settings.

2

  Select the tab to setup, and choose the options.

3

  Select the 

Path

 tab.

  Designated the directory for the converted 

files to be saved in.

Video Quality

Select the quality of the video by choosing desired 

quality in the Video Quality box.

Wide Screen

Many of DivX movies are made in 720x480 wide

screen format. Choosing this option will show the

movie in the original screen ratio.

Содержание HD 400

Страница 1: ......

Страница 2: ...arious purposes To use this product properly make sure to read through this manually before using it http www mpio com For more information on the MPIO products visit our web site on the Internet You...

Страница 3: ...um are the registered trademark of Intel Corporation Macintosh and Macintosh are the registered trademark of Apple Computer Inc Products and products described in this manual are the trademark or regi...

Страница 4: ...near heating device or heat generators Do not use in minus zero temperatures or outdoors during winter operating temperature 5 C 40 C Do not leave in humid areas or frequently flooding areas Do not le...

Страница 5: ...ing hearing loss Data Storage 1 MPIO Co Ltd will not be responsible for data loss or damages occurred while transferring data between the product and a PC 2 When storing important data please make a b...

Страница 6: ...Mode 20 Setting the Repeat Mode 20 Setting EQ Equalizer Mode 21 Setting the User EQ Equalizer 22 Setting the Lyrics 22 Setting WOW 23 Setting the File Info 24 Video Mode 25 Playing Video Files 25 Scr...

Страница 7: ...er Mode 47 Deleting Files with Navigation Mode 48 Viewing File Info with Navigation Mode 48 Setting Mode 49 Setting Music 49 Setting Radio 49 Setting Record 49 Setting Viewer 49 Setting System 50 Goin...

Страница 8: ...e Photos in JPEG and BMP format can be viewed and e Book function is also supported Playing games with an MP3 player You can enjoy fun games at any time while you are listening to music Experience liv...

Страница 9: ...24PIN USB Multi Cable Utility CD Quick Guide Product Warranty Carrying Case Note Actual player components may vary slightly from images shown and subject to change without notice Broken accessories m...

Страница 10: ...the player with a small pin The player will then operate normally Navigation Setting OK button Power Lock switch Earphone Jack Volume Control button 24PIN Terminal USB Charge LCD screen Scan Tracks Qu...

Страница 11: ...11 Getting Started LCD Screen Main Menu Screen Videos Radio Games Music Photo Text Voice Recording Direct Encoding Settings Browser...

Страница 12: ...status screen apprears in the LCD screen Charging time is based on the power off status Charging time with 24PIN USB Multi Cable About 4 hours When charging from the USB terminal of a PC Charging tim...

Страница 13: ...it has not been used for a long period of time The built in battery is expendable therefore the battery usage time will gradually reduce after purchase Always charge and store the produce at room temp...

Страница 14: ...wer Lock Switch to and then release The power will turn on Turning the Power OFF Push Power Lock Switch to and then release after 2 seconds The power will turn off Playing the Music Select Music using...

Страница 15: ...used Press button once more then the music will be played again Changing the Mode 1 Press MENU button during playback or pause The main menu screen appears 2 Select the desired mode using button and t...

Страница 16: ...volume can be adjusted from 0 to 40 Using the Lock Function If you set the lock function other buttons will not operate when they are pressed during playback To set the lock function push Power Lock...

Страница 17: ...ing Rewinding during Playback Search Songs To fast forward or rewind during playback keep pressing or When you let go of the button normal play will resume Repeate Mode Next Song Title File Format Vol...

Страница 18: ...en to songs repeatedly There are four repeat modes Whenever you press button during playback or pause the repeat mode will change Mode Change Sequence Play all music files in the HD400 folder accordin...

Страница 19: ...e repeat playback and start song search Finding Files with Navigation Mode You can easily find any desired file and play it in Navigation mode 1 Press OK button during playback or pause to enter Navig...

Страница 20: ...n 2 Select Music using button and then press OK button Setting the Repeat Mode You can play one music file or several music files in the Music folder repeatedly or randomly 1 Select Repeat using butto...

Страница 21: ...elect EQ mode appropriate for each music genre User EQ Select the EQ set by the user Adjust EQ in the User EQ menu SRS You can listen to the music in surround sound effect Adjust SRS level in the WOW...

Страница 22: ...ng button and then press OK button 2 Adjust the EQ level using button and then press OK button Select the EQ Frequency Select the low frequency to adjust low tone and select the high frequency to adju...

Страница 23: ...Japanese are supported Setting WOW You can enjoy dynamic and rich sound with the improved 3D surround sound effect 1 Select WOW using button and then press OK button 2 Adjust the WOW items using butt...

Страница 24: ...tem using button and then press OK button File Name Show the file name only even if the file had tag information ID3 Tag Show ID3 Tag when the file has tag information Show the file name when there is...

Страница 25: ...Rewinding during Playback Finding the desired scene during playback To fast forward or rewind during playback press and hold or button When you let go of the button normal play will resume Video Mode...

Страница 26: ...ile will be played Note The skip function starts from the video file currently being played Finding Files with Navigation Mode You can easily find any desired file and play it in Navigation mode 1 Pre...

Страница 27: ...s button in PRESET mode Scan and save all channels that can be received Note Earphone works as an antenna Wear the earphone before scanning radio channels You can set or release the PRESET mode using...

Страница 28: ...ps when it is found Press button after a channel is found The scanned channel will be saved Note You can set or release the PRESET mode using button You can set the frequency scan range in the Radio i...

Страница 29: ...the screen 2 Press A B REC button shortly to stop recording The recorded file will be saved in My Recordings folder REC disappears from the screen Note File name of the saved radio channel will be cre...

Страница 30: ...r Navigation mode The list of saved channels appears 2 Select the desired channel using button and then press OK button The channel will be changed Note You can set or release the PRESET mode using bu...

Страница 31: ...to the Radio Setting Mode 1 Select Setting using button from Main Menu screen and then press OK button 2 Select Radio using button and then press OK button Setting the Sound Select the sound mode Ste...

Страница 32: ...can set the region or country for FM radio frequency channel receiving 1 Select FM Band using button and then press OK button 2 Select the desired country or region using button and then press OK but...

Страница 33: ...ct Seek Step using button and then press OK button 2 Select the desired scan range 50KHz or 100KHz using button and then press OK button Running the Auto Preset You can find and save channels automati...

Страница 34: ...e radio reception sensitivity 1 Select Reception using button and then press OK button 2 Select the Reception sensitivity Normal Good Best using button and then press OK button Note The noise may incr...

Страница 35: ...nd then press OK button The Record mode appears Note To record voice set Input to Voice from the Record Setting menu To record an external audio device set Input to Line in Screen Information Voice Re...

Страница 36: ...recording time is displayed 3 To end recording press button The recording ends and the recorded file will be saved in the My Recordings folder Recording an External Audio Device Direct Encoding Confir...

Страница 37: ...rding is not possible For external audio device encoding the 24PIN USB Multi Cable comes with the player must be used Be sure to set the external audio device s volume on an appropriate level before e...

Страница 38: ...ayback or pause to enter Navigation mode The list of recorded files saved in the My Recordings folder will be displayed 2 Select the file you want to play using button and then press OK button The fil...

Страница 39: ...elect the desired input source Voice or Line in using button and then press OK button Voice Set to record voice through a built in microphone Line in Set to record output sound from an external audio...

Страница 40: ...from 48KBPS 56KBPS 64KBPS 80KBPS 96KBPS 112KBPS 128KBPS 160KBPS 192KBPS 224KBPS and 256KBPS Note The higher the beat rate is set the better the recording quality However the size of recorded file wil...

Страница 41: ...xt file Viewing Photo Text File Select Viewer using button in Main Menu screen and then press OK button The files saved will be displayed Screen Information Note Photo or text files will be displayed...

Страница 42: ...randomly created folder the file cannot be displayed in Navigation mode Files in JPEG and BMP format can be displayed Using Button to Display Text Files Up Down scroll page by page Up Down scroll line...

Страница 43: ...desired file using button and then press OK button Photo or text file will be displayed Note The list of files saved in the Viewer folder appears Text files will not be displayed in the Slideshow mod...

Страница 44: ...ss OK button When Slide Speed is set photo files will change according to the set time interval Slide Speed Select one from NONE 1 SEC 3 SEC 5 SEC 10 SEC 15 SEC Note About the Slideshow display of pho...

Страница 45: ...view from the page of previously viewed text file when the Viewer is run after the power is on 1 Select Book Mark using button and then press OK button 2 Select On or Off using button and then press O...

Страница 46: ...Main Menu screen and then press OK button The game screen appears Press the button to stop the game Excellion Game Firing a Missile Dropping a Bomb Opening the Menu Ending the Game Moving Up Down Lef...

Страница 47: ...g Button in Brower Mode Select file or folder easily with Browser mode Selecting file or folder Entering the Folder Opening POP UP Menu Moving to Upper Folder Closing POP UP Menu OK Playing the File o...

Страница 48: ...You can delete files in Navigation mode 1 Select the file to delete using button from the file list and then press button The popup menu appears 2 Select Delete using button and then press OK button...

Страница 49: ...music file playback The items are Repeat EQ User EQ Lyrics WOW and File Info See page 20 Setting Radio Set items related to radio The items are Sound FM Band Seek Step Auto Preset and Reception See p...

Страница 50: ...can set menu language and ID3 tag language 1 Select Language using button and then press OK button Note Changing the Language setting requires restarting the system to take its effect So we recommand...

Страница 51: ...ages support ID3 tag Among the 55 languages English Korean Japanese Simplified Chinese Traditional Chinese German French Spanish and Russian support both ID3 tag and menu language Setting Scroll Speed...

Страница 52: ...ime using button and then press OK button 2 Adjust the backlight time using button and then press OK button BackLight Time You can select one from 5 SEC 10 SEC 15 SEC 20 SEC and ALWAYS Select ALWAYS t...

Страница 53: ...ing button and then press OK button 2 Adjust the desired brightness using button and then press OK button The brightness adjustment level is from 1 to 7 Note The brighter the adjustment is the more th...

Страница 54: ...ect NONE if you do not want an automatic turn off Setting Auto Power Off You can set to turn off the power automatically when there is no button operation for a certain period of time 1 Select Auto Po...

Страница 55: ...en press OK button 2 Select On or Off using button and then press OK button On Select Music to play the file that was played last when entering the play screen Off The Main Menu screen appears when th...

Страница 56: ...using button and then press OK button Current time and date are automatically set Note City names displayed by the longitude are as follows London Lisbon Madrid Paris Amsterdam Berlin Stockholm Rome...

Страница 57: ...0 must be installed in Windows XP environment Connecting to MTP Media Transfer Protocol Used to connect to your PC with Window Media Player To connect to MTP mode Windows Media Player 10 or later must...

Страница 58: ...n developed by Microsoft and its official name is Windows Media DRM 10 for Portable Devices Portable devices with MTP Media Transfer Protocol such as MPIO SOLID can download and play music files from...

Страница 59: ...using button and then press OK button Information about the product appears 2 To exit press OK or MENU button When downloading files by running Windows Media Player after selecting MSC Mode in the USB...

Страница 60: ...d EQ User EQ Lyrics WOW Sound Seek Step Auto Preset Input Quality Auto Preset File Info Reception FM Band 60 Menu Structure The menu structure is subject to change in the future with firmware upgrades...

Страница 61: ...Game Viewer System Slide Speed Language Scroll Speed BackLight Time Bright Sleep Auto Power Off Resume Beep Time Date USB Mode Information Browser Setting Book Mark 61 Usage...

Страница 62: ...k PowerBook PowerBook G4 Memory 64MB or more Hard disk space 20MB or more Supported Operating Systems Mac OS version 9 2 or later Caution Connection using USB Hubs or extension cables is not guarantee...

Страница 63: ...rt the Installation CD into the CD ROM Drive The installation will auto start and the installation will begin as shown in right If the installation doesn t auto start double click the CD ROM icon in W...

Страница 64: ...ton All the utility programs will be installed The user can select the programs needed to install But the following items must be installed Windows 98 Device Driver For Windows 98 98SE user s only MPI...

Страница 65: ...ection 5 Click the Install button to install the selected utilities in order 6 Click the Finish button to finish the installation Check the MPIO Utility icon on the desktop to confirm installation Cli...

Страница 66: ...Looking for a New Device The installation screen may not appear Check the Device Manager to confirm the installation Confirming USB Installation Windows98 ME Control Panel Systems Device Manager Hard...

Страница 67: ...dd New Hardware Wizard window appears on the screen as shown in right click the Next button 2 Check Search for the driver for your device click the Next button Installing USB Driver Manually Please re...

Страница 68: ...n the screen Then click the Finish button Go to the following destination to confirm that the installation was completed successfully Windows98 ME Control Panel Systems Device Manager Hard Disk Contro...

Страница 69: ...e 24PIN USB Multi Cable 3 The connection screen appears when the connection is correct Select the steps as shown in the following figures and then click OK button 4 Select the synchronization method a...

Страница 70: ...can be used in the same way to store data Copy Paste Select the data to store click on right mouse button Select Copy and then Paste in the Removable Disk drive Note The actual available memory capac...

Страница 71: ...he data you want to delete click the mouse to select Delete The selected file or folder is deleted Note If the 24PIN USB Multi Cable is disconnected while a file is being uploaded or downloaded the de...

Страница 72: ...e cursor on Stop a Hardware Device icon in the system tray and click right mouse button 2 Select Stop USB Mass Storage Device 3 Select USB Mass Storage Device from the list of hardware and click the S...

Страница 73: ...ntel Pentium4 1 GHz or higher HDD 20 MB or more S W Requirements Microsoft DirectX 9 0 or later required Microsoft Media Player 9 0 Unified Codec Pack K Lite Codec Pack http www k litecodecpack com OS...

Страница 74: ...elect the PMP Transcoder included in the installation CD and run it 2 Click the Next button 3 Use the Browse button to select the target installation directory and then click the Next button Installin...

Страница 75: ...75 Connection 4 Click the Next button 5 When the installation is complete click the Finish button The Transcoder icon will appear on the desktop Click Click...

Страница 76: ...put file besides the changed extension MP4 3 Press the button to save the output file as a different file name and then select the file name to be created 4 Press the button to transcode the whole Inp...

Страница 77: ...tart position The mark will appear at the start position 5 Move the seek bar to the intended ending position 6 Press the End Pos button to set the end position The mark will appear at the end position...

Страница 78: ...e Transcode button to start conversion and the Transcoding Complete will appear when transcoding is finished Note Depending on the format of the input file transcoding may not be supported Using the T...

Страница 79: ...scode select the file to cancel and click right mouse button and a pop up window will appear Choose Delete Selected List to deselect selected files or choose Delete All List to cancel all files 3 Clic...

Страница 80: ...ed file list and double click or click right mouse button and select View File Information to view the file information The file information dialogue box will disappear when the ESC key is pressed or...

Страница 81: ...gs 2 Select the tab to setup and choose the options 3 Select the Path tab Designated the directory for the converted files to be saved in Video Quality Select the quality of the video by choosing desi...

Страница 82: ...ormat is selected as a MP4 3 Click the button to play the file 4 Fast forward or rewind by clicking the or button 5 Click the button to pause the video and click the button to stop the video 6 Click t...

Страница 83: ...PIO Utility 1 Turn on the device and connect the device to the computer with the 24PIN USB Multi Cable 2 Double click MPIO Utility icon in your desktop 3 Click the Format Config button 4 Click the OK...

Страница 84: ...button Format Config Default Setting Restoration is complete You may separate the device from the PC Note The captured screens of MPIO Utility may vary for the user s PC environment MPIO Utility does...

Страница 85: ...must be formatted in FAT32 To use the device after it has been formatted the default settings must be restored using MPIO Utility See page 86 Storing Default Settings for more information The capture...

Страница 86: ...ulti Cable 2 Double click MPIO Utility icon in your desktop 3 Click the Setup Config button 4 Click the OK button 5 Click the OK button after the Safely Remove Hardware message appears as shown 6 Afte...

Страница 87: ...e click MPIO Utility icon in your desktop 4 Click the F W Upgrade button 5 Click the OK button 6 Select the downloaded Upgrade HD400 dwu file in the Browse window and then click the Open button Note T...

Страница 88: ...unplugged from your PC When the firmware upgrade is complete HD400 will be turned OFF automatically Note Disconnecting the 24PIN USB Multi Cable while upgrading firmware may cause fatal damage to the...

Страница 89: ...raded when the device is unplugged from your PC When the firmware upgrade is complete HD400 will be turned OFF automatically Note To upgrade the firmware there must be 10MB of free memory space in HD4...

Страница 90: ...r more information please refer to the user s manual in the CD Cannot view images Check to see if there are any image files saved in the Viewer folder Only image files in JPEG and BMP format can be vi...

Страница 91: ...nvertible Format mpeg4 WMA AVI DivX by PC Converting Viewer Photo JPEG BMP Text TXT FM Radio Frequency Band 76 108MHz S N ratio 50dB FM Recording MP3 Languages Menu Languages English Korean Japanese C...

Страница 92: ......

Отзывы: