- 8 -
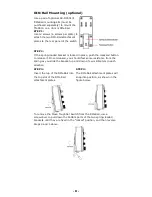
DIN-Rail Mounting (optional)
Use a pair of optional DK-DC50131
DIN-Rail mounting kits (must be
purchased separately) to mount the
TN-5510 on a 35 mm DIN-Rail.
STEP 1:
Use 12 screws (6 screws per plate) to
attach the two DIN-Rail attachment
plates to the rear panel of the switch
STEP 2:
If the spring-loaded bracket is locked in place, push the recessed button
to release it. Once released, you should feel some resistance from the
spring as you slide the bracket up and down a few millimeters in each
direction.
STEP 3:
Insert the top of the DIN-Rail into
the top slot of the DIN-Rail
attachment plates.
STEP 4:
The DIN-Rail attachment plates will
snap into position, as shown in the
figure below.
To remove the Moxa ToughNet Switch from the DIN-Rail, use a
screwdriver to pull down the bottom parts of the two spring-loaded
brackets until they are fixed in the “locked” position, and then reverse
Steps 3 and 4 above.


