Installation
The VAP2500 enables you to transmit multiple standard- and high-definition video streams throughout your home
wirelessly. You can enjoy a full range of video services and applications without having to run wires, lay cables,
or drill holes. The VAP2500 uses one-button, Wi-Fi Protected Setup (WPS) technology to ensure easy, reliable
installation.
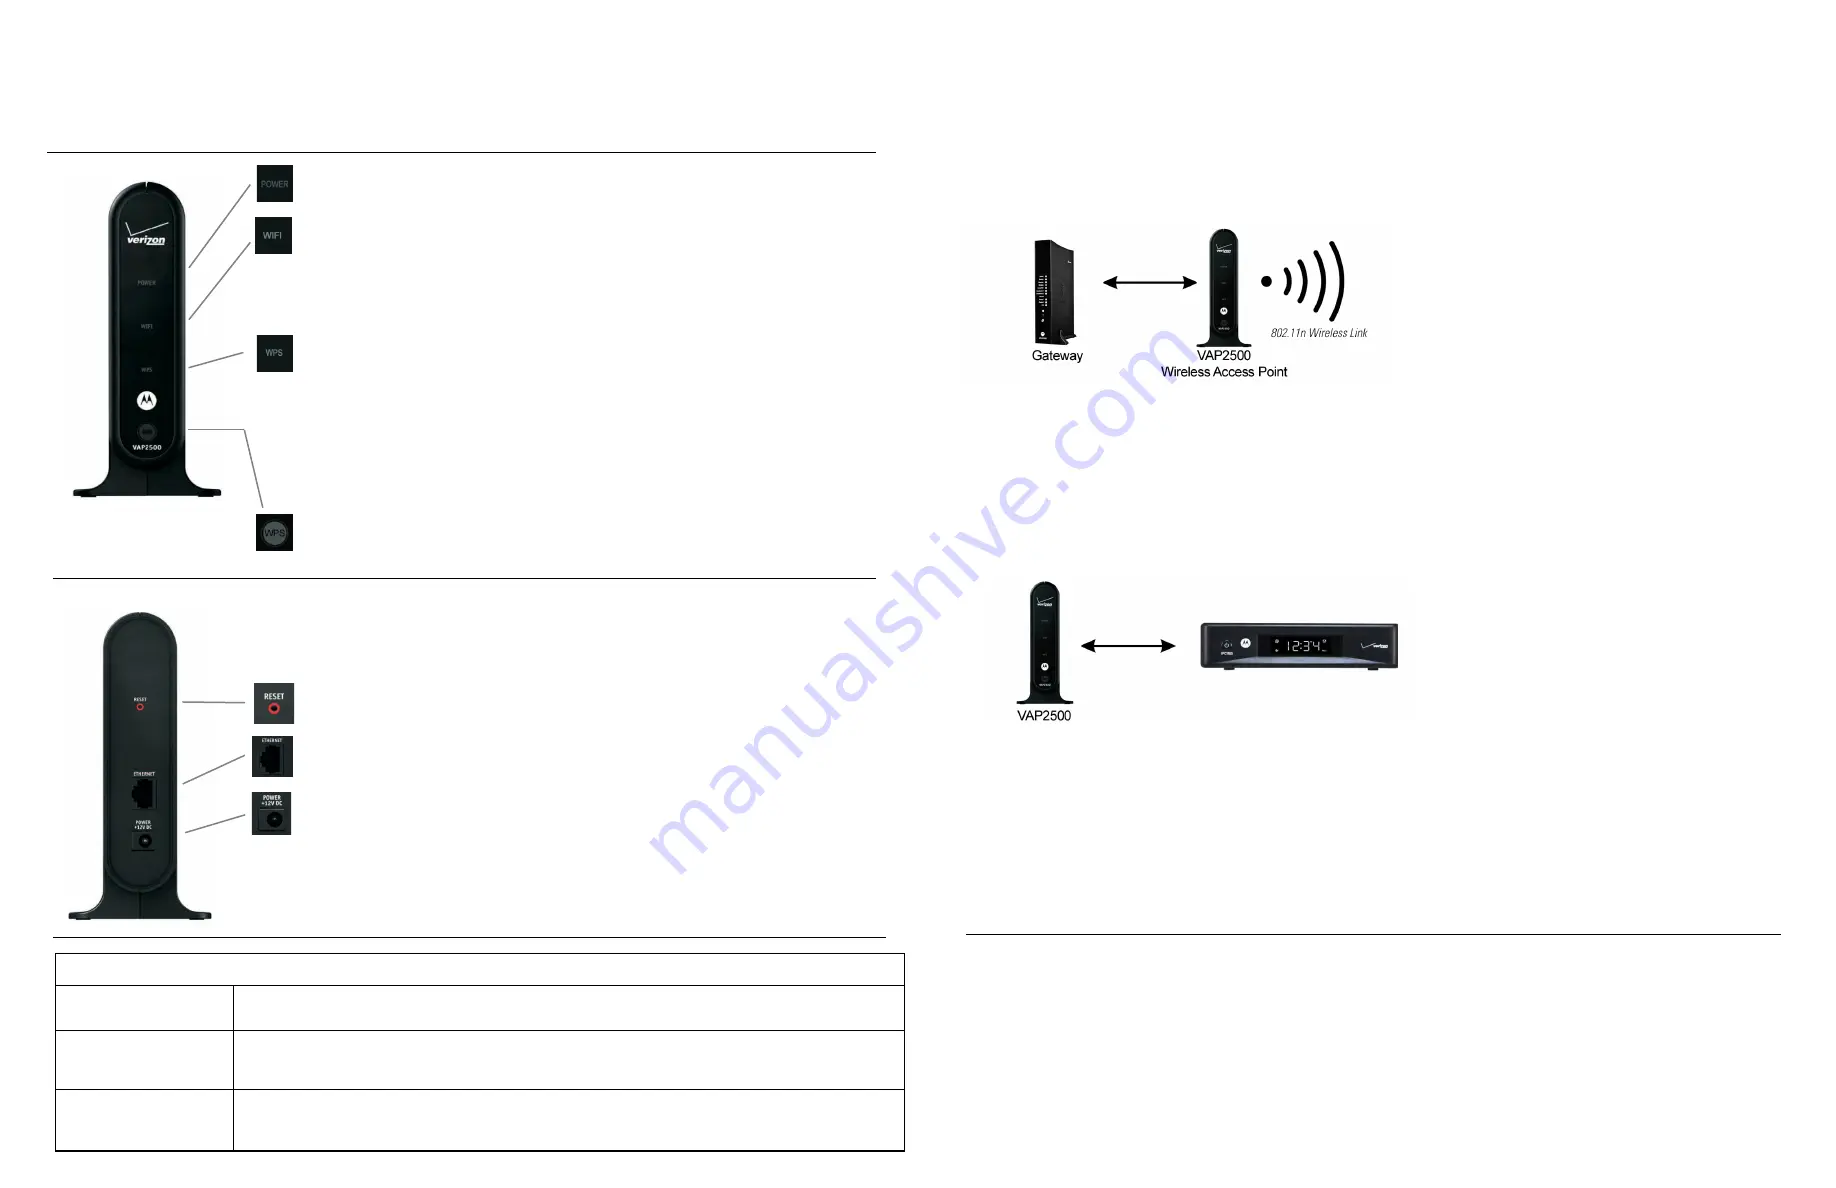
Front Panel
Power
Green = The VAP2500 is on.
Red/orange = Device has failed the power on self test.
Off = The VAP2500 disconnected from its power source.
WiFi
Red = Bandwidth is available for less than one device.
Green = Bandwidth is available for more than one device.
Fast flashing green = No client connected with an access point (access point
only).
Amber = Bandwidth is available for only one device.
Off = No power or in POST.
WPS
Blinking Green = During WPS pairing (which has a two minute time out)
then both devices’ LEDs slow flash. If an access point has just finished
pairing with an client and a second WPS session is started with another
client, the access point will start its second slow flashing green after the
30 second time.
Solid Green = WPS pairing is successful; the LED will turn solid green
for 30 seconds and then turn off. If unsuccessful, the LED stays solid
green.
Off = WPS between access point and client was successful.
WPS
WPS button; invokes WPS processing when the button is pressed and
released.
Rear Panel
Reset Button
Resets the VAP2500 to its default settings.
Ethernet Port
Connects to the Ethernet-equipped Home Gateway.
Power
Connector
Provides power to the VAP2500.
Installing Additional FiOS clients
Repeat steps 2-5 above.
Troubleshooting
POWER LED is red-
orange
If any of the POST checks fail then the POWER LED will illuminate to give a red-orange color. If the
red-orange POWER LED is on, then the unit is broken and needs to be replaced.
Solid green WPS LED
WPS association has failed (LED remains solid green for more than 30 seconds). If WPS is
successful then the LED immediately turns solid green, stays solid green for 30 seconds, then
turns OFF. Repeat step #4 above.
Fast flashing WIFI LED
Failure to connect with AP. Call for technical support.
Installing Your VAP2500
Follow the instructions below to install your Wireless Access Point and Client.
Step 1: Connect the Wireless Access Point
1. Connect one VAP2500 unit to your Gateway using the provided six-foot black Ethernet cable with yellow tips cable.
Before you connect the VAP2500, ensure the Gateway is powered on.
2. Connect the power adapter to the VAP2500 and plug the adapter into a wall outlet. You’ll see the unit’s Power LED
light goes on, indicating the unit is powered
Step 2: Connect the Wireless Client
1. Connect one VAP2500 unit to your set-top using the provided six-foot black Ethernet cable with yellow tips cable.
Before you connect the VAP2500, ensure the set-top is powered on.
2. Connect the power adapter to the VAP2500 and plug the adapter into a wall outlet. You’ll see the unit’s Power LED
light goes on, indicating the unit is powered
.
3. Wait 60 seconds after powering the client, and then press and hold the WPS button on the front panel for two
seconds. You will then have two minutes to activate the WPS on the access point.
4. Press the WPS button on the access point. If pairing is successful the WPS will light solid green for 30 seconds and
then turn off.
5. Turn on TV at the client and view video. See Troubleshooting if this fails.


