


List of Figures
xi
List of Figures
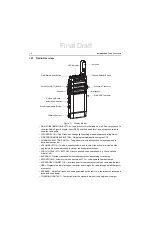
Figure 1-1. Display Model ...................................................................................................................... 1-2
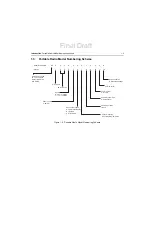
Figure 1-2. Portable Radio Model Numbering Scheme.......................................................................... 1-3
Figure 2-1. Portable Programming Cable with TTR (PMKN4128_)........................................................ 2-3
Figure 2-2. Micro USB Programming Cable (CB000262A01) ................................................................ 2-4
Figure 2-3. Audio Test Cable (CB000233A01) ....................................................................................... 2-5
Figure 3-1. Power-Up Screen Icon ......................................................................................................... 3-2
Figure 3-2. Channel Profile Screen Icon ................................................................................................ 3-3
Figure 4-1. CPS Programming Setup..................................................................................................... 4-1
Figure 4-2. Connecting RF Antenna Adaptor To Radio RF Input/Output Port........................................ 4-2
Figure 4-3. RF Plug ................................................................................................................................ 4-2
Figure 4-4. Radio Tuning Equipment Setup ........................................................................................... 4-3
Figure 5-1. Holster Removal .................................................................................................................. 5-6
Figure 5-2. External Antenna Removal .................................................................................................. 5-6
Figure 5-3. Screw Plug Removal............................................................................................................ 5-7
Figure 5-4. RF Plug Removal ................................................................................................................. 5-7
Figure 5-5. Unlock The Battery Door...................................................................................................... 5-8
Figure 5-6. Battery Door Removal.......................................................................................................... 5-8
Figure 5-7. Battery Removal .................................................................................................................. 5-9
Figure 5-8. Screw Removal .................................................................................................................... 5-9
Figure 5-9. Back Housing Removal...................................................................................................... 5-10
Figure 5-10. Back Housing Removal...................................................................................................... 5-10
Figure 5-11. PCB Catch Disassembly .................................................................................................... 5-11
Figure 5-12. Uplifting Of The Main PCB ................................................................................................. 5-11
Figure 5-13. Audio Jack, Speaker, Micro USB, Microphone Flex, and Display Flex Disassembly......... 5-12
Figure 5-14. Internal Frame Screws Disassembly.................................................................................. 5-13
Figure 5-15. Internal Frame Disassembly .............................................................................................. 5-13
Figure 5-16. Speaker Disassembly ........................................................................................................ 5-14
Figure 5-17. Display Module Disassembly ............................................................................................. 5-14
Figure 5-18. Internal Antenna Disassembly ........................................................................................... 5-15
Figure 5-19. Dust Cover Head Removal ................................................................................................ 5-15
Figure 5-20. Dust Cover Removal.......................................................................................................... 5-16
Figure 5-21. Dust Cover Tail Insertion .................................................................................................... 5-16
Figure 5-22. Dust Cover Tail Full Insertion Into Housing ........................................................................ 5-17
Figure 5-23. Internal Antenna Reassembly............................................................................................ 5-17
Figure 5-24. Display Module Reassembly.............................................................................................. 5-18
Figure 5-25. Speaker Reassembly ......................................................................................................... 5-18
Figure 5-26. Internal Frame Reassembly ............................................................................................... 5-19
Figure 5-27. Internal Frame Screws Reassembly .................................................................................. 5-19
Figure 5-28. Audio Jack, Speaker, Micro USB, Microphone Flex, and Display Flex Reassembly ......... 5-20
Figure 5-29. Main PCB Reassembly ...................................................................................................... 5-21
Figure 5-30. Back Housing Reassembly ................................................................................................ 5-21
Figure 5-31. Screw Reassembly ............................................................................................................ 5-22
Figure 5-32. Battery Reassembly ........................................................................................................... 5-22
Figure 5-33. Lock The Battery Door ....................................................................................................... 5-23
Figure 5-34. Attaching One RF Plug And Two Screw Plugs .................................................................. 5-23
Figure 5-35. External Antenna Reassembly........................................................................................... 5-24
Figure 5-36. External Antenna Reassembly........................................................................................... 5-24
Figure 5-37. SL1600Exploded View ....................................................................................................... 5-25
Final Draft
Содержание SL1M
Страница 1: ...tTitle Page SL1M Portable Radio Basic Service Manual MN000916A01 AA tttt Final Draft ...
Страница 2: ...Final Draft ...
Страница 4: ...Notes Final Draft ...
Страница 6: ...vi Notes Final Draft ...
Страница 10: ...x Table of Contents Notes Final Draft ...
Страница 12: ...xii List of Figures Notes Final Draft ...
Страница 14: ...xiv List of Tables Notes Final Draft ...
Страница 16: ...xvi List of Tables Notes Final Draft ...
Страница 36: ...Notes 2 6 Test Equipment and Service Aids Audio Test Cable Final Draft ...
Страница 46: ...Notes 3 10 Transceiver Performance Testing Test Mode Final Draft ...
Страница 50: ...Notes 4 4 Radio Programming and Tuning Radio Tuning Setup Final Draft ...
Страница 78: ...Notes 5 28 Disassembly And Reassembly Procedures Torque Chart Final Draft ...
Страница 82: ...Notes 6 4 Basic Troubleshooting Operational Error Codes Final Draft ...
Страница 89: ...Final Draft ...