


5-20
Disassembly And Reassembly Procedures
: Radio Reassembly – Detailed
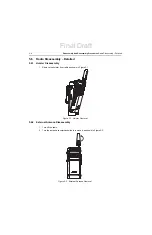
5.7.6
Main PCB Reassembly
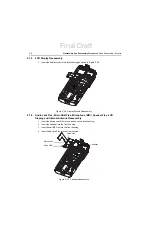
1. Attach the Audio Jack, Speaker, Micro USB, and Microphone Flex to the connector located at
the bottom side of the main PCB as shown in Figure 5-28.
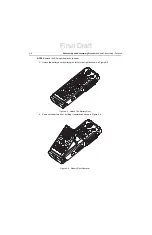
2. Attach the Display Flex to the connector located at the bottom of the main PCB.
Figure 5-28. Audio Jack, Speaker, Micro USB, Microphone Flex, and Display Flex Reassembly
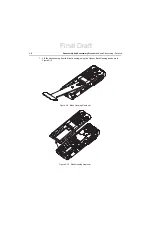
3. Insert the main PCB onto the internal frame.
4. Attach the Top Control Flex to the connector located at the upper side of the main PCB.
5. Attach the PTT Flex to the connector located at upper side of the main PCB.
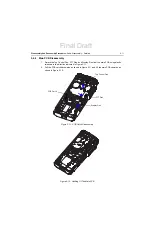
6. Attach the Display Flex to the connector located at the LCD display module.
Only press on Poron Pad on Top Control Flex, while attaching
the flex to the connector.
Audio Jack, Speaker,
Micro USB and Microphone
Flex
Display Flex
!
C a u t i o n
Final Draft
Содержание SL1M
Страница 1: ...tTitle Page SL1M Portable Radio Basic Service Manual MN000916A01 AA tttt Final Draft ...
Страница 2: ...Final Draft ...
Страница 4: ...Notes Final Draft ...
Страница 6: ...vi Notes Final Draft ...
Страница 10: ...x Table of Contents Notes Final Draft ...
Страница 12: ...xii List of Figures Notes Final Draft ...
Страница 14: ...xiv List of Tables Notes Final Draft ...
Страница 16: ...xvi List of Tables Notes Final Draft ...
Страница 36: ...Notes 2 6 Test Equipment and Service Aids Audio Test Cable Final Draft ...
Страница 46: ...Notes 3 10 Transceiver Performance Testing Test Mode Final Draft ...
Страница 50: ...Notes 4 4 Radio Programming and Tuning Radio Tuning Setup Final Draft ...
Страница 78: ...Notes 5 28 Disassembly And Reassembly Procedures Torque Chart Final Draft ...
Страница 82: ...Notes 6 4 Basic Troubleshooting Operational Error Codes Final Draft ...
Страница 89: ...Final Draft ...