background image

MVMS

 Management Server User Manual 

21 

5.1.3


Alarm Linkage Recording 

Go to Home

 Device Setting interface. Select the desired device to enable and set schedules.

Go  to  Home

Alarm  Center

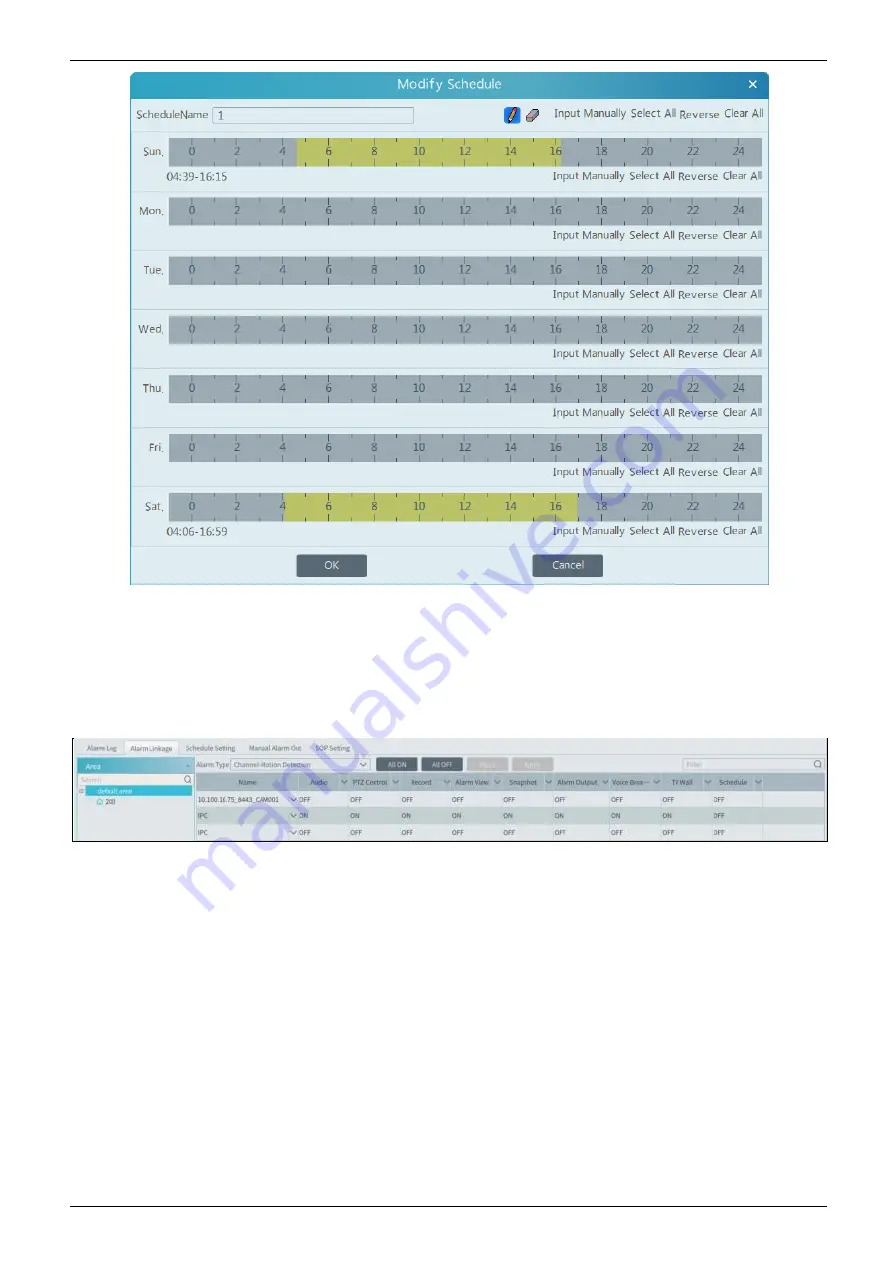
Alarm  Linkage  as  shown  below.  Select  alarm  type,  enable  record,  set  linakage  channel  and  set

schedules.

Click [Apply] to save the settings.

5.2


Record Playback 

In the main menu interface, click ―Record Playback

 to go to record playback interface. Record files saved on the HDD/ SD card of the 

devices and storage server can be played. 

There are two types of record playback: synchronous playback and asynchronous playback. 

Содержание MVMS

Страница 1: ...MVMS Management Server User Guide Please read this instruction guide carefully before using the product and keep it for further reference ...

Страница 2: ... wholly at your own risks Our company shall be irresponsible for abnormal operation privacy leakage or other damages resulting from cyber attack hacker attack virus inspection or other internet security risks however our company will provide timely technical support if necessary Surveillance laws vary from country to country Check all laws in your local region before using this product for surveil...

Страница 3: ...2 4 1 Live View 12 4 1 1 View Mode Setting 13 4 1 2 Monitoring Point View 13 4 1 3 Channel Group View 14 4 1 4 Plan View 15 4 2 View Control 16 4 3 Snapshot 17 4 4 Multi Screen View 17 4 5 Talkback 18 4 6 PTZ Control 18 4 7 Audio Broadcast 18 5 Record Playback 20 5 1 Record Configuration 20 5 1 1 Manual Recording 20 5 1 2 Schedule Recording 20 5 1 3 Alarm Linkage Recording 21 5 2 Record Playback 2...

Страница 4: ...ing Status Log 54 11 Local Configuration 55 11 1 Local Config 55 11 2 Overload Settings 55 11 3 Alarm View Settings 55 11 4 Network Configuration 56 11 5 Server Port Configuration 56 11 6 System Time Configuration 56 11 7 OSD Position Configuration 57 11 8 System Configuration 57 11 9 Audio Uploading 57 12 Intelligent Management 58 12 1 Face Surveillance 58 12 1 1 Object Library 58 12 1 2 Task Man...

Страница 5: ...t Server User Manual 13 4 Search 78 13 5 Parking Overstaying 79 13 6 Backlist Vehicle 79 14 Web Client 81 14 1 Operating Environment of Web Client 81 14 2 Start IE Client 81 15 Troubleshooting 83 16 Specifications 85 ...

Страница 6: ...yback and alarm preview Support corridor mode Support fisheye mode Support PTZ direction control and focus control support setting and calling preset and cruise Support listen two way talk and broadcast Support record search playback and downloading from device and control center Support record search and playback by time channel event and tag Support time slice playback Support record clip and ba...

Страница 7: ...on No Description 1 Mouse or keyboard port 9 Central bass orange 2 VGA port 10 Rear speaker black 3 DVI port 11 Optical SPIDF out port 4 HDMI port 12 Audio input light blue 5 LAN RJ 45 port LAN1 13 Front speaker Lime 6 USB3 0 ports 1 2 14 Microphone Pink 7 LAN RJ 45 port LAN2 15 LAN RJ 45 port LAN3 8 USB3 0 ports 3 4 16 LAN RJ 45 port LAN4 1 Mouse or keyboard port 9 Central bass orange 1 1 3 Inter...

Страница 8: ...e default username is admin the default password is 123456 Check Remember Password or Auto Login as needed Click Login If you forget the password please click Reset password Then a small window will appear You can reset the password by answering the pre defined questions If this is the first time for you to log in it is recommended to set the security questions answers ...

Страница 9: ...nt and Permission Alarm Center Operation and Maintenance Management Face Surveillance Face Greeting Line Crossing Counting etc Help Including User Manual Register license and About MVMS Functional area Menu Description Live View To view live images and to record snapshot and talk etc Record Playback To remotely play the local records or back up records E Map To manage and display maps hot spots et...

Страница 10: ...o manage vehicles in the parking lot Line Crossing Counting To monitor and analyze people vehicle flow in real time Operation and Maintenance Management To search export and maintain logs Local Configuration To set record path snapshot path system startup and maintenance overload and alarm view Functional Selection To select common functions displayed on the home page Other buttons Button Descript...

Страница 11: ...turers such as Hikvision Dahua PMS etc The default username of the standard device is admin and the default password of the standard device is 123456 Note The default media transfer server and storage server can be selected when adding devices Users can also create new media transfer server and storage server in advance see Add Media Transfer Server and Add Storage Server Area must be set up befor...

Страница 12: ...RL from its web client or the third party tools like ODM 3 1 3 Initiatively Report Select the Initiatively Report Tab to see the following interface Enter the device ID set in the DVR NVR or IP camera and choose the protocol If the DVR NVR is needed to add please go to Network Platform Access interface of the DVR NVR Check Enable enter the IP address and port default 2009 of the MVMS and then set ...

Страница 13: ...lick Delete to delete devices in bulk 3 3 Device Upgrade In the Add Edit or Delete Device interface check the devices you want to upgrade and then click Batch Upgrade for IPC to upgrade the firmware of IPC Note When multiple IPCs are upgraded simultaneously the selected IPCs must be the same series 3 4 Device Setting Go to Home Device Setting interface as shown below In this interface the paramete...

Страница 14: ... and click to add channels choose the selected channel and click to remove those channels Click to add all channels click to remove all selected channels You can also enter the key words to search the channels and then select them Click Ok to save the settings Select the added channel group and click to modify the channel click to delete the channel 3 7 Add Media Transfer Server Media transfer ser...

Страница 15: ...nd click OK to save the settings Click to modify the media transfer server click to delete the media transfer server 3 8 Add Storage Server Storage server is in charge of the storage of record information including the information of schedule record record based on motion alarm sensor alarm smart detection alarm like object removal detection line crossing detection etc responding to the search and...

Страница 16: ...e settings Select the Manually Add tab to go to the storage server adding interface Enter the server name IP address and port and click OK to save the settings After the storage server is added click to set record partition In the record partition setting interface select the disk and click OK to save the settings Click to modify the storage server click to delete the storage server ...

Страница 17: ... the current view mode 4 Enable disable broadcast 9 Image export 5 Manual alarm output 10 Choose the camera stream Channel stream main stream sub stream third stream and self adaptive stream can be optional When the third stream is selected the system will automatically switch to sub stream if the channel camera doesn t support the third stream Toolbar on the display window Button Description Butt...

Страница 18: ...ginal Size Full Screen screen display proportion please select it as needed 4 1 1 View Mode Setting Users can select the common display mode and self define the display mode through the buttons on the toolbar To customize the display mode Click on the toolbar Enter screen display name and select the display row and column Hold the left mouse button and drag on the screen and then click Merge to me...

Страница 19: ...ck to stop viewing Right click on the live view window and then select Close Channel to stop viewing Click on the toolbar of the live view interface to stop all live view 4 1 3 Channel Group View Start Channel Group View After the channel group is set successfully See Channel Group Setting go to live view interface as shown below ...

Страница 20: ... then click beside the channel group name to play all channels of the channel group in this window in sequence Stop Channel Group View Place the cursor on the auto switch window and then click to stop viewing Right click the auto switch window and then click Close Channel to stop viewing Click on the toolbar of the live view interface to stop all live view 4 1 4 Plan View In the live view interfac...

Страница 21: ...hannel Display Double click a window to view in single channel mode Double click the window again to recover the window Audio Broadcast Click to bring audio broadcast box as shown below The left device list shows the devices that support audio broadcast Check the device and click Add to add the desired broadcast device Click Start Broadcast and then all added device will start broadcast Select the...

Страница 22: ...the snapshot succeed The snapshot will be saved in the Mini MVMS Server by default A maximum of 100 snapshots can be saved If more than 100 pictures are captured some previous snapshots will be overwritten 4 4 Multi Screen View In the live view interface multi screen view can be realized by holding a tab and dragging it to other monitors graphics card should support multi screen output at the same...

Страница 23: ...re only allows enabling one device s talk at the same time the system will stop talking with the current device if a new talk is enabled 4 6 PTZ Control Click or right click to select PTZ Control to enter PTZ control interface The directions of PTZ zoom focus Iris preset track and cruise can be controlled through PTZ control panel 4 7 Audio Broadcast Click to pop up an Audio Broadcast interface as...

Страница 24: ...the left device and then click Add to add the device you want to broadcast Check the added camera on the right and then click Start Broadcast Click to delete the added device Choose multiple devices and then click Remove to delete them at a time ...

Страница 25: ... channel is recording the recording will stop when the viewing window is closed 5 1 2 Schedule Recording Go to Home Record Setting To set schedule recording select the channel stream type and schedule Then Click Apply to save the settings To set schedule Click the Schedule Setting tab to go to the following interface Click Add Enter the schedule name Set the schedule Click and then move the cursor...

Страница 26: ...e as shown below Select alarm type enable record set linakage channel and set schedules Click Apply to save the settings 5 2 Record Playback In the main menu interface click Record Playback to go to record playback interface Record files saved on the HDD SD card of the devices and storage server can be played There are two types of record playback synchronous playback and asynchronous playback ...

Страница 27: ...ar on Playback Window Button Description Button Description Stop viewing Zoom in Audio on off Zoom out Snapshot Fit to window Button Descriptions of Area 2 Button Description Screen display mode button 1 4 9 16 screen mode is optional Full screen Enable or disable OSD Close all window viewing Get record from network devices Get record from storage servers Rewind Low speed playback Stop ...

Страница 28: ...side to playback window for playing or double click a desired channel to play or click Search to search the record files and then click to play Playback record type includes manual recording motion detection recording schedule recording sensor recording object removal recording video exception recording intrusion recording and line crossing recording and so on In the timetable different color bars...

Страница 29: ...tion can be viewed at the same time When playing record file in synchronous mode or asynchronous mode clicking or will be useless unless all the playback windows are closed 5 2 3 Asynchronous Playback Asynchronous Playback when playing some channels record at the same time each channel is independent from the others and each channel s playback time is different Click to go to the asynchronous play...

Страница 30: ... Manual 25 Click to play the record Click button on the top right corner to play in full screen mode Double click the image to switch to slice search mode by day In the above interface click to switch to slice search mode by hour ...

Страница 31: ... by Event Go to Home By Event interface Select the desired monitoring point set the record source the start time and the end time and then check events Click Search The searched record data will be listed Click to play the record click to back up the record data 5 2 6 Playback by Tag Go to Home Record Playback interface Select a channel and put the cursor on the right center Then a tag icon will a...

Страница 32: ...n click Backup The backup progress will be seen during backing up the record Click to pause click to stop backing up the record click to clear the backup list Backup on device This function is applied to the added NVR devices Search the record from the HDD of the NVR in this interface and then insert a USB storage device into the USB port of the NVR and then click this button Then the recorded fil...

Страница 33: ... Server User Manual 28 Select the device Set the start time and the end time Choose events Click Search 5 4 Search Picture In this interface pictures stored on the SD card or storage server can be searched and viewed ...

Страница 34: ...ce Alarm Server interface to view the online status of the alarm server If it is not online please check its network connection Click to modify the added alarm server click to delete the added alarm server 6 2 Alarm Configuration Go to Home Device Setting interface Select the desired device to enable alarms refer to the user manual of the corresponding device for the detailed settings Go to Home A...

Страница 35: ...et alarm schedule Select the schedule of the desired device 7 24 or 5 24 is the default schedule Other schedules need to be set in advance Click the Schedule Setting tab to set See Schedule Recording To set schedule for details Manual Alarm Out Click Manual Alarm Out tab to go to the following interface Select the camera and then click Trigger Alarm Out to manually trigger the alarm out of the cam...

Страница 36: ...ce Management Add Edit or Delete Device Encoding Device interface Then click Select SOP to select the SOP and encoding devices Select the SOP Then check the desired device and click to select it Finally click OK to save the settings After that you can choose the corresponding SOP action when you handle the alarm of the camera 6 4 Alarm View Having set the alarm preview linkage the alarm view windo...

Страница 37: ...o expand the alarm list as shown above Hover the mouse over the top of the alarm list and then a bidirectional arrow will appear Drag the alarm list up or down to zoom in or out the alarm list Click or to play the record or captured images click to delete alarm information ...

Страница 38: ...ement Server User Manual 33 Click to play the record click to open the snapshot search window as shown below 6 5 Alarm Log Alarm logs can be searched and exported by going to Home Alarm Center Alarm Log interface ...

Страница 39: ...p Enter E map name select parent e map and map type Then click OK to save the settings 7 1 2 Add Hotspot The hotspots include monitoring points and sensors Drag a hotspot to the corresponding area on the map as shown below Click Modify Map to change map name and parent map Select Delete Map to delete the added map 7 1 3 E Map Monitoring Go to Home E Map Monitoring interface Select a window on the ...

Страница 40: ...MVMS Management Server User Manual 35 Alarm view if you select Yes the monitoring video will automatically pop up on the right window when an alarm is triggered ...

Страница 41: ...ransfer server The decoding output is a standard video signal The decoder is necessary for decoding videos on the TV wall Go to Home Add Edit or Delete Device Decoder interface The setting steps of adding decoders are the same as adding encoding device setup see Add Encoding Device for details 8 2 1 Create and Connect Decoder The decoder which needs to be connected to the platform must be the mast...

Страница 42: ... TV wall See Decoder Bind for details 8 3 TV Wall Management Go to Home TV Wall Management TV Wall Setting 8 3 1 TV Wall Settings Create TV Wall Go to Home TV Wall Management Edit TV Wall Select a TV wall server and then click to create a TV wall Initializing Double click the created TV wall to prompt a TV wall window Click Initialize to create TV wall layout ...

Страница 43: ...hown Click it to merger these small windows Splitting select the merged window and click Split to restore the window to the previous status The online decoder displayed in the decoder output list is the binding decoder of this TV wall Drag the outputs to windows on the right in sequence and then click Save to save the settings ...

Страница 44: ...the new name and then click OK To delete TV wall Click behind the TV wall name Decoder Bind Go to Home TV Wall Management TV Wall System Setting interface as shown below In this interface decoder bind can be set up Decoder bind configuration modify the binding state between decoder and TV wall ...

Страница 45: ... decoder management interface as shown above The online status of the decoder indicates that the decoder is successfully bound with TV wall Go to TV Wall Setting interface as shown below Drag the outputs of the decoder to the window on the right and save them to complete output bind ...

Страница 46: ...Plan Go to Home TV Wall Management TV Wall View TV Wall Plan Click beside the TV wall name to create the TV wall plan name Configure Plan Double click the plan name to show the plan Drag the monitoring points to the corresponding window respectively to decode image ...

Страница 47: ...n a window to open a small window on it Click Disable PIP to stop opening window The small window can be dragged to anywhere on the big window 3 Click Hide ID to hide the window number click Display ID to display the window number 4 Click Save to save the current plan 5 Click Save as to save it as another plan Double click a window to play the video ...

Страница 48: ...t menu again to restore to the previous status 3 Save as Alarm Window click it to save the current window as an alarm window The alarm linkage image will be displayed in this window Go to Home Alarm Center Alarm Linkage or Home Alarm System Alarm Linkage interface Select TV wall linkage item to set alarm linkage 4 Set as Playback Window when decoding images click this menu to play the records of t...

Страница 49: ...ng click it to stop decoding the current image 7 View Decoder view the information of the decoder 8 Clear TV Wall click it to clear the decoding configuration of the current output Screen Merging or Splitting Drag the mouse to select multi window and then click Merge to merge these windows Select the merged window and click Split to restore the window to its previous status Auto Switch Group 1 Cre...

Страница 50: ...anagement Server User Manual 45 Select Auto Switch Window to select the window group Click Monitoring Point to select the auto switch channel group Enter auto switch name and dwell time 2 Execute auto switch ...

Страница 51: ...ps will not be executed at the same time Auto switch plan 1 Create auto switch plan Click behind the TV wall plan name to set the auto switch Click Join in to select the plan Then set dwell time and click OK 2 Start stop auto switch Click behind the TV wall name to start auto switch plan Click the Stop button to stop the auto switch 3 Modify auto switch plan Click again to modify the auto switch p...

Страница 52: ...k to get records from device or storage server and then click OK to search records or drag the cameras or channels to a window to search and play the records Of course the specified time and event types can be set to search the specified records Playing control During playback the record can be controlled by the above buttons Right click menu ...

Страница 53: ...onal 5 Playback stream type main stream or sub stream is selectable 6 Stop decoding 7 View decoder information 8 Clear TV wall The following picture is an example of TV Wall 8 3 5 Task Setting of TV Wall Go to Home TV Wall Management Task Setting Click behind the TV wall name Select plan name enter task name set run time and enable plan task Click to start the task Click the Stop button to stop th...

Страница 54: ...wall name and then click OK to confirm the deletion 8 3 6 TV Wall System Configuration Go to Home TV Wall Management TV Wall System Setting interface as shown below In this interface the channel number can be set up Channel number configuration set the channel number and make the channel convenient to be controlled by the network keyboard controller Users can export these channel number in this in...

Страница 55: ...MVMS Management Server User Manual 50 ...

Страница 56: ...yption to select the questions and set the answers It is very important to reset the password if you forget your password Click Add to prompt an adding user window as shown below Enter user name and password Then select permission group it must be set in advance Binding MAC address or remark can be filled in as needed After that click OK to save Click to modify the added user click to delete the a...

Страница 57: ...Server User Manual 52 Enter permission group name Select system permission operation permission area permission and TV wall permission as needed Click to modify the permission group click to delete the permission group ...

Страница 58: ...nfiguration Go to Home Operation and Maintenance Management Click Backup and Restore Configuration to go to the following interface You can import the former system configuration files to the new version Click Backup System Configuration in the last version to backup the system configuration files Then click Restore System Configuration in the new version to restore the system configuration 10 3 V...

Страница 59: ...us Log Go to Home Operation and Maintenance Management Status Log interface In this interface record status online or offline status of servers and monitor client can be viewed Set the start time and the end time and then click Search to search status logs ...

Страница 60: ...w the DVR NVR name and the channel name If disabled only the channel name is shown Verify the password before exiting the program if enabled you shall enter the password before exiting the program In this interface you also can select the resource tree sorting rules video configuration rules language and upload the various alarm audio files You can click Synchronize platform time to synchronize th...

Страница 61: ...each server service as needed The port of each server also can be changed 11 5 Server Port Configuration Click Home Local Configuration Server Port Config to go to the following interface In this interface you can set the ports of authentication server config server media transfer server alarm server TV wall server intelligent analysis server and so on The service of all servers is enabled by defa...

Страница 62: ...rface In this interface you can enable Alarm preview using third stream or Do not display the alarm without schedule Enable and set the same alarm reporting interval and its linked alarm type Choose Synchronize devices and Synchronize Time Zone and then click Synchronize Platform Time to synchronize the device times with the time of the platform 11 9 Audio Uploading Go to Home Local Configuration ...

Страница 63: ...nd then click Refresh to quickly search the server in the same local network Click the Manually Add tab to manually add the IP address and port of the server 12 1 Face Surveillance If it is the first use of face surveillance function please configure it in the following order 12 1 1 Object Library Create and edit object library by going to Home Object Library Create Object Library Right click the ...

Страница 64: ... then you can add or delete devices If adding a device all targets in this library will be copied to this device If deleting the added device all targets of this library will be cleared from this device Click Copy to to copy the current library A and its targets to another library B and create library B If Copy to face recognition NVR IPC terminal is selected the current library A and its targets ...

Страница 65: ...s in the folder and its subfolders will be imported Current Folder After clicking Import from Folder and choosing Current Folder choose a folder including multiple subfolders and pictures Then pictures in the folder will be imported but pictures in the subfolders will not be imported Modify or delete targets Click to modify the information of the target Click to delete the target Click Custom to c...

Страница 66: ...face capture types face capture by IPC face match by IPC Face capture by IPC if the IPC is a face detection IPC please select it It is selected by default Face match by IPC if the IPC is a face recognition IPC please select it Set face match type Face Match by IPC select the IPC click and then double click the library that links the face database of IPC Make sure this IPC supports face match funct...

Страница 67: ...le b when the captured face picture is unsuccessfully matched this failure result will be pushed to the alarm service and the picture will be shown in the Real time View interface of Face Surveillance module too If Unmatched is enabled a when the captured face picture is successfully matched this result will not be pushed to the alarm service b when the captured face picture is unsuccessfully matc...

Страница 68: ...ibrary on the left and then fill out the information of this target Click OK to add Put the cursor on the captured picture and then click to quickly search images by this picture Put the cursor on the captured picture and then click to quickly download the captured picture The right panel of the real time view interface is face match result area ...

Страница 69: ...e IPC and picture source Select the captured match pictures from intelligent server or face recognition NVR Set the start and end time and then click Search to search the face pictures Put the cursor on the captured picture and then some shortcut buttons will be displayed Click to add the capture picture to the library Select the library on the left and then fill out the information of this target...

Страница 70: ... the captured picture 12 1 5 Search Image by Image Set the schedule and make sure all channels can be recorded normally Select a picture and picture source Set the start time and the end time Set the maximum count and similarity Click Search Click to play the record in a small window E Map Track View Create a E map You can create or delete an E map in this interface The hot spot can be added to th...

Страница 71: ... line Click Playback by Tracks to play back records as shown below 12 1 6 Configuration Set the schedule Face Detection Algorithm Setting Set the similarity of face match by default and FTP as needed If FTP is configured the captured face pictures will be automatically uploaded to FTP server ...

Страница 72: ...or white list Additionally you can choose the duration time of VIP Box s Link camera to sub screen If the sub screen is connected the system will automatically recognize it In this interface you can configure cameras for face attendance and face greeting Double click the blank area of the screen box as shown on the above left to pop up a box Check the channel name and click to add it ...

Страница 73: ...sk interface See 14 1 2 Task Management for details Set camera deployment Drag the camera name to the preview window When there are targets detected the match result will be displayed on the right panel View the match result of the greeting screen Go to Face Surveillance System Select projection compare channels to configure cameras used to compare faces In this interface right click on the small ...

Страница 74: ...P Search tab as shown below You can enter the key word to search the target or manually select the target from the library Then set the start time and the end time and click Search to search the record The detailed information of this target will be viewed Click to play the record ...

Страница 75: ...e is matched successfully Loop Playback if enabled the VIP name will be broadcasted in a loop Single VIP Cycle Time set the time of the single VIP name broadcasted Single VIP Box Size set the percentage of VIP box size occupying the entire screen 12 3 Face Attendance Click Face Attendance to go to the face greeting interface The setting steps are as follows Click the Staff Management tab to create...

Страница 76: ...ompare channels to configure channels used to compare faces Right click on the screen to select Project onto to select sub screen Then you will see the face display on the sub screen as shown on the below View the attendance records Select the target and search condition by day by week by month etc to search the records as below ...

Страница 77: ...ease set the working day and working time as needed 12 4 Line Crossing Counting 12 4 1 Task Management Go to Home Line Crossing Counting Task Management Click the camera with the line crossing counting or target counting function and then select the schedule After that click Apply to save the settings 12 4 2 Real time Statistics Go to Home Line Crossing Counting Real time Statistics Double click t...

Страница 78: ...rend 12 4 3 Summary Statistics Go to Home Line Crossing Counting Summary Statistics Before setting summary statistics please set E Map by going to Home E Map E Map Setting first Drag the camera with the line crossing counting function to the specified area Then return to the summary statistics interface The results of summary statistics of the specified multi channel can be viewed 12 4 4 Historica...

Страница 79: ...MVMS Management Server User Manual 74 12 5 Smart Site View In the home page click View and select Change to Smart Site Page Face Attendance Settings ...

Страница 80: ...ndance settings are finished the attendance record will be shown as follows The descriptions of the buttons on the lower left corner Click it to change the library Click it to display full screen Click it to enter the staff management interface 12 6 Smart View In the home page click View and select Change to Smart View Page In this page you can view the statistics of smart events such as license p...

Страница 81: ...hoose the ANPR camera and then click to add it Click Apply to bind this camera to the lane Choose the ANPR camera and then click to unbind it Set the corresponding lane of the monitoring window Then click Apply to save the settings After that you can go to the vehicle monitoring interface to view the live images of the left and right lane Bind LED Screen Choose the LED screen and then click to add...

Страница 82: ...tomatically opened when temporary vehicles and non blacklist vehicles pass the ANPR camera 13 2 Vehicle Management Link vehicles to the parking lot Go to the vehicle management interface Click Add and then enter the license plate number vehicle color owner name and phone number and choose the parking lot parking type vehicle type and start time and end time After the vehicle information is added c...

Страница 83: ... of vehicle monitoring and adding vehicles to vehicle list the captured vehicle picture and its detailed information will display on the following interface when the vehicle passes the ANPR camera beside the lane and its license plate number is captured and recoginzed accurately by ANPR cameras If the vehicle passing the lane is neither added to the linked vehicle list nor added to the blacklist a...

Страница 84: ...o download the picture 13 5 Parking Overstaying In this interface you can check the information of the vehicles which stay in the parking lot longer than the predefined parking duration Enter the parking duration and then click Refresh to display the detail information of overstaying vehicles such as license plate number entering time lane and duration 13 6 Backlist Vehicle Add vehicles to blackli...

Страница 85: ...added vehicle and click Delete to delete it To search the vehicle inforamtion Enter the license plate number and then click Refresh to view the inforamtion of blacklist vehicles The vehicles added to balcklist are not allowed to pass even if the license plate number is captured by the ANPR camera Note The vehicles have been linked to a parking lot can not be added to blacklist and vice versa ...

Страница 86: ...or antivirus to stop downloading Active X control Please close other components and configure antivirus and firewall to allow the installation of the plugin files 14 2 Start IE Client Before starting IE client make sure all servers must be started first Login Input the IP address or domain name of Authentication Server and the web server port for example http 192 168 50 3 8088 In this example IP a...

Страница 87: ...ick Return to Configuration to go to the web configuration client In the web configuration client click Return to Monitor to go to the web monitor client In the web monitor client or configuration client click the platform logo to return to the platform interface The operation steps of this web client interface are similar as the monitor client Please refer to relevant chapter for details ...

Страница 88: ...annot be seen or the device is offline after the user logins to the monitor client 1 Please checkup whether this user account is anadministrator account If this account is an operator account please checkup whether it has the authority to view the device information 2 Please checkup whether the media transfer server of the device has been started 5 The alarm information cannot be received after th...

Страница 89: ...r there still has usable memory This situation will not emerge when the CPU occupancy rate is less than 75 and there still has usable memory 2 Please checkup whether the network environment is supported including whether the uplink bandwidth of the device and stream match and whether the downlink bandwidth of the media transfer server and the streams of all channels of devices match 3 Please check...

Страница 90: ... number of users 256 users Simultaneous Online users 256 users User Permission Self define Real time view Up to 100 CH real time preview support auto switch PTZ Support PTZ control PTZ permission PTZ lock PTZ preset management Storage type IP SAN streaming media storage Record type Schedule manual and alarm records Record search Multi channel synchronous search and playback Access bandwidth 880Mbp...

Отзывы: