background image

20

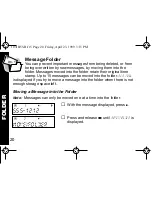
Message Folder

You can prevent important messages from being deleted, or from 
being overwritten by new messages, by moving them into the 
folder. Messages moved into the folder retain their original time 
stamp. Up to 15 messages can be moved into the folder. 

MEM


FULL


is displayed if you try to move a message into the folder when there is not 
enough storage space left. 

Moving a Message into the Folder

Note:  

Messages can only be moved one at a time into the folder.   

With the message displayed, press 

t

.

Press and release 

r

 until 

MOVE)FOLDER

 is 

displayed.

m  

8

1  

h

jlb

e

555-1212

m  

8

2  

h

jlbe

MOVE)FOLDER

FOLDER

1031B55-B.fr5  Page 20  Friday, April 23, 1999  3:15 PM

Содержание LS350

Страница 1: ...A USER GUIDE 1031B55 B fr5 Page 1 Friday April 23 1999 3 15 PM ...

Страница 2: ...t 11 Alert Audio 12 Messages 14 Reading New Messages 14 Reading Stored Messages 16 Saving Messages 17 Deleting Messages 18 Deleting a Single Message 18 Deleting All Messages 19 Message Folder 20 Moving a Message into the Folder 20 Reading Messages in the Folder 22 Deleting Messages from the Folder 24 Alarm 25 Setting the Alarm 25 Turning Off a Daily or Weekly Alarm 28 Message and Pager Indicators ...

Страница 3: ...package that is convenient to carry If your LS350 has the f symbol it uses FLEX technology The Motorola FLEX protocol based pagers offer extended battery life and improved paging reliability To fully understand the features this pager offers please take a few minutes to read this user s guide This user s guide also includes a detachable quick reference card on the back cover INTRODUCTION 1031B55 B...

Страница 4: ...r needed If you have a cellular phone give your pager number instead of your cellular number Then you can decide who to call back on your cellular phone without paying for incoming calls Battery Information Your pager operates with one AAA size alkaline battery carbon zinc batteries are not recommended Polarity Marking Battery Compartment GETTING STARTED 1031B55 B fr5 Page 2 Friday April 23 1999 3...

Страница 5: ...tch the battery door Lift the battery door up to open Remove the old battery noting the polarity Position the new battery so the and markings on the battery match the polarity diagram next to the battery compartment Close the battery door Slide the door until it is fully closed Note Check your pager s clock time after replacing the battery GETTING STARTED 1031B55 B fr5 Page 3 Friday April 23 1999 ...

Страница 6: ...t r Read Used to turn the pager on read messages and navigate through menus s Select Used to select pager settings and features Also used to read additional screens of messages Read Button Select Button Menu Button GETTING STARTED 1031B55 B fr5 Page 4 Friday April 23 1999 3 15 PM ...

Страница 7: ...he alert The unread message home screen is displayed When your pager is on and no activity is taking place the Standby screen is displayed The Standby screen displays the time and date and may display other status indicators m 88 f hjlb e MOTOROLA m 88 f hjlb e NEW 1 m 88 f hjlb e 3 30P 07 05 GETTING STARTED 1031B55 B fr5 Page 5 Friday April 23 1999 3 15 PM ...

Страница 8: ... press s OFF is displayed momentarily before the pager shuts off and m is removed from the display The off screen displays the time and date and if the alarm is set the alarm indicator m 85 f hjlb e PAGER OFF m 85 f ojlb e OFF m 88 f ojlb e 3 30P 07 05 GETTING STARTED 1031B55 B fr5 Page 6 Friday April 23 1999 3 15 PM ...

Страница 9: ...ge 34 Backlight In low light conditions press and hold t for 2 seconds to turn on the pager s backlight The backlight turns off automatically after the pager returns to the Standby screen Setting up Your Pager This section gives instructions for setting the time and date Access to this feature is obtained through the Setup Pager menu GETTING STARTED 1031B55 B fr5 Page 7 Friday April 23 1999 3 15 P...

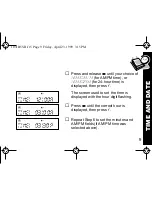
Страница 10: ...ess and release r until SET UP PAGER is displayed Press s TIME DATE is displayed Press s FORMAT AM PM or FORMAT 24HR is displayed m 86 f hjlb e SET UP PAGER m 81 f hjlb e TIME DATE m 85 f hjlbe FORMAT AM PM TIME AND DATE 1031B55 B fr5 Page 8 Friday April 23 1999 3 15 PM ...

Страница 11: ...used to set the time is displayed with the hour digit flashing Press r until the correct hour is displayed then press s Repeat Step 6 to set the minutes and AM PM fields if AM PM time was selected above m 85 f hjlbe TIME 12 00A m 85 f hjlbe TIME 03 00A m 85 f hjlbe TIME 03 30P TIME AND DATE 1031B55 B fr5 Page 9 Friday April 23 1999 3 15 PM ...

Страница 12: ... release r until the correct month is displayed then press s Press and release r until the correct day is displayed the press s SET is displayed momentarily m 85 f hjlbe DATE 07 01 m 85 f hjlbe DATE 07 05 m 85 f hjlbe SET TIME AND DATE 1031B55 B fr5 Page 10 Friday April 23 1999 3 15 PM ...

Страница 13: ... r until SELECT ALERT is displayed then press s The current alert setting is displayed Press r until your choice of ALERT AUDIO or ALERT VIBE is displayed Note If ALERT AUDIO is selected the pager automatically goes into the set audio alert mode refer to Alert Audio on page 12 m 82 f ojlbe SELECT ALERT m 82 f ojlbe ALERT VIBE m 82 f hjlbe ALERT AUDIO ALERTS 1031B55 B fr5 Page 11 Friday April 23 19...

Страница 14: ...is displayed press s The pager gives a sample of your selection SELECTED is displayed momentarily When Alert Audio is selected in the Select Alert feature the previously selected alert is displayed and sampled m 82 f ojlbe SELECTED m 82 f hjlbe AUDIO 1 ALERTS 1031B55 B fr5 Page 12 Friday April 23 1999 3 15 PM ...

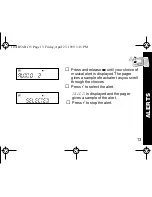
Страница 15: ... gives a sample of each alert as you scroll through the choices Press s to select the alert SELECTED is displayed and the pager gives a sample of the alert Press s to stop the alert m 82 f hjlbe AUDIO 2 m 82 f hjlbe SELECTED ALERTS 1031B55 B fr5 Page 13 Friday April 23 1999 3 15 PM ...

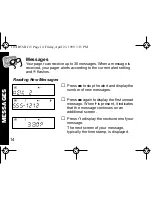
Страница 16: ...splay the number of new messages Press r again to display the first unread message When e is present it indicates that the message continues on an additional screen Press s to display the next screen of your message The next screen of your message typically the time stamp is displayed m 81 f hjlbe NEW 2 m 81 f hjlbe 555 1212 m 81 f hjlbe 3 30P MESSAGES 1031B55 B fr5 Page 14 Friday April 23 1999 3 ...

Страница 17: ...t message is displayed To exit from any screen while reading your messages press t GO HOME is displayed then press s The number of unread new messages is displayed before the pager returns to the Standby mode m 81 f hjlbe END MESSAGES 1031B55 B fr5 Page 15 Friday April 23 1999 3 15 PM ...

Страница 18: ...layed Press s to display the second screen of your message If you want to view the first screen again press s again Press r to display the next stored message If you want to display just the first screen of your messages continue to press and release r m 81 f hjlbe 555 1212 m 81 f hjlbe 3 30P m 82 f hjlbe 555 1234 MESSAGES 1031B55 B fr5 Page 16 Friday April 23 1999 3 15 PM ...

Страница 19: ...er refer to Message Folder on page 20 After you have viewed all stored messages END is displayed Note To exit from any screen while reading your messages press t GO HOME is displayed then press s The number of unread messages is displayed before the pager returns to the Standby mode m 82 f hjlbe END MESSAGES 1031B55 B fr5 Page 17 Friday April 23 1999 3 15 PM ...

Страница 20: ... moved to the message folder are not deleted Deleting a Single Message Display the message you want to delete Press t GO HOME is displayed Press r until DELETE MSG is displayed Press s DELETED is displayed m 81 f hjlbe 555 1212 m 81 f hjlbe GO HOME m 83 f hjlbe DELETE MSG m 83 f hjlbe DELETED DELETING 1031B55 B fr5 Page 18 Friday April 23 1999 3 15 PM ...

Страница 21: ...this feature From the Standby screen press t twice Press and release r until DEL ALL MSGS is displayed then press s DEL ALL YES is displayed Press s DELETED is displayed All messages except unread messages and those in the message folder are deleted m 83 f hjlbe DEL ALL MSGS m 83 f hjlbe DEL ALL YES m 83 f hjlbe DELETED DELETING 1031B55 B fr5 Page 19 Friday April 23 1999 3 15 PM ...

Страница 22: ...s can be moved into the folder MEM FULL is displayed if you try to move a message into the folder when there is not enough storage space left Moving a Message into the Folder Note Messages can only be moved one at a time into the folder With the message displayed press t Press and release r until MOVE FOLDER is displayed m 81 f hjlbe 555 1212 m 82 f hjlbe MOVE FOLDER FOLDER 1031B55 B fr5 Page 20 F...

Страница 23: ...o the folder and the pager returns to the read message mode Note After messages are moved to the folder they can not be moved back into the personal message area They can only be read or deleted m 82 f hjlbe MOVED FOLDER 1031B55 B fr5 Page 21 Friday April 23 1999 3 15 PM ...

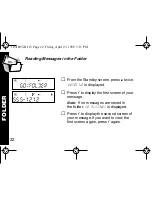
Страница 24: ...the first screen of your message Note If no messages are stored in the folder NO MESSAGES is displayed Press s to display the second screen of your message If you want to view the first screen again press s again m 81 f hjlbe GO FOLDER m 81 f hjlbe 555 1212 FOLDER 1031B55 B fr5 Page 22 Friday April 23 1999 3 15 PM ...

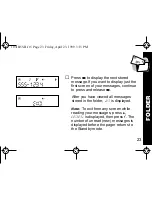
Страница 25: ... have viewed all messages stored in the folder END is displayed Note To exit from any screen while reading your messages press t GO HOME is displayed then press s The number of unread new messages is displayed before the pager returns to the Standby mode m 82 f hjlbe 555 1234 m 82 f hjlbe END FOLDER 1031B55 B fr5 Page 23 Friday April 23 1999 3 15 PM ...

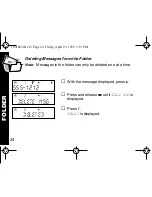
Страница 26: ... only be deleted one at a time With the message displayed press t Press and release r until DELETE MSG is displayed Press s DELETED is displayed m 81 f hjlbe 555 1212 m 82 f hjlbe DELETE MSG m 82 f hjlbe DELETED FOLDER 1031B55 B fr5 Page 24 Friday April 23 1999 3 15 PM ...

Страница 27: ... At the selected alarm time your pager alerts with the same alert as the incoming message alert Setting the Alarm From the Standby screen press t twice Press and release r until SET ALARM is displayed Press s ALARM 1 is displayed m 84 f hjlbe SET ALARM m 81 f hjlbe ALARM 1 ALARM 1031B55 B fr5 Page 25 Friday April 23 1999 3 15 PM ...

Страница 28: ...l ON is displayed then press s The screen used to set the alarm time is displayed Set the alarm time by following the steps in Setting the Time and Date on page 8 m 81 f hjlbe ON m 81 f hjlbe TIME 12 00A ALARM 1031B55 B fr5 Page 26 Friday April 23 1999 3 15 PM ...

Страница 29: ...wing the steps in Setting the Time and Date on page 8 When you have finished setting the alarm date press and release r until your choice of 1 TIME DAILY or WEEKLY is displayed Press s SET is displayed momentarily m 81 f hjlbe DATE 01 01 m 81 f hjlbe DAILY m 81 f hjlbe SET ALARM 1031B55 B fr5 Page 27 Friday April 23 1999 3 15 PM ...

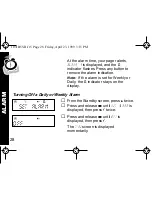
Страница 30: ... If the alarm is set for Weekly or Daily the l indicator stays on the display From the Standby screen press t twice Press and release r until SET ALARM is displayed then press s twice Press and release r until OFF is displayed then press s The TIME screen is displayed momentarily m 84 f hjlbe SET ALARM m 84 f hjlbe OFF ALARM 1031B55 B fr5 Page 28 Friday April 23 1999 3 15 PM ...

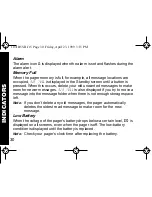
Страница 31: ...l indicators to inform you of the status of your messages and your pager Duplicate Message When a new message is received that is identical to one already stored the older message is overwritten by the new one DUPLICATE is displayed before the new message and new time stamp Errored Data When a message is received that might contain errors the characters likely to be in error flash when the message...

Страница 32: ...yed if you try to move a message into the message folder when there is not enough storage space left Note If you don t delete any old messages the pager automatically deletes the oldest read message to make room for the new message Low Battery When the voltage of the pager s battery drops below a certain level b is displayed on all screens even when the pager is off The low battery condition is di...

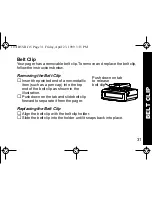
Страница 33: ... as a pen cap into the top end of the belt clip as shown in the illustration Push down on the tab and slide belt clip forward to separate it from the pager Replacing the Belt Clip Align the belt clip with the belt clip holder Slide the belt clip into the holder until it snaps back into place Push down on tab to release belt clip BELT CLIP 1031B55 B fr5 Page 31 Friday April 23 1999 3 15 PM ...

Страница 34: ...er use a soft non abrasive cloth moistened in a mild soap and water solution Use a second cloth moistened in clean water to wipe the surface clean Do not immerse in water Do not use alcohol or other cleaning solutions USE AND CARE 1031B55 B fr5 Page 32 Friday April 23 1999 3 15 PM ...

Страница 35: ...specially trained technicians offers repair and maintenance facilities throughout the world You can protect your pager purchase with an optional extended warranty covering parts and labor For more information about warranties please contact either your paging service provider retailer or Motorola Inc at 1 800 548 9954 For repairs call Motorola Inc at 1 800 548 9954 in the U S or 1 800 323 9685 in ...

Страница 36: ...under one or more Motorola U S Patents A partial listing of these patents is provided on the inside surface of the battery door Other patents covering this product are pending Note Patent numbers listed below with an asterisk apply only to the pager models which utilize the POCSAG protocol 4336524 4385295 4412217 4518961 4701759 4755816 4829466 4839628 4851829 4893271 4910510 5073767 5157391 53811...

Страница 37: ...quency energy and if not installed and used in accordance with the instructions may cause harmful interference to radio communications However there is no guarantee that interference will not occur in a particular installation If this equipment does cause harmful interference to radio or television reception which can be determined by turning the equipment off and on the user is encouraged to try ...

Страница 38: ...NOTES 1031B55 B fr5 Page 36 Friday April 23 1999 3 15 PM ...

Страница 39: ...NOTES 1031B55 B fr5 Page 37 Friday April 23 1999 3 15 PM ...

Страница 40: ...NOTES 1031B55 B fr5 Page 38 Friday April 23 1999 3 15 PM ...

Страница 41: ...T SHALL MOTOROLA BE LIABLE FOR DAMAGES IN EXCESS OF THE PURCHASE PRICE OF THE MOTOROLA PAGER FOR ANY LOSS OF USE LOSS OF TIME INCONVENIENCE COMMERCIAL LOSS LOST PROFITS OR SAVINGS OR OTHER INCIDENTAL SPECIAL OR CONSEQUENTIAL DAMAGES ARISING OUT OF THE USE OR INABILITY TO USE SUCH PRODUCT TO THE FULL EXTENT SUCH MAY BE DISCLAIMED BY LAW Motorola pagers are shipped from the factory with a standard l...

Страница 42: ...ollowing conditions occur Pagers that are incomplete such as those in which boards or components are missing and or incompatible Pagers whose serial numbers do not match on the boards or pagers in which the board serial numbers don t match the housing Pagers that have been opened by or had work performed by anyone other than a Motorola authorized pager service center Pagers received with non confo...

Страница 43: ...tion number PIN and the number of your service provider Additional spaces have been provided to write down the pager and PIN of your family and friends Service Provider Pager Number and PIN Family and Friends Pager Number and PIN PERSONAL NUMBERS 1031B55 B fr5 Page 41 Friday April 23 1999 3 15 PM ...
Страница 44: ...LS350 are trademarks or registered trademarks of Motorola Inc Reg U S Pat Tm Off 1998 1999 by Motorola Inc All Rights Reserved Personal Communications Sector 1500 Gateway Blvd Boynton Beach FL 33426 8292 Printed in U S A 4 99 6881031B55 6881031B55 B 1031B55 B fr5 Page 42 Friday April 23 1999 3 15 PM ...
Страница 45: ...sage Folder Turning Your Pager On Press r Turning Your Pager Off From the Standby screen press t twice Press and release r until PAGER OFF is displayed then press s Setting the Time and Date From the Standby screen press t twice Press and release r until SET UP PAGER is displayed Press stwice Press and release r for AM PM or 24 hour format then press s Press r until the correct hour digit is displ...

Страница 46: ...isplay the first message Press r to display the next message Repeat this step to display all messages in the folder Setting the Alarm From the Standby screen press t twice Press and release r until SET ALARM is displayed then press s twice Press and release r until ON is displayed then press s Press r until the correct hour digit is displayed then press s Repeat Step 4 to set the minutes the AM PM...

Отзывы:

Похожие инструкции для LS350