background image

6

Fitting  and  using  the  tools

Fitting  and  using  the  tools

Fitting  and  using  the  tools

Fitting  and  using  the  tools

Fitting  and  using  the  tools

In general, all attachments which are fitted within the
processor bowl must be firmly attached to the spindle

. Always adjust the attachment until you are sure that

they are correctly fitted.

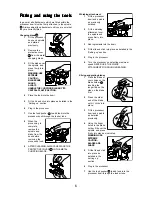
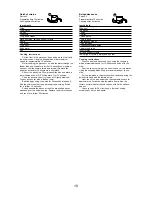
Chopping blade 

23

1

Fit the processor
bowl and spindle
as detailed
previously.

2

Remove the
protective cover

20

 from the metal

chopping blade.

3

Fit the blade over
the spindle and
press firmly into
place.
WARNING: USE
EXTREME
CAUTION –
BLADES ARE
SHARP.
ALWAYS
HANDLE THE CHOPPING BLADE BY ITS
CENTRAL PLASTIC SECTION.

4

Place the food into the bowl.

5

Fit the lid and click into place as detailed in the
‘Setting up’ section.

6

Plug in the processor.

7

Use the food pusher 

 to add food into the

processor bowl through the feeder tube.

8

When the
processing is
complete,
remove the
spindle and
blade from the
bowl before
removing the
processed food.

9

AFTER CLEANING, ALWAYS REPLACE THE
PROTECTIVE COVER 

20

 ON THE METAL

CHOPPING BLADE.

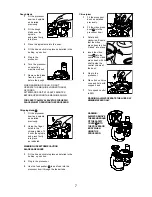
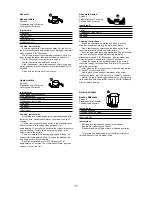
Whisking attachment

1

Fit the processor
bowl and spindle
as previously
detailed.

2

Fit the whisking
attachment over
the spindle and
press firmly into
place.

3

Add ingredients into the bowl.

4

Fit the lid and click into place as detailed in the
‘Setting up’ section.

5

Plug in the processor.

6

Turn the processor on selecting maximum
speed NEVER USE THE WHISK
ATTACHMENT FOR DOUGH KNEADING.

Slicing and grating blades

1

Place the blade of
your choice on the
blade holder 

,

inserting the
longer tab on the
side on the blade
first.

2

Press the other
end of the blade
until it ‘clicks’ into
place.

3

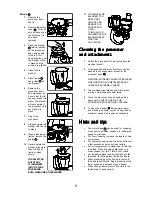
Fit the processor
bowl and spindle
as detailed
previously.

4

Using the finger
holes in the blade
holder, fit it over the
spindle and press
firmly into place as indicated.
WARNING: USE
EXTREME
CAUTION –
BLADES ARE
SHARP.

5

Fit the lid and click
into place as
detailed in the
‘setting up’
section.

6

Plug in the processor.

7

Use the food pusher 

 to add food into the

processor bowl through the feeder tube.

Содержание 48920

Страница 1: ...lect 730 Select 730 Select 730 Select 730 Select 730 Two year guarantee This guarantee is valid in the UK and Ireland only It is in your interest to retain the retailers receipt as proof of purchase P...

Страница 2: ...ds with your house electricity supply which must be A C Alternating Current If the socket outlets in your home are not suitable for the plug supplied with this appliance the plug should be removed and...

Страница 3: ...orange grapefruit lemon lime cut into halves Blending liquidising Soups purees drinks milkshakes batters Max vol 700g 700g 600g 350g 1kg 600g flour 400g water Speed 3 1 2 2 1 3 1 3 3 Time 15 20 secs 2...

Страница 4: ...arse slicing blade 20 Chopping blade protective cover 21 Dough blade 22 Whisking attachment 23 Chopping blade 24 Citrus cone 25 Citrus press bowl 19 20 21 23 24 22 Stor Stor Stor Stor Storag ag ag ag...

Страница 5: ...s unplugged from the mains 2 Fit the safety cover into the processor body and turn anti clockwise firmly until it clicks into place the arrows will now be lined up THE FOOD PROCESSOR WILL NOT OPERATE...

Страница 6: ...from the bowl before removing the processed food 9 AFTER CLEANING ALWAYS REPLACE THE PROTECTIVE COVER 20 ON THE METAL CHOPPING BLADE Whisking attachment 1 Fit the processor bowl and spindle as previou...

Страница 7: ...e chipping blade fit it over the spindle and press firmly into place as indicated WARNING USEEXTREMECAUTION BLADESARESHARP 3 Fit the lid and click into place as detailed in the setting up section 4 Pl...

Страница 8: ...it into the feed tube When chopping hard foods e g meat cheese cut into 1 inch 2 5cm cubes For shredding place food horizontally into the feed tube for slicing place the food vertically When blending...

Страница 9: ...paration time 10 minutes Cooking time 45 minutes Ingredients 600g potatoes 150ml milk 1 clove garlic 2 egg yolks 100g fresh cream teaspoon nutmeg 25g mild cheddar cheese 10g butter salt and pepper to...

Страница 10: ...round nutmeg Whisk for a further 15 seconds Evenly sprinkle the bacon across the pre cooked pastry base and pour the mixture on top Replace the dish in the oven and cook for a further 30 minutes Bolog...

Страница 11: ...the crumble Bake in a pre heated over at 220o C Gas mark 7 for approximately 45 minutes The crumble should form a golden crunchy crust on the fruit Chocolate mouse Serves 4 Preparation time 10 minutes...

Страница 12: ...rphy Richards has a policy of continuous improvement in product quality and design The Company therefore reserves the right to change the specification of its models at any time Morphy Richards Limite...

Отзывы: