


K6859438
07/22/2005
Page 9 of 9
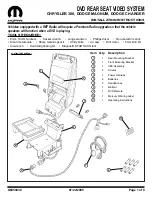
6) Place supplied bin mat (Item 8) inside of the
console bin.
7) Close the VES assembly lid and open the assem-
bly as shown.
8) Remove DVD remote (Item 9) and install batteries.
9) Peel and stick mercury warning label (Item 10) to
lower portion of forward facing surface of the left
(driver’s side) B-pillar.
DVD Remote
F – Perform Operation Test:
1) Turn on ignition and the unit will power up.
2) Use a diagnostic STARSCAN tool so that the Front Control Module (FCM) is reconfigured and
recognizes the Video Entertainment System (VES). Follow the procedure shown below.
3) Insert a known good DVD into the player.
4) Verify function of headphones and DVD remote using supplied Operating Instructions (Item 11).
5) Place Operating Instructions in the vehicle’s glove box.
IN THE INITIAL START UP SCREEN
• PRESS ------- VEHICLE PREPARATION
• TOGGLE DOWN AND HIGHLIGHT -----
PROGRAM NETWORK CONFIGURATION FCM (CGW)
• PRESS ------- START
• PRESS ------- NEXT>
• TOGGLE DOWN AND HIGHLIGHT ------- VES
• PRESS ------- ADD
FOLLOW ON SCREEN PROMPTS
(I.E. CYCLE IGNITION KEY)
• PRESS ------- NEXT>
• PRESS ------- FINISH


