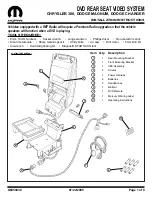


Front
Mounting
Bracket
K6859438
07/22/2005
Page 8 of 9
7) Rotate the floor console assembly right side up
and holding on to the bottom of console bin, carry
it back to the vehicle.
8) Carefully place the console front first into the right
rear door opening and onto the back seat.
9) Lift up console from the bottom and lower it loose-
ly back into position.
10) From the front seat, lift up front of console and
plug-in 12-way power harness connector and
3-way power outlet connector.
NOTE: Make sure the power harness remains under
the carpet liner to prevent rattles.
E – Finalize the installation:
1) Open the VES assembly lid and re-install 3-4 pre-
viously removed screws through the VES front
mounting bracket and console bin floor.
2) Re-install two floor console mounting screws at
the center console.
3) Re-install all other previously removed and saved
components, panels, and fasteners.
4) Re-connect the vehicle’s battery.
5) Place supplied batteries (Item 6) into both head-
phones (Item 7) as shown.
Floor Console/
VES Assembly
Bin Floor
Screws (3-4)


