Mood Media MULTIPLAY 7200 Скачать руководство пользователя страница 19


MP7200® user instructions 

19


III.


MESSAGES 

 
This menu allows: 


Listening to a message via the internal speaker, without interrupting the 
broadcasting on the loudspeakers network. 


Consulting the broadcasting scenario of sound messages (out of personal messages).  


Recording one’s own messages with a mike and scheduling them. 


Setting the parameters of pre-recorded messages opening / closing. 


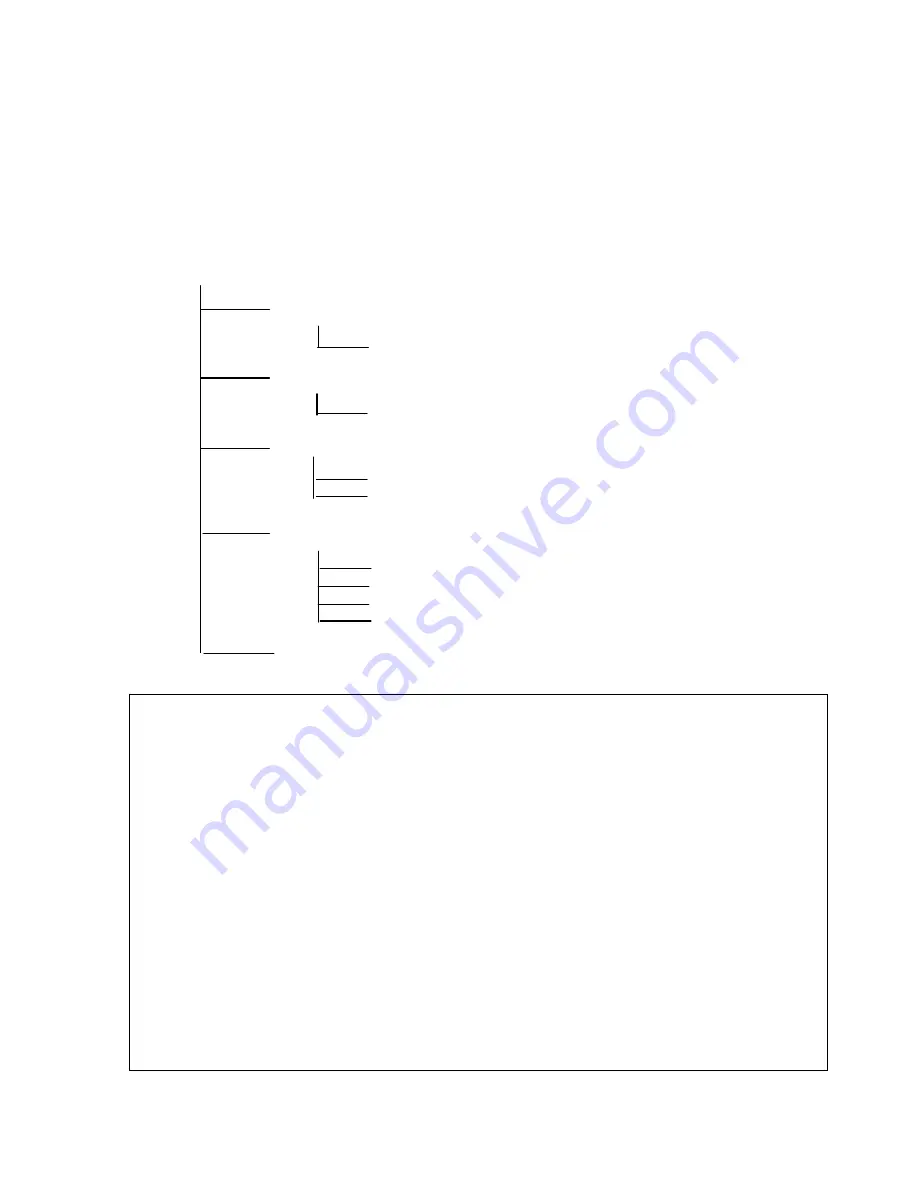
Flowchart of the "MESSAGES" menu 


MESSAGES  


Listen to messages 


Select message 


See scenario 


List of messages 


Local messages 


Selecting a message  


Selecting the action  


Open/close messages 


Select day 


Time slot 


Closing at noon? 


Exit 


Exit menu 


How to access the "MESSAGES"  menu? 


1)


Press the central "OK" key. 


2)


The "MUSIC" menu is displayed on the screen. Press twice the 


arrow key

The 

display shows "MESSAGES". Press the central "OK" key to validate your selection. 


How to access its functions?  
 

3)


Press any arrow key 

/

/

/

, up to the desired function: "LISTEN TO MESSAGES" or 

"SEE SCENARIO" or "LOCAL MESSAGES" or "OPEN/CLOSE MESSAGES" or "EXIT MENU". 


4)


Press the central "OK" key to confirmer the function. 


How to exit the "MESSAGES" menu? 
 

5)


Press any arrow key


/

/

/

, up to "EXIT MENU", validate by pressing the central 

“OK” key. The music restarts with your selection and the LCD display returns to its 
normal level: date, time, and title being broadcasted.


Содержание MULTIPLAY 7200

Страница 1: ...MULTIPLAY 7200 Instructions for use...

Страница 2: ...al programming of a weekday select day Monday Tuesday 14 3a Power time 14 3b Time slots 14 3c Select program 15 3d Select music 15 3e Save selection 16 3f Rename 16 II EVENTS 17 III MESSAGES 19 1 List...

Страница 3: ...tiPlay 7200 allows managing the broadcasting of sound messages via a network or the Internet Although it uses a highly sophisticated development technology Mood Media endeavours once again to offer th...

Страница 4: ...er On the emplacement Protection of electric cable Do not put anything on the cables and do not place the cables on a passage axis Particularly make sure of protecting the connectors the plugs and the...

Страница 5: ...network PRECAUTION To avoid risks of electrocution only use the electric cable that was supplied Plug the cable into the mains socket Connect the electric plug in a correctly grounded mains socket Im...

Страница 6: ...and a network of loudspeakers are needed There is a through zone audio output a Connect the audio cable s plug in the audio output audio out 1 2 or 3 of your MP7200 b Depending on your amplifiers you...

Страница 7: ...e performer the tile and the name of the program scroll across the 2nd line On the third line To give a message directly put the mike in position one and speak The icon representing the mike should ap...

Страница 8: ...eave it on line Comment In the MUSIC menu you can set the Power Time The MP 7200 will switch off automatically at the end of playing time that that you entered in parameters and will switch on again a...

Страница 9: ...the message b Selecting the action 4 Open close messages a Selection of the day b Time slot c Closing at noon d Exit 5 Exit the menu IV SETTINGS 1 The music s volume 2 Volume of messages 3 Date time 4...

Страница 10: ...lowing page Important When you make a direct announcement with the microphone the message is played on all the zones As well as the setting of the sound s volume music and messages is the same on all...

Страница 11: ...o access the MUSIC menu 1 Press the central OK key How to access its functions 2 Press any direction key up to the desired function DAY S SELECTION EVERY DAY or SELECT DAY MONDAY TUESDAY WEDNESDAY 3 P...

Страница 12: ...and title in progress of broadcasting Important When you press the arrow keys please give the system the time to record your order 2 Musical programming of a whole week Select day Every day This func...

Страница 13: ...sh to select several programs at the same time refer to 2d The display then shows Select day Exit Confirm by pressing OK The 2nd time slot appears taking the previous modifications into account use th...

Страница 14: ...ramming of a weekday select day Monday Tuesday This function allows selecting and broadcasting different programs according to an accurate time of the day This selection is valid on that day during th...

Страница 15: ...display again shows Select program Renew the above procedure or if you wish to create your own sequence refer to 3d 3d Select music to create one s own musical scenario The display shows Select music...

Страница 16: ...display shows Rename New P You name your selection by using the arrow keys and up down to make the letters scroll and left right to move the cursor toward the left or right Confirm by pressing OK The...

Страница 17: ...t during a chosen period of time and a time slot Flowchart of the EVENTS menu EVENTS Select music Frequency Beginning of the event End of the event Time slot How to access the EVENTS menu 1 Press the...

Страница 18: ...gram using the arrow keys and up down to increase or decrease the hour and the minutes or the date and left right to move the cursor toward the left or right Confirm by pressing OK f The display shows...

Страница 19: ...on Open close messages Select day Time slot Closing at noon Exit Exit menu How to access the MESSAGES menu 1 Press the central OK key 2 The MUSIC menu is displayed on the screen Press twice the arrow...

Страница 20: ...io This function allows consulting the list of messages and their broadcasting timetable Steps 1 2 3 page 19 a The display shows Listen to messages GO b With the arrow key select See scenario Press th...

Страница 21: ...ready select Select action Do nothing with the arrow key and OK the display returns to b d Otherwise the display shows Start recording START Press the central OK key If your mike is in the ON position...

Страница 22: ...g the message created With the arrow keys change and up down to increase or decrease the hour and the minutes or the date and left right to move the cursor toward the left or the right Confirm by pres...

Страница 23: ...of end of broadcasting and possibility of modifying it You can modify the dates and timetable with the arrow keys and up down to increase or decrease the hour and the minutes or the date and left righ...

Страница 24: ...and up down to increase or decrease the hours and minutes Confirm by pressing OK d Close at noon YES NO is then displayed If you do not close at noon select NO with the arrow keys and The display then...

Страница 25: ...n select NO with the arrow keys and The display then shows Select day exit press OK to exit the submenu If you close at noon select YES with the arrow keys and The display then shows Time slot To set...

Страница 26: ...menu 1 Press the central OK key 2 The MUSIC menu is displayed on the screen Press three times the arrow key The display shows SETTINGS Press the central OK key to validate your selection How to access...

Страница 27: ...setting the volume of messages in relation to the music Steps 1 2 3 page 26 a The display shows Volume messages GO Press the central OK key to reach this submenu b The display shows a dashed line on...

Страница 28: ...ows Select day every day If you wish to reduce the volume automatically every day at the same time press OK c The display shows Reduced volume T To set the time parameters of start and end of the low...

Страница 29: ...the menus press the central OK key The display shows Password _ Enter your password with the arrow keys and up down to scroll through the figures and or the letters and left right to move the cursor...

Страница 30: ...MAINTENANCE menu 1 Press the central OK key 2 Le menu MUSIC menu is displayed on the screen Press four times the direction key The display shows MAINTENANCE Press the central OK key to validate your s...

Страница 31: ...ter this function press OK Otherwise with the arrow keys and left right select another function 1b SAS update to update via the SAS when your MP7200 is connected to a SAS Internet or intranet Steps 1...

Страница 32: ...the arrow keys and left right select another function 1d Serial number to consult the machine s serial number essential for identification when connecting via the SAS Steps 1 2 3 4 page 30 a The displ...

Страница 33: ...unction 1f More info memory capacity This information is only useful for diagnostics purposes of online maintenance 2 Expert System password to define at the installation the system language the numbe...

Страница 34: ...e sides So that CDs remain clean handle them with care Never touch the surface Do not paste paper or adhesive tape on CDs Do not expose CDs to direct sunlight to sources of heat or to excessive dampne...

Страница 35: ...ll no sound call the Mood Media customer department Update Update interrupted Remove the DVD ROM and restart the procedure Update error The DVD ROM is ejected if the update was already done DVD ROM DV...

Страница 36: ...MP7200 user instructions 36 MOOD MEDIA Rd 307 78810 Feucherolles France hotline moodmedia fr...

Отзывы: