background image


Carefully read this manual for correct and 
safe appliance use and for helpful tips on 
efficient maintenance. 


Only  use  the  washing  machine 

after  carefully  reading  these  instructions.  
We  recommend  you  always  keep  this 
manual  on  hand  and  in  good  condition  for 
any future owners. 


Please check that the appliance  is delivered 
with  this  instruction  manual,  warranty 
certificate,  service  centre  address  and 
energy  efficiency  label.  Also  check  that 
plugs,  drain  hose  support  hook  and  liquid 
detergent  or  bleach  tray  (only  on  some 
models)  are  included.  We  recommend  you 
keep all these components. 


Each  product  is  identified  by  a  unique  16- 
character  code,  also  called  the  “serial 
number”, printed on the sticker. This can be 
found inside the door opening. This code is 
a unique code for your product that you will 
need  to  register  the  product  warranty,  or  if 
you  need  to  contact  the  Customer  Service 
Centre. 


This appliance is marked according to 
the European directive  2012/19/EU on 
Waste  Electrical  and  Electronic 
Equipment (WEEE). 

WEEE contains both polluting substances (which 
can  cause  negative  consequences  for  the 
environment)  and  basic  components  (which  can 
be  re-used).  It  is  important  to  have  WEEE 
subjected  to  specific  treatments,  in  order  to 
remove  and  dispose  properly  all  pollutants,  and 
recover and recycle all materials. Individuals can 
play an important role in ensuring that WEEE does 
not become an environmental issue; it is essential 
to follow some basic rules: 



WEEE should not be treated as household 

waste; 



WEEE should be handed over to the relevant 

collection points managed by the municipality or 
by registered companies. In many countries, for 
large WEEE, home collection could be present. 

In many countries, when you buy a new appliance, 
the old one may be returned to the retailer who has 
to collect it free of charge on a one-to-one basis, 
as long as the equipment is of equivalent type and 
has the same functions as the supplied equipment. 


1.  GENERAL SAFETY RULES 

2.  INSTALLATION 

3.  PRACTICAL TIPS 

4.  MAINTENANCE AND CLEANING 

5.  QUICK USER GUIDE 

6.  CONTROLS AND PROGRAMS 

7.  DRYING CYCLE 

8.  AUTOMATIC WASHING/DRYING  CYCLE 

9.  THROUBLESHOOTING AND  WARRANTY 


E

N


Содержание MWDI7555

Страница 1: ...ng Instructions Model MWDI7555 Integrated Washer Dryer Please read these instructions carefully before attempting to install or use this appliance It is advisable to keep these instructions in a safe...

Страница 2: ...is some important safety information in addition to guidelines and recommendations that will enable you to take full advantage of all the functions available This quality appliance has been tested an...

Страница 3: ...nnot be found with the appliance Cost of Call out for work covering routine maintenance such as but not exclusively cleaning of filters Cost of Call out for work required to correct the alignment of d...

Страница 4: ...e Electrical and Electronic Equipment WEEE WEEE contains both polluting substances which can cause negative consequences for the environment and basic components which can be re used It is important t...

Страница 5: ...ersons with reduced physical sensory or mental capabilities or lack of experience and knowledge if they have been given supervision or instruction concerning use of the appliance in a safe way and und...

Страница 6: ...pentine waxes and wax removers should be washed in hot water with an extra amount of detergent beforebeing driedinthewasherdryer Items such as foam rubber latex foam shower caps waterproof textiles an...

Страница 7: ......

Страница 8: ...to unplug the machine Do not expose the washing machine to rain direct sunlight or other weather elements Protect from possible freezing When moving do not lift the washing machine by the knobs or det...

Страница 9: ...ngsand plasticspacertubes B During the removal of the screws occasionally spacer tubes fall inside the product these can be removebytiltingtheproductforward 2 and recovering them from the floor A or i...

Страница 10: ...hole positions then drill outthesepositions Fix the hinges in place with the 4 screws provided A Fix the magnet B in place using screw C Mount the plate D on the right or left hand side depending on y...

Страница 11: ...asherissetat The 4 adjustable feet allowthe height of the washer to be adjusted from 820 mm to a maximum of 840 mm To adjust the height you should remove the nuts fitted to each foot and replace these...

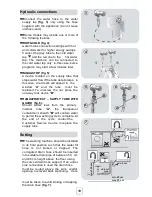
Страница 12: ...tube must be 5 6 replaced To unscrew the nut press the one way lock device B B AQUAPROTECT SUPPLY TUBE WITH GUARD fig 6 Should water leak from the primary A internal tube A the transparent A containm...

Страница 13: ...acement Detergent drawer The detergent draw is split into 3 compartments as illustrated in figure 9 compartment 1 for prewash detergent 9 for special additives 1 softeners starch fragrances etc 2 WARN...

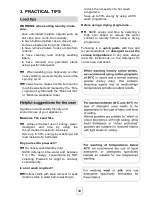
Страница 14: ...Size Achieve the best use of energy water detergent and time by using the recommended maximum load size Save up to 50 energy by washing a full load instead of 2 half loads Do you need to pre wash For...

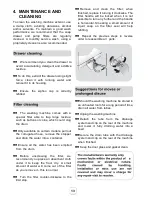
Страница 15: ...ll the water has been emptied from the drum Before unscrewing the filter we recommend you place an absorbent cloth under it to keep the floor dry A small amount of water will come out of the filter as...

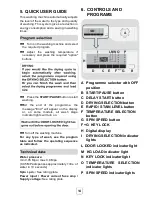
Страница 16: ...achine For any type of wash see the program table and follow the operating sequence as indicated Water pressure min 0 05 Mpa max 0 8 Mpa 0 05 MPa dispenses approximately 1 litre of water in 10 seconds...

Страница 17: ...e START PAUSE button for about 2 seconds some indicator light and the time remaining indicator will flash showing that the machine has been paused Wait until the DOOR LOCKED light has gone out before...

Страница 18: ...g cycle after the selection of washing programme according to laundry type select a degree of dryness by pressing this button At the end of the washing programme the selected drying cycle will start a...

Страница 19: ...er the maximum allowed for the programme in order to protect the fabrics If you want carry out a cold wash all the indicators must be off By pressing this button it is possible to reduce the maximum s...

Страница 20: ...yed This time can recaulculate during the wash depending on detergent levels and load balancing 3 DOOR LOCKED INDICATOR LIGHT The indicator light is illuminated when the door is fully closed When STAR...

Страница 21: ...lance 5 KEY LOCK INDICATOR LIGHT The indicator light show that the keys are locked 6 WASH TEMPERATURE INDICATOR LIGHTS This shows the washing temperature of the selected programme that can be changed...

Страница 22: ...8 8 9 60 Eco 20 C 4 6 6 7 8 8 9 20 Mixed 2 4 3 3 3 5 4 4 4 5 60 Delicates 2 2 2 5 2 5 2 5 2 5 40 Rinse Spin Drain 14 1 1 1 1 5 1 5 1 5 30 Rapid 3 4 30 2 2 2 5 2 5 2 5 2 5 30 14 30 44 3 3 3 5 3 5 3 5 3...

Страница 23: ...L button 3 Selecting the RAPID program on the knob it will be possible to select with the RAPID button one of the three rapid programs available among 14 30 and 44 4 Programmes for automatic drying Us...

Страница 24: ...nse This program performs 3 rinses with an intermediate spin which can be reduced or excluded by using the appropriate button It is used for rinsing any type of fabric for example after a wash carried...

Страница 25: ...23 performance...

Страница 26: ...is used during the last 10 20 minutes of the drying cycle to minimize creasing Mixed Low Dry Low temperature drying programme recommended for synthetics and mixed fibres always refer to the laundry ca...

Страница 27: ...thin underwear By fabric type Cottons linen towels cotton jersey bed and table linen Synthetics blouses shirts overalls etc made of polyester or polyamide as well as for cotton synthetic mixes Only dr...

Страница 28: ...iance will go into standby mode on certain models the display will show two lines Switch off the machine by turning the programme selector to the OFF position Open the door and remove the laundry Turn...

Страница 29: ...roning Press the START PAUSE button At the end of the wash phase the display will show the drying time remaining When the programme is finished the word End will appear on the display After 5 minutes...

Страница 30: ...oes not drain water Make sure the filter is not clogged Make sure the drain hose isn t bent kinked or trapped Make sure the home drainage system is not blocked and is allowing watertoflowthroughwithou...

Страница 31: ...duct from damage if the load is not balanced before spinning This may result in The machine attempts to balance the load increasing the time of spin Reduction of the speed of spin to decrease vibratio...

Страница 32: ...n future washes abundant foam This is often due to the anionic surfactants found in the detergents which are hard to eliminate from laundry In this case do not re rinse to eliminate these effects it w...

Страница 33: ...r appliance to have developed a fault please check through the troubleshooting guide first If after the previous checks there is still a fault please contact the Repairtech Service Help line below Ple...

Страница 34: ...this appliance may not be treated as household waste Instead it shall be handed over to the applicable collection point for the recycling of electrical and electronic equipment Disposal must be carrie...

Страница 35: ...33 16 12 43015989 A P...

Отзывы: