background image

10 

12.


Plug the projector lift power cable into a nearby AC power outlet. Ensure that the 
outlet is readily accessible so that the assembly can be quickly and easily 
disconnected from power. 

13.


Mount the RF remote control receiver near the ceiling surface. 

14.


Use the RF remote control to lower and raise the lift through its full range several 
times. 
Note that if the motor gets hot from overuse, internal circuitry will disable the 
motor until it has had time to cool back down to the operating temperature. 

15.


Use a carpenter's level to check the balance again. Adjust the height as necessary to 
achieve balance, following the instructions in step 9. 


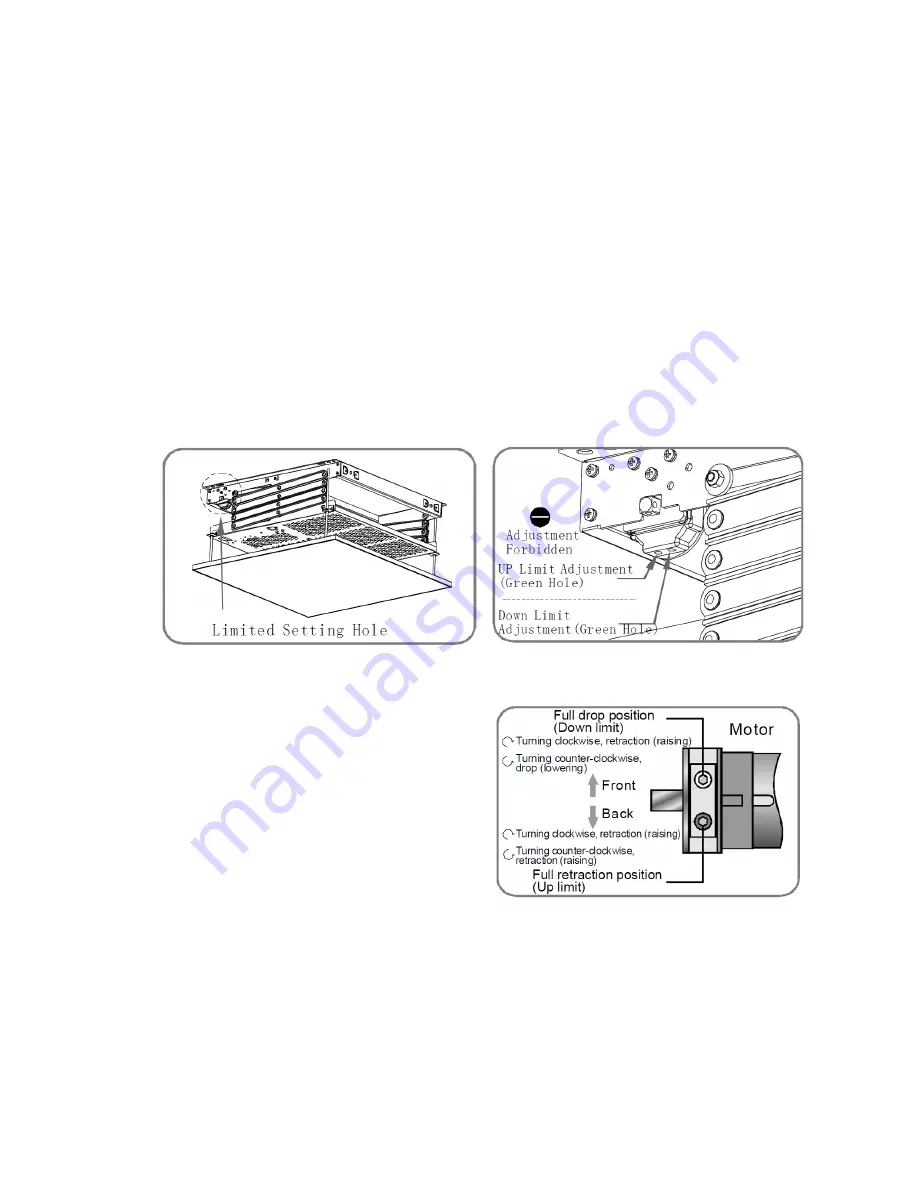
16.


Use the included M4 hex wrench to adjust the down limit and up limit on the 
motor, raising and lowering the lift as 
necessary to test the new limits. The 
down limit should provide sufficient 
clearance to properly project the video 
image, while the up limit should be such 
that the surface of the decorative 
ceiling plate is even with the ceiling 
surface. 

17.


Once the up and down limits have been set, use a carpenter's level to recheck the 
balance and adjust the height as necessary, following the instructions in step 9. 

18.


Reinstall the dropped ceiling and cut a hole for the decorative ceiling plate. The hole 
should have 5-10 mm space between the plate and the surrounding ceiling tile. 


Содержание 15495

Страница 1: ...Stealth Motorized Recessed Projector Lift Max 44 lbs P N 15495 User s Manual ...

Страница 2: ... AND GUIDELINES 3 Installation and Operation 3 General 4 Power 4 Height Adjustment 5 PACKAGE CONTENTS 6 PRODUCT OVERVIEW 7 INSTALLATION 8 SPECIFICATIONS 11 REGULATORY COMPLIANCE 11 Notice for FCC 11 Notice for Industry Canada 12 ...

Страница 3: ...kg and the maximum weight of any installed projector is 44 lbs 20 kg Frequently inspect the installation for imbalance and signs of wear or damage to cables and springs Do not use if repair or adjustment is needed Do not stand beneath this product while it is in operation Before installing the device remove any unnecessary cables and disable any equipment not needed for powered operation Ensure th...

Страница 4: ...ase refer to your local building regulatory agency for guidance Do not place or install this device in an area where it can be exposed to excessive amounts of dust humidity oil smoke or combustible vapors When it is extended take care not to shake the lift or attempt to manually lift it up This device has no user serviceable parts Do not attempt to repair or disassemble this device The motor requi...

Страница 5: ... tangled with other cords Ensure that the power cord does not present a tripping hazard Never unplug the unit by pulling on the power cord Always grasp the connector head or adapter body Ensure that power is turned off and disconnected before making any electrical connections Remove the batteries from the controller if it will go unused for a lengthy period of time Height Adjustment Be careful whi...

Страница 6: ...ntents to ensure you have all the items listed below 1x Motorized projector lift assembly 1x Ceiling cutout template 1x M4 hex wrench 4x M3x20mm screws 4x M4x20mm screws 4x M5x20mm screws 4x Rubber washers 3x Long ribbons 1x 6P 4 power wire clip 1x User s manual ...

Страница 7: ...7 PRODUCT OVERVIEW ...

Страница 8: ...th the variable H 2 If H is less than 11 8 300mm the lift can be mounted directly to the primary ceiling structure If H is greater than or equal to 11 8 you will need to use M10 threaded rods not included to mount the lift at the correct height 3 Use the cardboard template to mark the mounting locations on the primary ceiling structure 4 Mount the lift to the primary ceiling structure Use a carpen...

Страница 9: ... 8 20mm between the decorative plate and the projector or projector mounting plate 8 Connect the projector power and video to the projector If using an inverted orientation first feed the cables through the hole in the projector mounting plate 9 Use a carpenter s level to recheck the balance of the projector mounting plate If it is not perfectly level adjust the length of the woven belts To adjust...

Страница 10: ... the height as necessary to achieve balance following the instructions in step 9 16 Use the included M4 hex wrench to adjust the down limit and up limit on the motor raising and lowering the lift as necessary to test the new limits The down limit should provide sufficient clearance to properly project the video image while the up limit should be such that the surface of the decorative ceiling plat...

Страница 11: ... 9 lbs 19 0 kg Maximum Projector Weight 44 0 lbs 20 0 kg REGULATORY COMPLIANCE Notice for FCC This device complies with Part 15 of the FCC rules Operation is subject to the following two conditions 1 this device may not cause harmful interference and 2 this device must accept any interference received including interference that may cause undesired operation Modifying the equipment without Monopri...

Страница 12: ...adio communications However there is no guarantee that interference will not occur in a particular installation If this equipment does cause harmful interference to radio or television reception which can be determined by turning the equipment off and on the user is encouraged to try to correct the interference by one or more of the following measures Reorient or relocate the receiving antenna Inc...

Отзывы: