background image

12

ODGR Series Outdoor Gas Fireplace

92D0001

Optional Weather Enclosure

An optional weather enclosure is available to protect 
the burner when not in use.

CAUTION:

 Do not use the weather enclosure 

if the unit has glass doors installed.

Installation Instructions

1.  Turn the unit OFF and allow to cool.
2.  Grab the weather enclosure by the handle(s).
3.  Slide the top of the weather enclosure up between 

the back of the surround top and the screen rail. 
(Fig. 19)

4.  Push the bottom of the weather enclosure into the 

firebox just enough to clear the valve access cover 
and set down. (Fig. 20)

KT457
place we top
4/1/04  djt

KT457

Fig. 19

  Place top of weather enclosure between surround top 

and screen rail.

Surround Top

Weather Enclosure

Screen Rail

KT458
place we bottom 
4/1/04  djt

Screen

Hearth Brick

Valve Access Cover

KT458

Fig. 20

  Push bottom of weather enclosure into firebox.

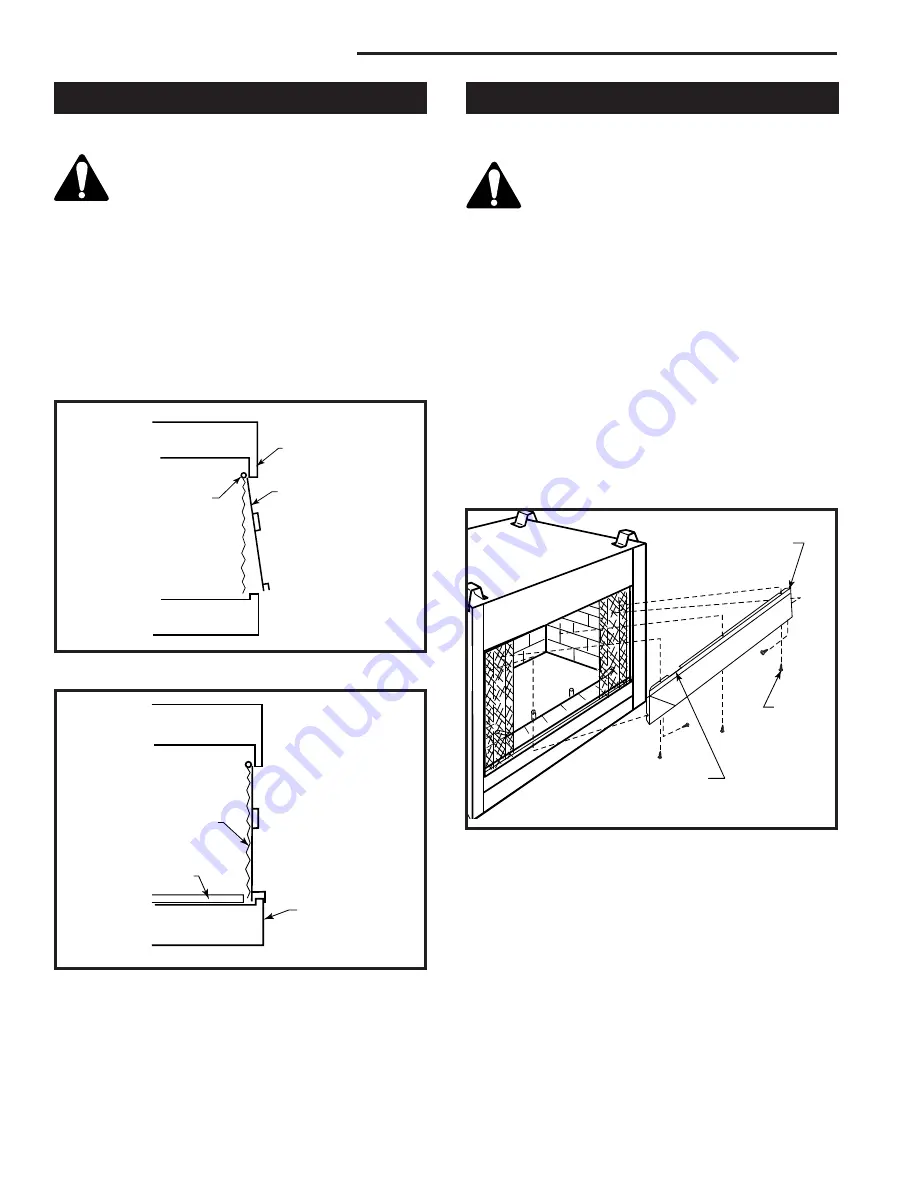
Optional Stainless Steel Hood

An optional stainless steel hood is available for both the 
ODGR400  and ODGR500.

NOTE: The stainless steel hood may NOT 
be used when the optional glass doors are 
installed.

Installation Instructions:

1.  Turn the unit off and allow to cool.
2.  Place the hood so the 2

B⁄,

" (67 mm) slot clears the 

sensor plate located under the fireplace opening on 
the top left side. (Fig. 21)

3.  Secure the hood to the unit using the three (3) slots 

in the hood and the pilot holes in the unit with the 
stainless steel sheet metal screws provided. (Fig. 
21) 

4.  Align the sides of the hood so the pilot holes on the 

right and left sides of the unit are exposed through 
the slots on the ends of the hood. Secure using the 
remaining stainless steel sheet metal screws. (Fig. 
21)

&0
/$'32HOOD

Stainless 

Steel Hood

Stainless 

Steel Sheet 

Metal Screws 

(5)

Sensor Plate Slot

FP1635

Fig. 21

  Secure stainless steel hood with five (5) sheet metal 

screws.

Содержание ODGR400

Страница 1: ...lier from a neighbor s phone Follow the gas supplier s instructions If you cannot reach your gas supplier call the fire department Installation and service must be performed by a qualified installer service agency or the gas supplier WARNING Improper installation adjustment alteration service or maintenance can cause injury or property damage Read the installation operating and maintenance instruc...

Страница 2: ...ics 11 Optional Weather Enclosures 12 Optional Stainless Steel Hood 12 Lighting Operating Instructions 13 Troubleshooting 14 Maintenance 15 Replacement Parts 16 Accessories 18 Warranty 19 Proposition 65 Warning Fuels used in gas wood burning or oil fired appliances and the products of combustion of such fuels contain chemicals known to the State of California to cause cancer birth defects and othe...

Страница 3: ...ged Use only burner specified by manufacturer LP cylinder enclosures if provided by the consumer must con form to the design parameters as detailed below Enclosures for LP Gas Supply Systems Enclosures for LP gas supply cylinders shall be ventilated by openings at the level of the cylinder valve and at floor level The effectiveness of the opening s for purposes of ventilation shall be determined w...

Страница 4: ... Access 1456M 362mm Low Voltage Wire Access Fireplace Dimensions Fig 2 ODGR500 specification and framing dimensions 36 914mm 40 1016mm 39 6 1007mm 6 1 6 m m 56O 13mm 56O 6 822mm 622mm 43 6M 1111mm 856M 210mm 56O 165mm 56O 191mm Gas Line Access Rough Opening Height 6 16mm 22 559mm 56O 572mm 559mm Recessed Nailing Flange Rough Opening Width 41 Rough Opening Depth 3 6M 95mm 1041mm 3 6 98mm 7114 ODUVS...

Страница 5: ...ide 0 0 mm Back 0 0 mm Perpendicular Sidewall 0 0 mm Top of unit to ceiling 36 914 mm Front of unit to combustibles 36 914 mm Screened Porch Installation The ODGR may be installed safely and is design certi fied by CSA to be installed in a screened porch with these guidelines Minimum porch area 96 sq feet 9 sq m Minimum celing height 92 234 cm Minimum of two 2 walls must be screened Minimum top of...

Страница 6: ... sta CFM170 DV Builder Front View O N M L K Ref Mantel Ref Mantel Leg From Leg Depth of Comb Opening F 14 356 mm K 14 356 mm G 12 305 mm L 12 305 mm H 10 254 mm M 10 254 mm I 8 203 mm N 8 203 mm J 1 38 mm O 1 38 mm Black Surround Face CFM164 CFM170 Fig 3b Combustible mantel leg minimum installation Side of Combustion Chamber Moisture Resistance This outdoor fireplace will shed moderate amounts of ...

Страница 7: ...ove 4 500 feet 1 370 m For elevations above 4 500 feet 1 370 m instal lations must be in accordance with the current ANSI Z223 1 NFPA 54 and or local codes having jurisdiction Valve Access Valve access can be accomplished in one of two ways 1 Remove the front panel just below the front of the hearth pan This is accomplished by lifting on the panel To replace the valve access panel line up the two ...

Страница 8: ...ight side of the appliance A knockout is provided to allow for the gas pipe installation and testing of any gas con nection NOTE The gas line connection can be made with 3 8 copper tubing approved for propane or natural gas 1 2 rigid pipe or an approved flex connector then reduced to 3 8 to the appliance Because some municipalities have some additional local codes it is always best to consult your...

Страница 9: ...o gas valve Refer to Figure 11 CAUTION Do not wire millivolt remote wall switch for gas appliance to a 120v power supply For lighting instructions refer to Page 12 NOTE If glass doors are installed the unit must be operated with the doors fully open Fig 12 If the doors are not fully open the thermodisk will auto matically turn the unit off CAUTION After the unit cools the burner will automatically...

Страница 10: ...t of air will be trapped in the line When first lighting the unit with pilot light it will take a few minutes to purge the trapped air Once purg ing is complete the pilot and burner will light and operate as indicated in the instruction manual Subsequent lightings of the appliance will not require purging When lit for the first time the appliance will emit a slight odor for an hour or two This is ...

Страница 11: ... valves flame adjustment is accomplished by rotating the Hi Lo adjustment knob located near the center of the gas control LO H I Turn counterclockwise to increase flame height Turn clockwise to lower flame height FP390 FLAME ADJUSTMENT KNOB 11 21 96 Fig 15 Flame adjustment knob for SIT820 valve Flame Characteristics It is important to periodically perform a visual check of the pilot and the burner...

Страница 12: ...ccess Cover KT458 Fig 20 Push bottom of weather enclosure into firebox Optional Stainless Steel Hood An optional stainless steel hood is available for both the ODGR400 and ODGR500 NOTE The stainless steel hood may NOT be used when the optional glass doors are installed Installation Instructions 1 Turn the unit off and allow to cool 2 Place the hood so the 2B 67 mm slot clears the sensor plate loca...

Страница 13: ...hese instructions exactly B BEFORE LIGHTING smell all around the heater area for gas Be sure to smell next to the floor because some gas is heavier than air and will settle on the floor WHAT TO DO IF YOU SMELL GAS Do not try to light any fireplace Do not touch any electric switch Do not use any phone in your building Immediately call your gas supplier from a neighbor s phone Follow the gas supplie...

Страница 14: ...sk For Air in the lines Thermopile needs a minimum 325mV Adjust pilot flame height All wiring connections Replace Thermopile Thermocouple needs a minimum of 14mV Defective valve Turn to pilot meter should read greater than 100mV Thermodisk Pilot Lights with Piezo Ignitor YES YES YES YES Pilot Stays Lit Pilot Lights Main Burner System OK START CHECK Wall switch is not turned on Watch for grounded w...

Страница 15: ... burner gas orifice pilot burner thermopile combination millivolt gas valve Most of these components may require only an occa sional checkup and cleaning and some may require ad justment If repair is necessary it should be performed by a qualified technician In order to properly clean the burner and pilot assembly turn off the gas to the unit remove logs exposing the burner and pilot assembly Clea...

Страница 16: ... 3 Ceramic Tile single 57803 57803 4a Burner Orifice Natural Manifold Orifice 20007106 20007106 4b Burner Orifice LP Manifold Orifice 20007159 20007159 6 Side Brick Left 20002008 or 92D0004 20002021 or 92D0011 7 Back Brick 20002006 or 92D0002 20002019 or 92D0005 8 Side Brick Right 20002007 or 92D0003 20002020 or 92D0006 9 Left Hearth Brick 20007158 or 92D0008 20007241 or 92D0010 10 Right Hearth Br...

Страница 17: ... parts Parts may be ordered through your Monessen Fireplaces distributor or dealer You will need the following information when ordering re placement parts 1 The appliance model number 2 The serial number 3 A description of the part Should you need additional information beyond what your dealer can furnish contact MHSC 149 Cleveland Drive Paris KY 40361 Model and serial numbers are listed on the r...

Страница 18: ...roved component to make any modifications you may create a pos sible fire hazard and will void the MHSC warranty In addition such action may void the coverage provided by the owner s insurance Accessory Description Model Number 4 Stainless Steel For heater up to 40 000 BTU s and mantels UV36SH4 Hood 8 high by 12 wide UV42SH4 Glass Doors Designed to enhance the look of the fireplace 36GDKSSSR 42GDK...

Страница 19: ...ure dif ferentials produced by wind Broken glass components Cracks in ceramic and castable parts that do not affect safe operation We do not warrant this fireplace to be in compliance with your local building code Building codes vary greatly throughout the country and you should determine whether your local building code contains restrictions on the use of this fireplace before you purchase it Blo...

Страница 20: ...MHSC 149 Cleveland Drive Paris Kentucky 40361 www mhsc com ...

Отзывы: