background image

20

33D0237

Pipe Coupling

To Heater

Valve

3"

Minimum

CA

UTION

Use new black iron pipe, steel pipe, copper tubing or internally tinned copper tubing.
Internally tinned copper tubing can only be used per National Fuel Code, section
2.6.3, providing gas meets sulfide limits, and where permitted by local codes. Gas
piping system must be sized to provide minimum inlet pressure (listed on Data
Plate) at the maximum flow rate (BTU/Hr). Undue pressure loss will occur if the pipe
is too small.

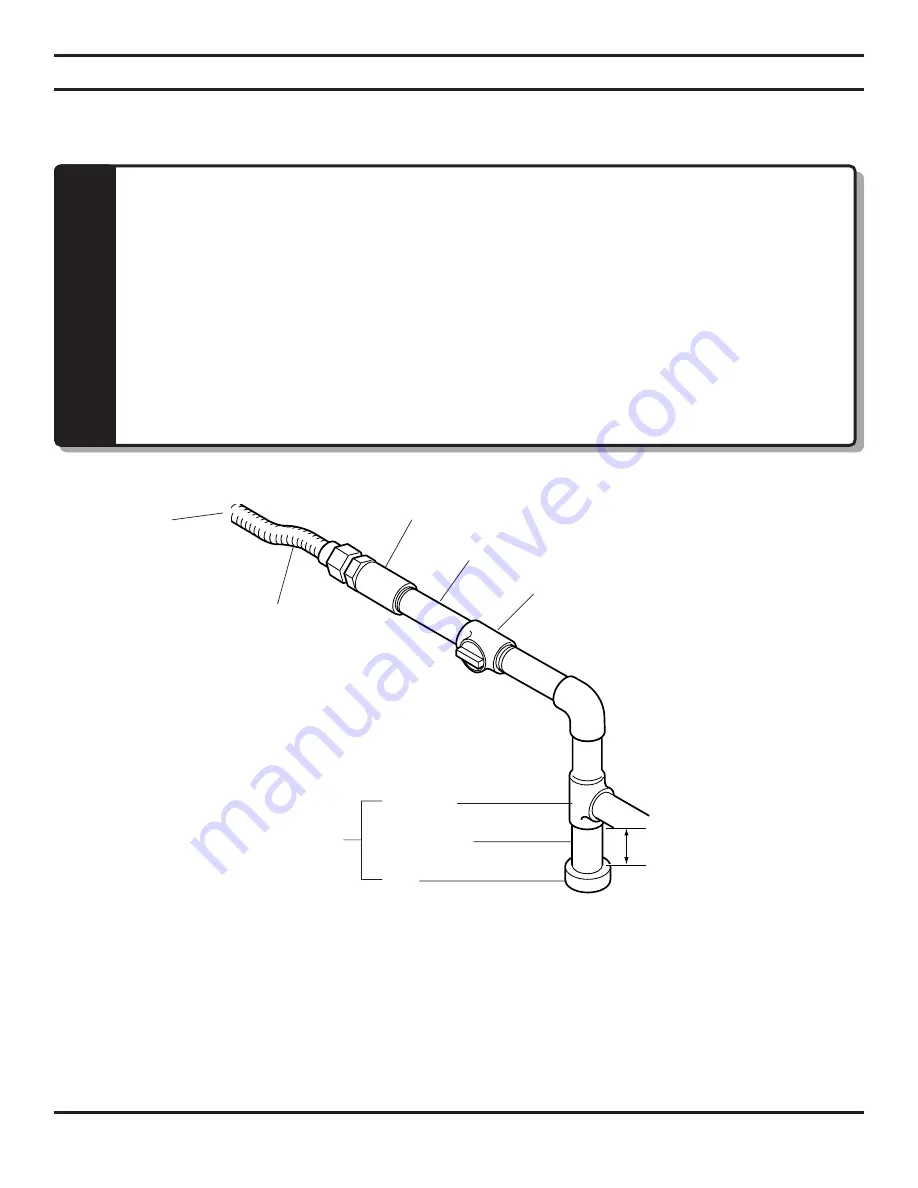
A manual shutoff valve must be installed upstream of the appliance. Union tee and
plugged 1/8" NPT pressure tapping point should be installed upstream of the
appliance. 

Refer to Figure 28.

A sediment trap should be installed upstream to prevent moisture and contaminants
from passing through the pipe to appliance controls and burners. Failure to do so
could prevent the appliance from operating reliably. 

Refer to Figure 28.

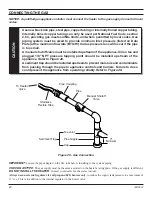
CONNECTING THE GAS

NOTICE: A qualified gas appliance installer must connect the heater to the gas supply. Consult all local
codes.

IMPORTANT: 

Loosen the pipe adapter on the flex tube before installing to the system piping.

CHECK GAS TYPE: 

The gas supply must be the same as stated on the heater’s rating plate. If the gas supply is different,

DO NOT INSTALL THE HEATER.

 Contact your dealer for the correct model.

Always use an external regulator for all propane/LPG heaters only, to reduce the supply tank pressure to a maximum of
13" w.c. This is in addition to the internal regulator in the heater valve.

Manual Shutoff

Valve

Pipe

Tee Joint

Sediment Trap

Pipe Nipple

Cap

Stainless

Flexible Tube

Figure 28 - Gas Connection

Содержание DBX24

Страница 1: ...his manual is not followed exactly a fire or explosion may result causing property damage personal injury or loss of life Do not store or use gasoline or other flammable vapors and liquids in the vicinity of this or any other appliance WHAT TO DO IF YOU SMELL GAS Do not try to light any appliance Do not touch any electrical switch do not use any phone in your building Immediately call your gas sup...

Страница 2: ...IGHTING INSTRUCTIONS 30 THERMOSTATIC CONTROL LIGHTING INSTRUCTIONS 31 MILLI VOLT CONTROL LIGHTING INSTRUCTIONS 32 MATCH LIGHTING INSTRUCTIONS 33 CLEANING and SERVICING 33 BLOWER AND OTHER OPTIONAL EQUIPMENT 34 ILLUSTRATED PARTS BREAKDOWN AND CABINET ACCESSORIES 35 ILLUSTRATED PARTS BREAKDOWN DFX24 MILLI VOLT DFX24 MANUAL DFX24 T STAT 36 REPLACEMENT PARTS LIST DFX24 MILLI VOLT DFX24 MANUAL DFX24 T ...

Страница 3: ... 8 CARBON MONOXIDE POISONING Early signs of carbon monoxide poisoning are similar to the flu with headaches dizziness and or nausea If you have these signs obtain fresh air immediately Have the heater ser viced as it may not be operating properly 9 The installation must conform with local codes or in the absence of local codes with the National Fuel Gas Code ANSI Z223 l 10 This unit complies withA...

Страница 4: ... system at test pressures in excess of 1 2 psig 3 5 kPa 20 The appliance must be isolated from the gas supply pip ing system by closing its equipment shutoff valve dur ing any pressure testing of the gas supply piping system at test pressures equal to or less than 1 2 psig 3 5 kPa 21 Do not use this room heater if any part has been under water Immediately call a qualified service technician to ins...

Страница 5: ...must be mounted on the floor or on the optional fireplace hearth OPERATION This unvented gas heater requires no outside venting and burns cleanly with high heating efficiency This zero clearance unvented gas heater can be installed against or recessed into any wall that is accessible to a gas line Figure 1 Unvented Gas Heater Control Access Door Shown Open ...

Страница 6: ... T stat 22 000 17 000 2 DFX24NV Milli Volt 22 000 17 000 2 DBX24NT T stat 10 000 N A 1 DFX32NM Manual 26 000 15 000 2 DFX32NT T stat 26 000 20 000 2 DFX32NV Milli Volt 26 000 20 000 2 IGNITION CONTROLS Piezo ignitor allows ignition of the pilot without the use of matches or batteries Manual control has four 4 positions OFF All gas to the gas logs is shut off at the valve IGN Valve position to ligh...

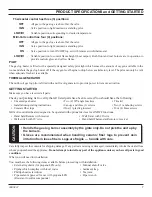
Страница 7: ... ceramic fiber logs to prevent skin irritation from loose fibers Logs are fragile handle with care CAUTION PRODUCT SPECIFICATIONS and GETTING STARTED Thermostat control has three 3 positions OFF All gas to the gas logs is shut off at the valve IGN Valve position to light maintain a standing pilot LOW HI Variable position corresponding to desired temperature Milli Volt control has four 4 positions ...

Страница 8: ...stalled for safe operation of the unit 3 Field wire main power supply to units with fan kit Refer to the ELECTRICAL SECTION found in this manual Electrical connections should only be performed by an experienced licensed certified tradesman 4 Install optional ON OFF kit on units with millivolt control Refer to installation instructions included with the kit and also refer to the ELECTRICAL WIRING s...

Страница 9: ...ace Rooms communicating directly with the space in which the appliances are installed through openings not furnished with doors are considered a part of the unconfined space UNUSUALLY TIGHT CONSTRUCTION IS DEFINED AS CONSTRUCTION WHERE a walls and ceilings exposed to the outside atmosphere have a continuous water vapor retarder with a rating of 1 perm 6 x 10¹¹ kg per pa sec m2 or less with opening...

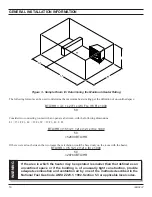
Страница 10: ...rmula can be used to determine the maximum heater rating per the definition of unconfined space BTU HR L1 L2 Ft x W Ft x H Ft x 1000 50 Consider two connecting rooms with an open area between with the following dimensions L1 15 1 2 Ft L2 12 Ft W 12 Ft H 8 Ft BTU HR 15 1 2 12 x 12 x 8 x 1000 50 52800 BTU HR If there were a door between the two rooms the calculation would be based only on the room w...

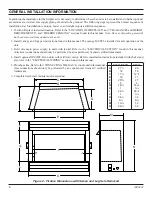
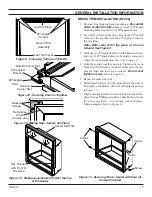
Страница 11: ... Figure 14 page 14 and logs 4 Place rear firebrick panel on back wall of firebox Set bottom of panel behind the bracket tabs of the grate See Figure 4 5 Place one of the side firebrick panels in cabinet Line up the hole in the retainer clip with the hole inside the firebox Using Phillips screwdriver attach the retainer bracket to inside of firebox See Figure 5 6 Repeat step five for the other fire...

Страница 12: ...elp secure the corners 4 Repeat for other side NOTE If you do not attach the trim at the correct corners use a hammer and screwdriver to tap on the one end of the 90 angle bracket This will separate the two pieces of trim See Figure 8 5 Place assembled brass trim on front of heater Using four 4 brass screws secure brass trim to sides of heater See Figure 8 Figure 6 Matching and Joining Corners of ...

Страница 13: ...See Figure 10 4 Hold the corners together securely Tighten screws on bracket with flat head screwdriver Make sure the cor ners are flush and there are no spaces Do not over tighten screws Refer to Figure 11 5 Repeat for other side trim 6 Slide assembled trim over the top and down the sides of the fireplace Flush trim with front of fireplace as shown in Figure 12 7 Align holes in assembled trim wit...

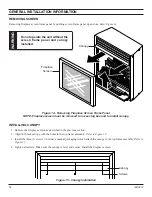
Страница 14: ...as described in the previous section 2 Align the black canopy with the holes in the top frame assembly Refer to Figure 15 3 Install the three 3 screws in owner s manual packaging which attach the canopy to the top frame assembly Refer to Figure 15 4 Tighten all screws Make sure the canopy is level and secure Install the fireplace screen Figure 14 Removing Fireplace Screen Frame Panel NOTE Fireplac...

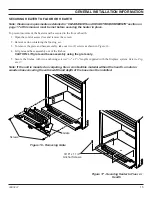
Страница 15: ...set 3 To remove the grate and base assembly take out two 2 screws as shown in Figure 16 4 Lift grate and base assembly out of the firebox CAUTION Lift grate and base assembly using the grate only 5 Secure the firebox with two anchoring screws 3 16 x 11 4 length supplied with the fireplace system Refer to Fig ure 17 Note If the unit is mounted on carpeting tile or combustible material without the h...

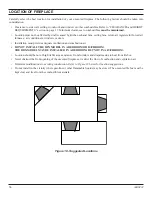
Страница 16: ...s or doors Installation must provide adequate ventilation and combustion air DO NOT INSTALL THE DFX MODEL IN A BEDROOM OR BATHROOM THE DBX MODEL MAY BE INSTALLED IN A BEDROOM BUT NOT IN A BATHROOM Location should be out of high traffic areas and away from furniture and draperies due to heat from firebox Never obstruct the front opening of the unvented fireplace or restrict the flow of combustion a...

Страница 17: ... a fire hazard 1 Sidewall Clearances The clearance from the in side of the appliance to any combustible adjacent wall should not be less than 9 for the DBX24 DFX24 or less than 15 for the DFX32 Refer to Figures 19 and 20 2 Ceiling Clearance The ceiling must be at least 42 from the top of the firebox opening Refer to Figures 19 and 20 3 BackWall Clearance The appliance may be placed against a combu...

Страница 18: ...rectly on a combustible floor or a raised platform of an appropriate height Do not place fireplace on carpeting vinyl tile or other soft floor coverings It may however be placed on flat wood plywood particle board or other hard surfaces Be sure fireplace rests on a solid continuous floor or platform with appropriate framing for support and so that no cold air can enter from under the firebox Ancho...

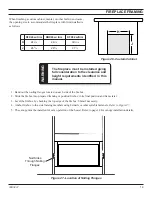
Страница 19: ...eners Refer to Figure 27 5 The canopy must be installed for safe operation of the heater Refer to page 14 for canopy installation details When finishing a custom cabinet mantel or other built in enclosure the opening size to accommodate the fireplace with trim installed is as follows FIREPLACE FRAMING DFX24 w trim DBX24 w trim DFX32 w trim H 243 4 243 4 3213 16 J 263 4 263 4 311 4 The fireplace mu...

Страница 20: ...ream to prevent moisture and contaminants from passing through the pipe to appliance controls and burners Failure to do so could prevent the appliance from operating reliably Refer to Figure 28 CONNECTING THE GAS NOTICE A qualified gas appliance installer must connect the heater to the gas supply Consult all local codes IMPORTANT Loosen the pipe adapter on the flex tube before installing to the sy...

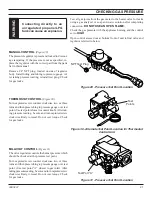
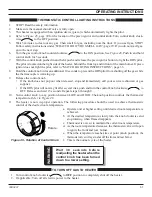
Страница 21: ...l fitting and tubing to pressure gauge Af ter taking pressure reading reinstall test plug Check for gas leaks THERMOSTAT CONTROL Figure 30 Turn captured screw counter clockwise two or three turns and then place tubing to pressure gauge over test point Use test point closest to control knob After tak ing pressure reading be sure and turn captured screw clockwise firmly to reseal Do not over torque ...

Страница 22: ...110 VAC TO OPERATE CONNECTING OPTIONAL WALL SWITCH OR THERMOSTAT 1 Use 18 awg two wire cable 20 feet maximum length 2 At one end of the cable connect both wires to the wall switch or thermostat At the other end connect one wire to TP TH and one wire to TH The color of the wires does not matter Optional Wall Switch Thermostat or Remote Receiver Switch On Off Switch On Off Switch Wall Switch ODS Pil...

Страница 23: ...ads with self adhesive backing to bottom of remote receiver and to floor of compartment behind access panel 7 Attach remote receiver to firebox with velcro pads Control switch must face forward CHECKING SYSTEM OPERATION The millivolt system and individual components may be checked with a millivolt meter having a 0 1000 mV range Conduct each check shown in chart below by connection meter test leads...

Страница 24: ... the parts in accordance with these diagrams or failure to use only parts specifically approved with this heater may result in property damage or personal injury LOG PLACEMENT Before you begin This unit is supplied with a set of three ceramic fiber logs Do not handle these logs with your bare hands Always wear gloves to prevent skin irritation from ceramic fibers After handling logs wash your hand...

Страница 25: ...2 PROPER INSTALLATION SEQUENCE DFX32 1 Position the rear log 2 in logbracket and on locating pins 2 Install the front log 1 in bracket Visually center log PROPER INSTALLATION SEQUENCE DBX24 Install one piece log on two locating pins Figure 35 Proper Sequence of Log Installation DBX24 Locating Pin Locating Pin One piece Log ...

Страница 26: ...for correct pilot flame If the pilot flame does not touch the thermocouple then the main burner cannot function reliably Refer to Figure 38 and 40 for incorrect shape of pilot flame MILLI VOLT CONTROL Figure 37 Correct Appearance of Pilot Flame Figure 38 Incorrect Appearance of Pilot Flame MANUAL AND THERMOSTAT CONTROL Figure 39 Correct Appearance of Pilot Flame Figure 40 Incorrect Appearance of P...

Страница 27: ...t log The face of the front log will glow a bright reddish orange when the heater is in operation NOTE When the log set is turned on for the very first time the burner flames in front of log 2 will appear an opaque orange on the surface of log 2 After two or three hours of continuous operation on the highest setting the normal bright orange red glow should be visible One piece Log Figure 43 Correc...

Страница 28: ... but may produce annoying smoke and smells as they are burned off during the initial operation of the appliance possibly causing headaches or eye or lung irritation This is a normal and temporary occurrence The initial break in operation should last two to three hours with the burner at the highest setting Provide maximum ventila tion by opening windows or doors to allow odors to dissipate Any odo...

Страница 29: ... not attempt to light any appliance Do not touch any electric switch do not use any phone in your building Immediately call your gas supplier from a neighbor s phone Follow the gas supplier s instructions If you cannot reach your gas supplier call the fire department C Use only your hand to push in or turn the gas control knob Never use tools If the knob will not push in or turn by hand don t try ...

Страница 30: ... the control knob for 30 seconds to allow air to bleed out of the gas piping 7 With the control knob pushed in push and release the piezo ignitor button to light the ODS pilot The pilot is located on the right side of the heater behind the front log and in front of the main burner If piezo ignitor does not light the pilot refer to MATCH LIGHTING INSTRUCTIONS page 33 8 Hold the control knob in for ...

Страница 31: ...e control knob If the knob does not pop out when released stop and immediately call your service technician or gas supplier If the ODS pilot will not stay lit after several tries push and turn the control knob clockwise to OFF Release and wait 15 seconds Repeat steps 6 through 9 10 Turn control knob to any position between LOW and HIGH The knob position controls the thermostat temperature Refer to...

Страница 32: ... push in and release the piezo ignitor button to light the pilot 8 Continue pushing the control knob in for a further 60 seconds to prevent the flame detector from shutting off the gas while the probe is warming up Release the control knob 9 Turn gas control knob counterclockwise to the ON position 10 After the pilot has been lit for one minute the burners can be turned on Turn the ON OFF switch t...

Страница 33: ...h end Gloves are recommended to prevent skin irritation from ceramic fibers If skin becomes irritated wash gently with soap and water Refer to manual for correct log placement PERIODIC CLEANING Refer to parts diagram for location of items discussed below Do not use cleaning fluid to clean logs or any part of heater Brush logs with soft bristle brush or vacuum with brush attachment Vacuum loose par...

Страница 34: ...section Models DFX24 and DBX24 use blower model BLO24 Model DFX32 uses blower model BLO The firebox must be connected to main power supply at time of firebox installation The blower must be installed prior to the installation of the unvented heater The electrical connections must be made before the firebox is framed and enclosed in the finished walls BRASS LOUVERS Optional brass louvers may be ins...

Страница 35: ...M DESCRIPTION QTY DFX DBX24 DFX32 1 Canopy 1 33D0015 33D1022 2 Screen Assembly 1 33D0050 33D1066 3 Left Firebrick Optional 1 33D0202 33D1044 4 Center Firebrick Optional 1 33D0200 33D1042 5 Right Firebrick Optional 1 33D0201 33D1043 6 Blower Optional 1 BLO 24 BLO STANDARD FEATURES ...

Страница 36: ...7 6 15 5 ILLUSTRATED PARTS BREAKDOWN DFX24 MILLI VOLT DFX24 MANUAL DFX24 T STAT WARNING Failure to position the parts in accordance with these diagrams or failure to use only parts specifically approved with this appliance may result in property damage or personal injury ...

Страница 37: ...D0474 1 26D2529 26D2530 1 26D2529 26D2530 14 Tube Fitting 3 8 x 5 16 1 11V0313 11V0313 15 NPT Pipe Plug 1 8 1 00F0092 00F0092 1 00F0092 00F0092 16 Tube Valve to Tee 1 33D0255 33D0255 1 33D0267 33D0267 17 Control Knob 1 18D0602 18D0602 18 Tube Tee 1 4 1 00F0474 00F0474 1 00F0474 00F0474 LOG SET 19 1 Front Log 1 33D0213 33D0213 1 33D0213 33D0213 1 33D0213 33D0213 20 2 Middle Log 1 33D0211 33D0211 1 ...

Страница 38: ... DFX32 T STAT WARNING Failure to position the parts in accordance with these diagrams or failure to use only parts specifically approved with this appliance may result in property damage or personal injury 1 3 4 2 19 20 8 16 10 10 10 9 14 7 18 13 11 13 12 5 5 17 6 15 5 ...

Страница 39: ... 18D0401 12 Piezo Wire 1 00K0632 00K0632 1 00K0632 00K0632 1 00K0632 00K0632 13 ODS Pilot Assembly 1 14D0473 14D0474 1 26D2529 26D2530 1 26D2529 26D2530 14 Tube Fitting 3 8 x 5 16 1 11V0313 11V0313 15 NPT Pipe Plug 1 8 1 00F0092 00F0092 1 00F0092 00F0092 16 Tube Valve to Tee 1 33D0255 33D0255 1 33D0267 33D0267 17 Control Knob 1 18D0602 18D0602 18 Tube Tee 1 4 1 00F0474 00F0474 1 00F0474 00F0474 LO...

Страница 40: ...6 3 ILLUSTRATED PARTS BREAKDOWN DBX24 T STAT WARNING Failure to position the parts in accordance with these diagrams or failure to use only parts specifically approved with this appliance may result in property damage or personal injury ...

Страница 41: ...18D0401 10 ODS Pilot Valve Tube 3 16 1 33D0043 33D0043 LOG SET 11 1 Front Log 1 33D0066 33D0066 PARTS AVAILABLE NOT SHOWN Tube Nut 1 4 2 00F0079 00F0079 Tube Ferrule 1 4 2 00F0080 00F0080 Tube Nut 3 16 1 00F0077 00F0077 Tube Ferrule 3 16 2 00F0078 00F0078 Piezo Kit 1 18D0402 18D0402 NPT Tube Fitting 3 8 x 1 1 2 1 26D2529 26D2530 Flex Tube with Fittings 1 20H0022 20H0022 Modulating Screw Min Flow 1...

Страница 42: ...tting is not correct 1 Control knob not fully pressed in 2 Control knob not pressed in long enough 3 Manual shutoff valve not fully open Turn appliance OFF and allow to cool before servicing Only a qualified service person should service and repair the heater WARNING REMEDY 1 Replace ignitor 2 Replace ignitor 3 Reconnect ignitor cable 4 Free ignitor cable if pinched by any metal or tubing 5 Replac...

Страница 43: ...en until snug then tighten 1 4 turn more 5 Contact local gas company 6 Replace thermocouple 7 Replace control valve 1 Clean burner or replace burner orifice 2 Replace burner orifice 3 Contact qualified service person 1 Contact local gas company 2 Clean burner or replace burner orifice 1 Clean burner or replace burner orifice 2 Replace burner 3 Replace gas regulator 1 Problem will stop after a few ...

Страница 44: ...staller in accordance with the installation instructions The Limited Lifetime Warranty will also be void if the appliance is not operated and maintained according to the operating instructions supplied with the appliance and does not extend to 1 firebox burner assembly damage by accident neglect misuse abuse alteration negligence of others including the instal lation thereof by unqualified install...

Отзывы: