background image

258  - 

E

SPañol

 - Manual de uso 


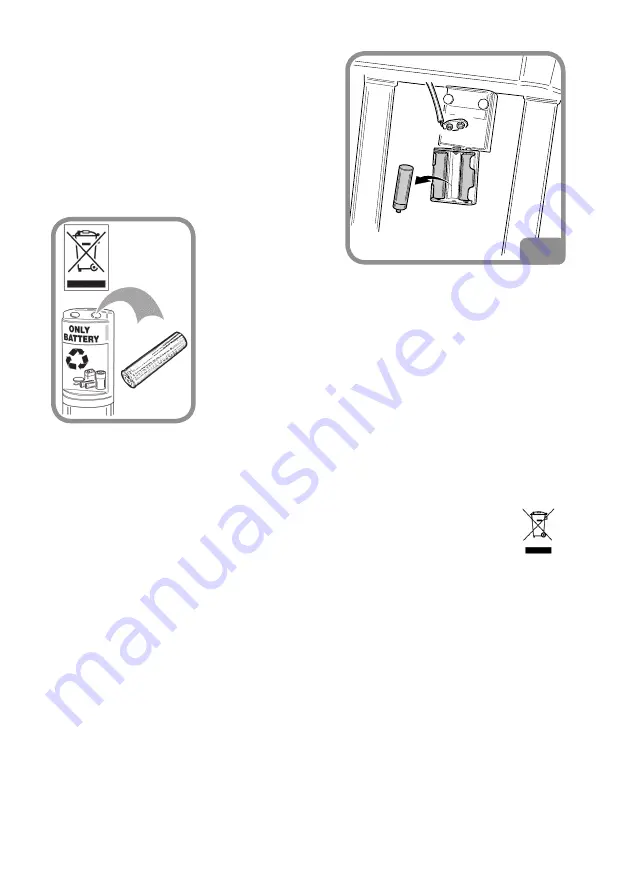
está presente el portapilas con las 6 pilas AA (Fig. 

47b). 

-  Retirar las pilas y eventualmente sustituirlas pro-

curando conectar las nuevas siguiendo la polaridad 

correcta. 

 Nota: Para  facilitar  la  sustitución,  es  posible 

también desconectar el portapilas del manipulador 

(Fig. 47c), desconectando el cable de alimentación 

para poder trabajar en una zona más cómoda e 

iluminada. 

-   Una vez introduci-

das  las  nuevas  pilas, 

se vuelve a cerrar el 

compartimento de las 

pilas y se procede con la carga.

ATENCIÓN: Eliminar las pilas usadas según las normativas 

vigentes.

INFORMACIÓN AMBIENTAL

El siguiente procedimiento de eliminación tiene que ser aplicado exclusivamente a 

las máquinas con placa datos máquina que trae el símbolo del bidón tachado 

.

Este producto puede contener sustancias que pueden ser dañinas para el entorno y 

para la salud humana si no es eliminado adecuadamente.

Por tanto, le proporcionamos la siguiente información para evitar el vertido de estas 

sustancias y para mejorar el uso de los recursos naturales.

Los aparatos eléctricos y electrónicos no deben ser eliminados con los normales desechos 

urbanos, tienen que ser enviados a una recogida selectiva para su correcto tratamiento.

El símbolo del bidón tachado, colocado sobre el producto y en esta página, recuerda 

la necesidad de eliminar adecuadamente el producto al final de su vida.

De esta manera es posible evitar que un tratamiento no específico de las sustancias 

contenidas en estos productos, o un empleo inapropiado de los mismos pueda llevar a 

consecuencias dañinas para el entorno y para la salud humana. Además, así es posible 

contribuir a la recuperación, al reciclaje y a la reutilización de muchos de los mate-

riales presentes en estos productos.

Con este fin, los fabricantes y distribuidores de equipos eléctricos y electrónicos or-

ganizan adecuados sistemas de recogida y eliminación de tales equipos.

47c

Содержание TBE160 MATIC

Страница 1: ...TBE160 MATIC Code 4 112435C 11 2017 Manuale d uso Operator s manual Manuel d utilisation Betriebsanleitung Manual de uso info mondolfoferro it www mondolfoferro it...

Страница 2: ...tice Les droits de traduction de m morisation lectronique de reproduction et d adaptation compl te ou partielle par tout type de moyen y compris microfilms et copies photostatiques sont r serv s Les i...

Страница 3: ...S DEI COMANDI UNITA RX 22 FUNZIONAMENTO BLOCCAGGIO RUOTA 23 LUBRIFICAZIONE DEI PNEUMATICI 26 SMONTAGGIO RUOTE AGRICOLE 27 MONTAGGIO RUOTE AGRICOLE 30 SMONTAGGIO RUOTE TUBELESS E SUPERSINGLE 31 MONTAGG...

Страница 4: ...tivo fornito assieme all apparecchiatura in una cartellina vicino alla macchina per agevolarne la consul tazione da parte degli operatori La documentazione tecnica fornita parte integrante della macch...

Страница 5: ...ente di stoccaggio macchina 25 55 C Movimentazione ATTENZIONE Eseguire con attenzione le operazioni di montaggio e movimentazione descritte L inosservanzaditaliraccomandazionipu provocare danneggiamen...

Страница 6: ...carico ed utilizzare l apposito punto di sollevamento Fig 4 MESSA IN OPERA ATTENZIONE Eseguire con attenzione le operazioni di disimballo montaggio e installazione di seguito descritte L inosservanza...

Страница 7: ...llata su di un pavimento stabile e rigido onde prevenire ed evitare qualsiasi deformazione della struttura Posizionare la macchina in modo da garantire l accessibilit su tutti e quattro i lati In part...

Страница 8: ...oagendo sull appositopiederegolabile Fig 7a peraver maggior stabilit durante le fasi di lavoro Con ruotemoltopesantipu esserenecessariodover intervenireulteriormentesullaregolazionedel piede Questo el...

Страница 9: ...rmative vigenti collegare la macchina ad una propria connessione elettrica dotata di un apposito interruttore automatico differenziale con sensibilit 30mA con soglia di intervento di 100mA e di un int...

Страница 10: ...addestrati che sappiano utilizzare l apparecchiatura in modo corretto e sicuro e che vi sia un adeguata su pervisione non toccare linee e parti interne di motori o apparecchiature elettriche senza pri...

Страница 11: ...onare la macchina in configurazione di riposo fig 5 con il braccio autocentrante abbassato e l autocen trante completamente chiuso DESCRIZIONE DELLO SMONTAGOMME Lo smontagomme funziona elettroidraulic...

Страница 12: ...hiesta l autocentrante pu bloccare cerchi con un diametro massimo fino a 60 I valori di rumorosit indicati sono livelli di emissione e non rappresentano necessariamen te livelli operativi sicuri Nonos...

Страница 13: ...ntare e smontare pneumatici ATTENZIONE Ogni altro utilizzo diverso da quello descritto da considerarsi improprio ed irragio nevole PERICOLO Non prevista dal costruttore l operazione di gonfiaggio sull...

Страница 14: ...tutti i comandi Controllare accuratamente il corretto funzionamento di ciascun comando della macchina Per evitare incidenti e lesioni l apparecchiatura dev essere installata adeguata mente azionata in...

Страница 15: ...Italiano Manuale d uso 15 N Braccio mobile autocentrante O Potenziometro P Display Q Side to side B C D E F G H I N M P L O Q A 11...

Страница 16: ...suolo Unsegnalatoreacustico luminoso postosulquadroelettrico vieneattivatodallamacchina ogni qualvolta si effettuano comandi manuali o automatici potenzialmente pericolosi Il segnalatore a luce aranc...

Страница 17: ...erda la presa del cerchio inoltre per ragioni di sicurezza non lasciare la ruota bloccata sul mandrino autocentrante durante gli intervalli di lavoro Potenziale pericolo di schacciamento mani Potenzia...

Страница 18: ...ia velocit sulla traslazione del carrello autocentrante e carrello utensili 3 Movimento verticale abbassamento e sollevamento gruppo utensili Movimento orizzontale rotazione autocentrante 4 Movimento...

Страница 19: ...ore a quello posteriore 16 Pulsante di emergenza VERSIONE CON MANIPOLATORE A TERRA FIG 14B 1 Movimento orizzontale traslazione carrello autocentrante e carrello utensili Movimento verticale alza e abb...

Страница 20: ...premere con pulsante 12a per memorizzare una posizione diversa da quelle pre impostate degli utensili pulsante 12b per commutare la dimensioni da pollici a millimetri e viceversa pulsante 14 15 per es...

Страница 21: ...inseguitoall azionamento di uno o pi comandi Rimane acceso finch sono azionati dei comandi FUNZIONE DEL LED ROSSO F Non utilizzato FUNZIONE DEL LED GIALLO LOW BATT Questo led si accende quando la tens...

Страница 22: ...nti due led di colore bianco fig 15a e e rosso fig 15a f Il led bianco LED RX ON si accende in modo lampeggiante quando l unit RX riceve dei comandi Il led rosso LED ALARM si accende per un tempo mini...

Страница 23: ...o di comando accensione del led verde posto sulla scatola del radiocomando Nel caso di pile scariche del trasmettitore accensione del led giallo posto sulla scatola del kit aggiornamento radio possibi...

Страница 24: ...o di intervento miratoallavariazionedelvaloreditaratura della pressione di funzionamento delle valvole di massima Il costruttore declina ogni responsabilit causata dalla manomissione di suddette valvo...

Страница 25: ...conda persona che mantenga la ruota in posizione verticale Per la movimentazione di ruote con peso superiore a 500Kg si consiglia l uso di un carrello elevatore o di una gru Non lasciare la ruota bloc...

Страница 26: ...lavora con ruote aventi un peso superiore a 300 Kg si raccomanda di utilizzare solo la prima velocit di rotazione del mandrino autocentrante In questo modo si tutela l integrit e la durata del ridutt...

Страница 27: ...LEVA stata inibita Per le coperture che vanno da 19 5 a 60 in su le operazioni di smontaggio sono come descritto nei paragrafi successivi SMONTAGGIO RUOTE AGRICOLE Bloccare la ruota sull autocentrante...

Страница 28: ...ONE ANTERIORE Agire sul pulsante tangenza utensile per portare in posizione la ruota rispetto all utensile di smontaggio fig 25 Posizionare l utensile a contatto con il pneumatico controllando che rim...

Страница 29: ...ruota sul pavimento e far arretrare il cerchio ottenendo cos lo spazio necessario per estrarla fig 31 SMONTAGGIO TALLONE POSTERIORE Agire sul comando S T S per portare il gruppo utensili dall altro la...

Страница 30: ...re di aiuto ruotare l autocentrante in senso anti orario MONTAGGIO RUOTE AGRICOLE N B Terminata la fase di smontaggio utensile e cerchio si trovano nell esatta posizione per iniziare la fase di montag...

Страница 31: ...ntati uno alla volta operando come descritto per le ruote agricole Lo smontaggio di Supersingle particolar mente duri di tubeless con cerchio a bal conata pari a bordo molto alto si ottiene lubrifican...

Страница 32: ...l pneumatico con o senza cerchietto Per evitare che il cerchietto si smonti con il pneumatico possibile prima di stallonare la copertura fissare il cerchietto alla ruota con i morsetti in dotazione al...

Страница 33: ...a pedale utilizzando un apposito kit accessorio MODI E MEZZI D ARRESTO L interruzione dell alimentazione elettrica della macchina si ottiene ruotando l interruttore generale fig 18 posto sulla scatola...

Страница 34: ...l Assistenza Tecnica ATTENZIONE il libretto Pezzi di ricambio non autorizza l utente ad intervenire sulle macchine ad esclusione di quanto espli citamente descritto nel manuale d uso ma consente all u...

Страница 35: ...sta segnalazio ne pu avvenire solamente all ac censione e indica che il display scollegato difetto so e contempora neamente settato un dip switch ad on E sufficiente riportare ad off il dip switch per...

Страница 36: ...analogico 1 potenziometro di misura spostamento radiale Verificare il collegamento del potenziometro e la sua integrit Se l errore permane chiamare l as sistenza tecnica E02 Mancanza di segnale sul ca...

Страница 37: ...a lavorando oppure effettuare una azione ammessa Intermittenza lenta continua Modo di funzionamento speciale attivo Utilizzata nel SETUP MODE ad esempio in calibrazione per richiamare l attenzione sul...

Страница 38: ...di pressione cilindro autocentrante Distributore che perde Sostituire distributore Guarnizioni usurate Sostituire guarnizioni Arresto del motore durante l utilizzo Intervento salvamotore Aprireilquadr...

Страница 39: ...Controllare che il diametro visualizzato sul display corrisponda a quello del cerchio Pulire il vetro protettivo del laser Se presente un messaggio di errore sul display chiamare l Assistenza Tecnica...

Страница 40: ...o getti d acqua per rimuovere sporcizia o residui dalla macchina Nei lavori di pulizia operare in modo da impedire quando ci sia possibile il formarsi o il sollevarsi della polvere Per ottenere maggio...

Страница 41: ...rticolari elettrici elettronici plastici e ferrosi Procedere quindi alla rottamazione diversificata come previsto dalle norme vigenti INFORMAZIONI SULLA SOSTITUZIONE E SMALTIMENTO DELLE BATTERIE SOLO...

Страница 42: ...rilascio di queste sostanze e per migliorare l uso delle risorse naturali Le apparecchiature elettriche ed elettroniche non devono essere smaltite tra i normali rifiuti urbani ma devono essere inviat...

Страница 43: ...usato Non gettare l olio usato in fognature cunicoli o corsi d acqua raccoglierlo e consegnarlo ad aziende autorizzate per la raccolta Spargimento o perdite d olio Contenere il prodotto fuoriuscito co...

Страница 44: ...lla sono di carattere generale e destinate a servire come guida di massima agli utilizzatori Le possibilit di impiego di ciascun tipo di estintore devono essere richieste al fabbricante GLOSSARIO Anel...

Страница 45: ...il quale far compiere alla macchina tutti i movimenti necessari alle varie operazioni Rigatura Operazione di ripristino della scolpitura del battistrada del pneumatico Stallonatura interna esterna Di...

Страница 46: ...NZA RETE HL5 SPIA ILLUMINAZIONE KM1 TELERUTTORE 2 VELOCITA MOTORE M1 KM2 TELERUTTORE 1 VELOCITA MOTORE M1 KM3 TELERUTTORE 2 VELOCITA MOTORE M1 M1 MOTORE CENTRALINA IDRAULICA M2 MOTORE AUTOCENTRANTE QF...

Страница 47: ...Italiano Manuale d uso 47...

Страница 48: ...N POSIZIONE SQ4 MICROINTERRUTTORE UTENSILE RUOTATO A DX SQ5 PROXIMITY PASSO CATENA XC1 CONNETTORE CAVO SERIALE XC2 CONNETTORE CAVO PEDALE ROTAZIONE SCOLPITURA YV1 E V SCARICO OLIO YV4 E V BRACCIO TRAS...

Страница 49: ...Italiano Manuale d uso 49...

Страница 50: ...A11 COMANDO ROTAZIONE AUTOC ORARIA SA12 COMANDO DISCO STALLONATORE SU SA13 COMANDO DISCO STALLONATORE GIU SA14 COMANDO UTENSILE RICERCA SU SA15 COMANDO UTENSILE RICERCA GIU SA16 COMANDO SELEZIONE VELO...

Страница 51: ...Italiano Manuale d uso 51...

Страница 52: ...E DX SA12 COMANDO DISCO STALLONATORE SU SA13 COMANDO DISCO STALLONATORE GIU SA14 COMANDO UTENSILE RICERCA SU SA15 COMANDO UTENSILE RICERCA GIU SA16 COMANDO SELEZIONE VELOCITA ROTAZIONE AUTOCENTRANTE S...

Страница 53: ...Italiano Manuale d uso 53...

Страница 54: ...C1 CILINDRO AUTOCENTRANTE C2 CILINDRO BRACCIO AUTOCENTRANTE C3 CILINDRO DISCO STALLONATORE C4 CILINDRO UTENSILE C5 CILINDRO ROTAZIONE BRACCIO PORTA UTENSILI C6 CILINDRO ALZA BRACCIO PORTA UTENSILI C7...

Страница 55: ...Italiano Manuale d uso 55...

Страница 56: ...56 Italiano Manuale d uso...

Страница 57: ...HEEL LOCKING OPERATION 77 LUBRICATING TYRES 80 DEMOUNTING AGRICULTURAL WHEELS 81 MOUNTING AGRICULTURAL WHEELS 84 DEMOUNTING TUBELESS AND SUPERSINGLE TYRES 85 MOUNTING TUBELESS AND SUPERSINGLE TYRES 85...

Страница 58: ...ar the tyre changer where it is readily accessible for consultation by the machine operator Thetechnicaldocumentationsuppliedisconsideredanintegralpartofthemachine and must always accompany the equipm...

Страница 59: ...chine 1380 Kg Ambient temperature for storing the equipment 25 to 55 C Handling WARNING Carry out carefully the assembly and han dling operations described Failure to com ply with these instruction ma...

Страница 60: ...at the load is correctly balanced and use the appropriate lift point Fig 4 INSTALLATION WARNING Take the utmost care during the unpacking assembly and installation procedures described Failure to comp...

Страница 61: ...ions on safety at work The machine must be installed on a stable and rigid floor to prevent and avoid any struc ture deformation Position the machine in a manner that guarantees access to all four sid...

Страница 62: ...7a toensurebetterstabilityduringoperation Inthe case of very heavy wheels it may be necessary to further adjust the foot This will prevent any jerking from the rear part of the base Fixing to the gro...

Страница 63: ...onnect the machine to its own electrical connection fitted with a suitable differential circuit breaker with 30mA sensibility and an intervention threshold of 100mA and a 32A automatic thermal magneti...

Страница 64: ...relevant stand ards and regulations in force Make sure that all machine operators are suitably trained that they are capable of using the machine correctly and safely and that they are adequately supe...

Страница 65: ...ing mode Fig 5 with the turntable arm lowered and the turntable completely closed TYRE CHANGER DESCRIPTION The tyre changer operates electro hydraulically It works on any type of integral wheels drop...

Страница 66: ...ptional accessory supplied on request the turntable can lock rims with a diameter of up to 60 The noise levels indicated correspond to emission levels and do not necessarily represent safe operating l...

Страница 67: ...yre mounting and demounting WARNING Any use other than those described in this manual is to be considered improper and unreasonable DANGER The manufacturer does not intend the machine to be used for i...

Страница 68: ...nction and location of all commands Carefully check that all controls on the machine are working properly The machine must be installed properly operated correctly and serviced regularly in order to p...

Страница 69: ...English Operator s manual 69 O Potentiometer P Display Q Side To Side B C D E F G H I N M P L O Q A 11...

Страница 70: ...ey and between the tool trolley and the ground Anacoustic luminousindicatorlocatedontheelectricalboardisactivatedbythemachine each time potentially dangerous manual or automatic commands are executed...

Страница 71: ...ance in the case that the turntable looses its grip on the rim Furthermore for safety reasons never leave the wheel locked on the turntable during work breaks Potential risk of hand crushing Potential...

Страница 72: ...raise and lower turntable arm 2 Button for selecting second speed setting for turntable trolley and tool trolley translation 3 Vertical movement lower and raise tool unit Horizontal movement turntable...

Страница 73: ...ront bead to rear bead 16 Emergency button VERSION WITH FLOOR STANDING MANIPULATOR FIG 14B 1 Horizontal movement turntable trolley and tool trolley translation Vertical movement raise and lower turnta...

Страница 74: ...n button pressed simultaneously with button 12a to store a tool position other than the default positions button 12b to toggle between inches and millimetres buttons 14 15 to execute side to side oper...

Страница 75: ...o the receiving unit following the activa tion of one or more commands It will remain on as long as the commands are activated FUNCTION OF THE RED F LED Not used FUNCTION OF THE YELLOW LOW BATT LED Th...

Страница 76: ...on the side of the RX unit case The white LED RX ON LED starts to flash when the RX unit receives commands The red LED ALARM LED turns on for a minimum of twenty seconds when the STOP button on the c...

Страница 77: ...adio control box lights up If the transmitter batteries are run down the yellow LED on the radio update kit box lights up the control unit can be connected to the machine using the original cable If t...

Страница 78: ...er declines all liability for damage resulting from tampering with these valves 19 The pressure should be reduced for weak or particularlythinrims forthickrimsthatare difficult to demount it is recomm...

Страница 79: ...sition A fork lift truck or a crane should be used when handling wheels weighing more than 500 kg Do not leave the wheel locked on the turntable for periods longer than the normal operating pauses DAN...

Страница 80: ...wheels that weigh more than 300 Kg it is recommended to use only the first rotational speed of the turntable This protects the reducer from damage and extends its duration LUBRICATING TYRES Before fi...

Страница 81: ...from 19 5 to 60 and larger the demounting procedure is as described in the following paragraphs DEMOUNTING AGRICULTURAL WHEELS Clamp the wheel on the turntable Operate the control lever to lift the w...

Страница 82: ...THE FRONT BEAD Press the tool plane button to posi tion the wheel correctly relative to the demounting tool fig 25 Position the tool so it is in contact with the tyre making sure that a safe dis tanc...

Страница 83: ...BEAD DEMOUNTING Use the S T S control to move the tool unit to the other side of the wheel Now turn the turntable Bring the bead breaker disc near the bead and start to push it outward Be careful tha...

Страница 84: ...are in the correct posi tionforthemountingprocedure otherwise position the tool so that the reference mark is flush with the rim edge Fig 33 Tighten the pliers A Fig 33 on the front edge of the rim Mo...

Страница 85: ...To mount particular rigid super single tyres and tubeless tyres on rims with very tall even shoulders lubricate thoroughly and proceed as described for agricultural wheels MOUNTING TUBELESS AND SUPERS...

Страница 86: ...ith or without the side ring To prevent the side ring from detach ing with the tyre fasten the side ring to the wheel using the clamps supplied with the machine before breaking the tyre bead N B If th...

Страница 87: ...red by turning the main switch Fig 18 located on the electric system box to zero Allthecommandslocatedonthecontrolleverareinterruptedbyreleasingthecommand itself dead man switch Pressing the stop butt...

Страница 88: ...described in the user manual It only enables users to providethetechnicalassistanceservice with precise information in order to minimise delays OPERATING MODES Table 1 summarises the machine s operat...

Страница 89: ...e messages or OFF FINAL USER This signal will appear only upon start up and indicates that the display is discon nected defective and at the same time a dip switch is set to on Return the dip switch t...

Страница 90: ...the potentiometer and its condition If the error persists contact tech nical assistance E02 No signal on analogue channel 2 channel currently not used E03 No signal on analogue channel 3 channel curre...

Страница 91: ...d or perform a permitted action Slow continuous flashing Special operating mode active Used in SETUP MODE for example for calibration to call attention to the fact that a special potentially dangerous...

Страница 92: ...ked Clean or replace the solenoid valve Turntable cylinder pressure drop The distributor leaks Replace the distributor Gaskets worn Replace the gaskets Motor stops during use Overload cut motor protec...

Страница 93: ...or does not work Check that the diameter shown on the display corresponds to the rim diameter Clean the protective glass on the laser If there is an error message on the display contact technical ass...

Страница 94: ...mpressed air or water jets to remove dirt or residues from the machine When cleaning take care not to create and raise dust as far as possible To make your machine last longer and perform bet ter it i...

Страница 95: ...e scrapped remove all electrical electronic plastic and metal parts And dispose of them separately in accordance with current provisions as prescribed by law INFORMATION ON REPLACING AND DISPOSING OF...

Страница 96: ...e providing you with the information below in order to prevent these substances from being released into the environment and to improve the use of natural resources Electrical and electronic equipment...

Страница 97: ...tances into the environment INFORMATION AND WARNINGS ABOUT HYDRAULIC FLUID Disposing of spent fluid Do not dispose of used oil in sewers storm drains rivers or streams collect it and consign it to an...

Страница 98: ...able Dry combustibles Inflammable liquids Electrical equipment Water YES NO NO Foam YES YES NO Powder YES YES YES CO2 YES YES YES WARNING This table contains general instructions to be used as guideli...

Страница 99: ...king and demounting Console Remote control unit used to make the machine perform all the movements necessary for the various operations Grooving Operation for restoring the groves in the tyre tread In...

Страница 100: ...INS PRESENCE LIGHT HL5 ILLUMINATION LIGHT KM1 M1 2ND MOTOR SPEED REMOTE SWITCH KM2 M1 1ST MOTOR SPEED REMOTE SWITCH KM3 M1 2ND MOTOR SPEED REMOTE SWITCH M1 HYDRAULIC POWER UNIT MOTOR M2 TURNTABLE MOTO...

Страница 101: ...English Operator s manual 101...

Страница 102: ...NG POSITION MICROSWITCH SQ4 TOOL ROTATED TO RIGHT DETECTOR MICROSWITCH SQ5 CHAIN PITCH PROXIMITY SWITCH XC1 SERIAL CABLE CONNECTOR XC2 GROOVING ROTATION PEDAL CABLE CONNECTOR YV1 OIL DRAIN S V YV4 LEF...

Страница 103: ...English Operator s manual 103...

Страница 104: ...URNT ROTATION CONTROL SA11 CLOCKWISE TURNT ROTATION CONTROL SA12 BEAD BREAKER DISC UP CONTROL SA13 BEAD BREAKER DISC DOWN CONTROL SA14 TOOL SEARCH UP CONTROL SA15 TOOL SEARCH DOWN CONTROL SA16 TURNTAB...

Страница 105: ...English Operator s manual 105...

Страница 106: ...OL ROTATION CONTROL SA12 BEAD BREAKER DISC UP CONTROL SA13 BEAD BREAKER DISC DOWN CONTROL SA14 TOOL SEARCH UP CONTROL SA15 TOOL SEARCH DOWN CONTROL SA16 TURNTABLE ROTATION SPEED SELECTOR SB1 STOP BUTT...

Страница 107: ...English Operator s manual 107...

Страница 108: ...l HYDRAULIC DIAGRAM C1 TURNTABLE CYLINDER C2 TURNTABLE ARM CYLINDER C3 BEAD BREAKER DISC CYLINDER C4 TOOL CYLINDER C5 TOOL HOLDER ARM ROTATION CYLINDER C6 TOOL HOLDER ARM UP CYLINDER C7 TRANSLATION CY...

Страница 109: ...English Operator s manual 109...

Страница 110: ...110 English Operator s manual...

Страница 111: ...DU BLOCAGE DE ROUE 131 LUBRIFICATION DES PNEUS 134 DEMONTAGE ROUES AGRICOLES 135 MONTAGE DES ROUES AGRICOLES 138 DEMONTAGE DES ROUES TUBELESS ET SUPERSINGLE 139 MONTAGE DES ROUES TUBELESS ET SUPERSIN...

Страница 112: ...tion fournie avec la machine dans une pochette pr s de la machine afin que les op rateurs puissent facilement le consulter tout moment Cette notice et toute la documentation technique jointe font part...

Страница 113: ...e 1 380 kg Temp ratures extr mes du lieu de stockage de la machine de 25 55 C Manutention ATTENTION Proc der avec pr caution aux op rations de montage et de manutention d crites ci apr s Le non respec...

Страница 114: ...Fig 5 afin de garantir une bonne r partition de la charge et utiliser la prise de levage fig 4 MISE EN PLACE ATTENTION D baller monter et installer avec soin la machine comme d crit ci dessous La non...

Страница 115: ...ail La machine doit tre install e sur un sol stable et rigide pouvant pr venir et viter toute d formation de la structure Positionner la machine de fa on en garantir l accessibilit aux quatre cot s de...

Страница 116: ...sant sur les pieds r glables pr vus cet effet fig 7a ceci afin d assuarer sa stabilit pendant les op rations En op rant avec des roues tr s lourdes il sera peut tre n cessaire de r gler un peu plus le...

Страница 117: ...isateur doit monter sur le cordon d alimentation une fiche conforme aux r glementations en vi gueur brancher la machine une prise quip e d un disjoncteur diff rentiel avec sensibilit 30 mAayant un seu...

Страница 118: ...quate qu ils sachent utiliser l quipement de mani re correcte et s re et qu il y ait une supervision ad quate ne pas toucher les lignes et les parties internes de moteurs ou d instruments lec triques...

Страница 119: ...osition de repos fig 5 avec le bras autocentreur abaiss et l autocentreur com pl tement ferm DESCRIPTION DU DEMONTE PNEUS Le d monte pneus fonctionne de fa on lectro hydraulique Celui ci travaille sur...

Страница 120: ...utocentreur peut bloquer des jantes d un diam tre maximum allant jusqu 60 Les valeurs report es sont des niveaux d mission sonore qui ne sont pas forc ment des niveaux op rants s rs Bien qu il existe...

Страница 121: ...TENTION Toute autre usage est consid rer comme impropre et d raisonnable DANGER L op ration de gonflage sur la machine n est pas pr vue par le fabricant Si jamais l op rateur se munissant de son propr...

Страница 122: ...ition de toutes les commandes Contr ler soigneusement le fonctionnement correct de chaque commande de la machine Pour viter des accidents et des l sions la machine doit tre bien install actionn de fa...

Страница 123: ...Fran ais Manuel d utilisation 123 N Bras mobile autocentreur O Potentiom tre P Ecran Q Side to side B C D E F G H F N M P L O Q A 11...

Страница 124: ...rique est activ par la machine chaque fois que des commandes manuelles ou automatiques potentiellement dangereuses sont effectu es L avertisseur est constitu par une lumi re clignotante de couleur ora...

Страница 125: ...la jante par ailleurs pour des raisons de s curit ne jamais laisser la roue bloqu e sur le mandrin autocentreur pendant les pauses de travail Risque potentiel d crasement de mains Risque potentiel d c...

Страница 126: ...ur d clencher la double vitesse de la mouvement du chariot autocentreur et du chariot des outils 3 Mouvement vertical descente et lev e du groupe outils Mouvement horizontal rotation autocentreur 4 Mo...

Страница 127: ...ERSION AVEC MANIPULATEUR AU SOL FIG 14B 1 Mouvement horizontal mouvement du chariot autocentreur et du chariot des outils Mouvement vertical l ve et descend le bras autocentreur 2 Bouton pour d clench...

Страница 128: ...en m me temps que bouton 12a pour enregistrer une position des outils diff rente de celles pr d finies bouton 12b pour commuter les dimensions de pouces millim tres et vice versa bouton 14 15 pour act...

Страница 129: ...e l unit r ceptrice la suite de l actionnement d une ou plusieurs commandes Elle reste allum e tant que des commandes sont actionn es FONCTION DE LA DEL ROUGE F Inutilis e FONCTION DE LA DEL JAUNE BAT...

Страница 130: ...nit RX La DELblanche DEL METTEURALLUM clignote lorsque le r cepteur re oit des commandes LaDELrouge DELALARME s allumependant un minimum de vingt secondes lorsque le bouton d arr t STOP est enfonc sur...

Страница 131: ...Au cas o la batterie du transmetteur seraient d charg es allumage de la diode jaune situ e sur la bo te du kit de mise jour radio il est possible de brancher l unit de commande la machine l aide du c...

Страница 132: ...tarage de la pression defonctionnementdesclapetsdemaximum ou du limiteur de pression n est admis Le fabricant d cline toute responsabilit pour les dommages caus s par la modifi cation des soupapes cit...

Страница 133: ...ion une deuxi me personne qui maintienne la roue en position vertical Pour la manutention desrouesd un poidssup rieur 500 kg il est conseill d utiliser un chariot l vateur ou une grue Ne pas laisser l...

Страница 134: ...gement que de d chargement de la roue A 22 ATTENTION Avec des roues de plus de 300 kg il est conseill d utiliser seulement la premi re vitesse de rotation du mandrin autocentreur Ceci afin de prot ger...

Страница 135: ...d sactiv e Pour les pneus allant de 19 5 60 et plus les op rations de d montage s effectuent comme d crit dans les paragraphes suivants DEMONTAGE ROUES AGRICOLES Bloquer la roue sur l autocentreur Act...

Страница 136: ...avant DEMONTAGE TALON AVANT Appuyer sur le bouton tangence outil pour positionner la roue par rapport l outil de d montage fig 25 Placer l outil en contact avec le pneu de mani re ce qu il reste une b...

Страница 137: ...n obtenir l espace n cessaire pour extraire facilement celle ci fig 31 DEMONTAGE TALON ARRIERE Actionner la commande S T S pour amener le groupe outils de l autre c t de la roue A ce point faire tourn...

Страница 138: ...e montre MONTAGE DES ROUES AGRICOLES N B Une fois la phase de d montage termin e les outils et la jante se trouvent danslapositionexactepourd buterlaphase de montage dans le cas contraire placer l out...

Страница 139: ...e d coll s un un en proc dant comme d crit pour les roues agricoles Led montagedeSupersingleparticuli re ment durs de pneus tubeless avec jante rebord avec rebord tr s haut s effectue en graissant soi...

Страница 140: ...jusqu ce que le pneu avec ou sans tringle soit compl tement sorti Pour viter de d monter la tringle avec le pneu avant de d talonner le pneu fixer la tringle la roue avec les pinces en dotation N B P...

Страница 141: ...terruptiondel alimentation lectriquedelamachinesefaitenportantl interrupteur g n ral fig 18 se trouvant sur la bo te du circuit lectrique sur la position z ro Toutes les commandes situ es sur le manip...

Страница 142: ...n autorise pas l utilisateur intervenir sur les ma chinessaufpourcequiestexplicitement d critdanscettenoticetechnique mais elle lui permet de fournir des informa tions pr cises au SAV afin de r duire...

Страница 143: ...s ou teinte UTILI SATEUR FINAL Cette signalisation ne peut se produite qu l allumage et indique que l cran est d connect ou d fectueux et que le dip switch est sur ON Il suffit de placer le dip switch...

Страница 144: ...anal analogique 1 potentiom tre de mesure d placement radial V rifier le branchement du poten tiom tre et son tat Si l alarme persiste contacter le SAV E02 Absence de signal sur le canal analogique 2...

Страница 145: ...tuer une action admise Clignotement lent continu Activation d un mode de fonctionnement sp cial Utilis dans le SETUP MODE en talonnage par exemple pour attirer l attention sur le fait qu un mode de fo...

Страница 146: ...ovanne Perte de pression du verin autocentreur Distributeur qui perd Remplacer le distributeur Joints us s Remplacer les joints Arret du moteur pendant l utilisation D clenchement du disjoncteur de pr...

Страница 147: ...ns Side To Side defectueux ou ne s arrete pas V rifier si le diam tre affich correspond celui de la jante Nettoyer la lentille du laser Si un message d alarme s affiche appeler le SAV Contacter le cen...

Страница 148: ...s tre propre Ne jamais utiliser d air comprim et ou de jets d eau pour liminer la salet ou des r sidus sur la machine Lors du nettoyage et dans la mesure du possible op rer de sorte ne pas soulever ni...

Страница 149: ...te responsabilit en cas de d g ts caus s par la modification des valves ci dessus INFORMATIONS CONCERNANT LA DEMOLITION En cas de d molition de la machine trier les pi ces en fonction de leur composit...

Страница 150: ...cable qu aux machines dont la plaquette d identification reporte le pictogramme de la benne barr e signifiant qu en fin de vie ils doivent tre trait s de fa on particuli re Ces machines contiennent en...

Страница 151: ...r et ext rieur et traiter de fa on ad quate la batterie us e si elle pr vue sur la machine Aveclacontributiondechacun ilserapossibleder duirelaquantit deressourcesnatu rellesn cessaires lafabricationd...

Страница 152: ...uillard huileux placer le bless l air libre et l acheminer vers le centre de premier secours le plus proche Yeux rincer abondamment l eau et contacter au plus vite les urgences m dicales Peau laver l...

Страница 153: ...ompe hydraulique Groupe outils Ensemble d instruments servant au d talonnage et au d montage des pneus Bo tier de commande Unit de commande distance gr ce laquelle il est possible de faire faire la ma...

Страница 154: ...IMENTATION HL5 VOYANT ECLAIRAGE KM1 TELERUPTEUR 2 VITESSE MOTEUR M1 KM2 TELERUPTEUR 1 VITESSE MOTEUR M1 KM3 TELERUPTEUR 2 VITESSE MOTEUR M1 M1 MOTEUR DE LA CENTRALE HYDRAULIQUE M2 MOTEUR DE L AUTOCENT...

Страница 155: ...Fran ais Manuel d utilisation 155...

Страница 156: ...MICROINTERRUPTEUR OUTIL TOURNE A DROITE SQ5 CAPTEUR PROXIMITE PAS CHAINE XC1 CONNECTEUR CABLE SERIE XC2 CONNECTEUR DU CABLE DE LA PEDALE DE ROTATION DE SCULPTURE YV1 E V VIDANGE D HUILE YV4 E V BRAS...

Страница 157: ...Fran ais Manuel d utilisation 157...

Страница 158: ...GAUCHE SA11 COMMANDE ROTATION AUTOC DROITE SA12 COMMANDE DISQUE DETALONNEUR HAUT SA13 COMMANDE DISQUE DETALONNEUR BAS SA14 COMMANDE OUTIL RECHERCHE HAUT SA15 COMMANDE OUTIL RECHERCHE BAS SA16 COMMAND...

Страница 159: ...Fran ais Manuel d utilisation 159...

Страница 160: ...OUTIL ROTATION DROITE SA12 COMMANDE DISQUE DETALONNEUR HAUT SA13 COMMANDE DISQUE DETALONNEUR BAS SA14 COMMANDE OUTIL RECHERCHE HAUT SA15 COMMANDE OUTIL RECHERCHE BAS SA16 COMMANDE SELECTION DE VITESSE...

Страница 161: ...Fran ais Manuel d utilisation 161...

Страница 162: ...ation SCHEMA HYDRAULIQUE C1 VERIN AUTOCENTREUR C2 VERIN BRAS AUTOCENTREUR C3 VERIN DISQUE DETALONNEUR C4 VERIN OUTIL C5 VERIN ROTATION BRAS PORTE OUTILS C6 VERIN LEVE BRAS PORTE OUTILS C7 VERIN MOUVEM...

Страница 163: ...Fran ais Manuel d utilisation 163...

Страница 164: ...164 Fran ais Manuel d utilisation...

Страница 165: ...85 SCHMIERUNG DER REIFEN 188 DEMONTAGE R DER LANDWIRTSCHAFTLICHER FAHRZEUGE 189 MONTAGE R DER LANDWIRTSCHAFTLICHER FAHRZEUGE 192 DEMONTAGE SCHLAUCHLOSE UND SUPERSINGLE REIFEN 193 MONTAGE SCHLAUCHLOSE...

Страница 166: ...n in Betrieb gesetzt werden Das Handbuch mitsamt dem beigepackten Bildmaterial ist in einer Dokumen tentasche griffbereit an der Maschine aufzubewahren um den Bedienern die Einsicht zu erleichtern Die...

Страница 167: ...0 kg Maschine 1380 kg Raumtemperatur des Lagerorts 25 55 C Handling ACHTUNG Die beschriebenen Montage und Handlingar beiten sorgf ltig ausf hren Die Nichtbeach tung dieser Empfehlungen kann zu schwere...

Страница 168: ...isten und den speziel len Anschlagpunkt Abb 4 verwenden VORBEREITUNG ZUR INBETRIEBNAHME ACHTUNG Die nachfolgend beschriebenen Verfahren f r das Auspacken das Montieren und die Installation der Maschin...

Страница 169: ...Maschine muss auf einem stabilen und harten Boden installiert werden um jedwede Verformung der Struktur zu vermeiden und auszuschlie en Die Maschine so aufstellen dass sie von allen vier Seiten aus z...

Страница 170: ...en um eine h here Stabilit t w hrend der Arbeitsphasen zu erreichen Dazu auf den h henverstellbaren Fu Abb 7a einwirken Bei sehr schweren R dern k nnte eine weitere Einstellung des Fusses notwendig se...

Страница 171: ...igen Bestimmungen entsprechenden Stecker mon tieren Die Maschine an einen eigenen elektrischen Anschluss mit Fehlerstromschutzschalter mit Ausl seschwelle von 30mA und Leitungsschutzschalter 32A mit A...

Страница 172: ...iert wurde Sicherzustellen dass alle Maschinenbediener f r eine korrekte und sichere Bedienung der Maschine ausreichend ausgebildet sind und hier ber Aufsicht gef hrt wird keine Leitungen und Innentei...

Страница 173: ...sition Abb 5 gebracht der Spannarm abgesenkt und der Spannteller vollst ndig geschlossen werden BESCHREIBUNG DER REIFENMONTIERMASCHINE Die Reifenmontiermaschine arbeitet elektrohydraulisch Sie arbeite...

Страница 174: ...sser von 60 einspannen Bei den angegebenen Ger uschpegeln handelt es sich um Emissionswerte die nicht unbedingt sichere Betriebsger uschpegel wiedergeben Trotz der Beziehung zwischen den vorliegenden...

Страница 175: ...Demontage von Reifen entwickelt ACHTUNG Jeder andere Einsatz gilt als unsachgem und unverantwortlich GEFAHR Das Aufpumpen des Reifens auf der Maschine ist vom Hersteller nicht vorgesehen Falls der Be...

Страница 176: ...genauestens unterwiesen ist Funktion und Anordnung der Steuer und Bedienvorrichtungen m ssen erlernt werden Die einwandfreie Funktion eines jeden Steuerelements sorgf ltig berpr fen Zur Vermeidung vo...

Страница 177: ...Deutsch Bedienungsanleitung 177 N Beweglicher Arm Spannteller O Potentiometer P Display Q Side to side B C D E F G H I N M P L O Q A 11...

Страница 178: ...hindern Eine Akustik und Leuchtmelder am Schaltschrank wird von der Maschine jedes Mal aktiviert wenn manuelle oder automatische Befehle ausgef hrt werden die gef hrlich sein k nnten Der Melder hat ei...

Страница 179: ...m Spannteller rutschen sollte Au erdem das Rad aus Sicherheitsgr nden w hrend der Arbeitspausen nicht auf dem Spannteller blockiert lassen Potentielle Quetschgefahr der H nde Potentielle Quetschgefahr...

Страница 180: ...Absenken des Spannarms 2 Drucktaste zum Einschalten der doppelten Geschwindigkeit bei der Verschiebung des Spannteller Schlittens und des Werkzeugschlittens 3 Senkrechte Bewegung Absenken und Anheben...

Страница 181: ...hls Side to side ohne Drehung der Werkzeuggruppe um vom vorderen Wulst zum hinteren zu wechseln 16 Not Aus Schalter AUSF HRUNG MIT BEDIENSTATION ABB 14B 1 Waagerechte Bewegung Verschiebung des Spannte...

Страница 182: ...gert die Werte 12b erh ht die Werte 13 Funktionstaste zu dr cken mit Taste 12a zur Speicherung einer nicht voreingestellten Position der Werkzeuge Taste 12b zum Umschalten der Abmessungen zwischen Zol...

Страница 183: ...r Empfangseinheit in Folge der Bet tigung einer oder mehrerer Steuerungen l uft Sie leuchtet so lange so lange Steuerungen bet tigt werden FUNKTION DER ROTEN LED F Nicht benutzt FUNKTION DER GELBEN LE...

Страница 184: ...und eine rote Led Abb 15a f Die wei e Led LED RX ON blinkt wenn die RX Einheit Befehle empf ngt Die rote Led LED ALARM leuchtet zwanzig Sekunden lang auf wenn die Stopptaste STOP auf der Steuers ule b...

Страница 185: ...euchten der gr nen Led auf dem Geh use der Fernbedienung Falls die Batterien des Sendeger ts leer sind Aufleuchten der gelben Led auf dem Geh use des Funk Aktualisierungskits kann die Steuereinheit mi...

Страница 186: ...druck der ber druckventile darf auf keinen Fall ver n dert werden Der Hersteller bernimmt keinerlei Haf tung bei Folgesch den durch die Ver n derung der Ventileinstellung 19 Bei schwachen oder besonde...

Страница 187: ...Rad in senkrechter Position h lt F r die Bewegung von R dern mit einem Gewicht ber 500 kg wird der Einsatz eines Hubwagens oder eines Krans empfohlen Das Rad nie l nger als f r die betriebsbedingt unb...

Страница 188: ...gearbeitet wird wird empfohlen nur die erste Drehgeschwindigkeit des Spanntellers zu benutzen Dadurch wird der einwandfreie Zustand und die Lebensdauer des Getriebemotors gesichert SCHMIERUNG DER REIF...

Страница 189: ...r die Reifen von 19 5 bis 60 aufw rts erfolgen die Demontage arbeiten wie in den nachstehenden Abschnitten beschrieben DEMONTAGE R DER LANDWIRTSCHAFTLICHER FAHRZEUGE Das Rad auf dem Spannteller einspa...

Страница 190: ...aste Werkzeugann herung bet ti gen um das Rad in Bezug auf das Demonta gewerkzeug auszurichten Abb 25 Das Werkzeug mit dem Reifen in Ber hrung bringen dabei immer einen Sicherheits abstand zur Felge e...

Страница 191: ...Abb 31 DEMONTAGE HINTERER WULST Auf die Steuerung S T S einwirken um die Werkzeuggruppe auf die andere Seite des Rads zu bringen An dieser Stelle den Spannteller drehen Die Abdr ckscheibe in Wulstn he...

Страница 192: ...n teller gegen den Uhrzeigersinn zu drehen MONTAGE R DER LANDWIRTSCHAFTLI CHER FAHRZEUGE HINW Nach der Demontage befinden sich das Werkzeug und die Felge genau in der Position f r den Beginn der Monta...

Страница 193: ...landwirt schaftlicher Fahrzeuge vorgeschrieben vorzugehen ist Bei der Demontage von besonders harten Super Single Reifen von schlauchlosen Reifen mit Felgen mit gleichm igem Felgenhorn und sehr hohem...

Страница 194: ...der Reifen mit oder ohne Sprengring austritt Um zu vermeiden dass der Spreng ring mit dem Reifen demontiert wird kann man vor Abdr cken des Reifens den Sprengring am Rad mit den zur Ausstattung der Ma...

Страница 195: ...erden ANHALTEN UND BEDIENELEMENTE F R DAS ANHALTEN Die Unterbrechung der Stromversorgung der Maschine wird durch Verstellung des Hauptschalters Abb 18 am Schrank der Elektroanlage in die Nullstellung...

Страница 196: ...NG Das Ersatzteilbuch berechtigt den Kunden nicht zu Eingriffen an der Maschine ausgeschlossen ist das aus dr cklich in den Gebrauchsanleitungen beschriebene Durch das Ersatzteilbuch kann der Kunde ab...

Страница 197: ...ange schlossen andernfalls ausgeschal ten Variable Meldungen oder ausge schalten ENDBE NUTZER Diese Meldung kann nur bei der Einschal tung erfolgen und zeigt an dass das Display abgetrennt defekt ist...

Страница 198: ...en Verschiebung Den Anschluss und den einwand freien Zustand des Potentiometers pr fen Wenn der Fehler weiter besteht den technischen Kunden dienst verst ndigen E02 Kein Signal am Analogkanal 2 Kanal...

Страница 199: ...holen oder einen zul ssigen Vorgang durchf hren Langsam und kontinuierlich intermittierender Ton Spezielle Betriebsart aktiviert Wird im SETUP MODE zum Beispiel bei der Kalibrierung benutzt um darauf...

Страница 200: ...etzen Druckverlust Zylinder des Spanntellers Verteiler mit Leck Verteiler ersetzen Dichtungen verschlissen Dichtungen ersetzen Anhalten des Motors w hrend der Benutzung Motorschutzschalter ausgel st D...

Страница 201: ...entspricht Das Schutzglas des Lasers reinigen Wenn eine Fehlermeldung auf dem Display angezeigt wird den Technischen Kundendienst verst ndigen Technischen Kundendienst verst ndigen Die Demontagebeweg...

Страница 202: ...Druck stehen Austretendes unter Druck stehendes l kann zu schweren Verletzungen f hren HINWEIS Den Arbeitsbereich sauber halten Niemals Druckluft oder Wasserstrahlen verwen den um Schmutz oder Ablage...

Страница 203: ...lgesch den durch die Ver nderung der Ventileinstellung INFOS ZUR ENTSORGUNG DER MASCHINE Bei eventueller Verschrottung des Ger ts die elektrischen elektronischen Kunststoff und Eisenteile vorsorglich...

Страница 204: ...n UMWELTINFORMATIONEN Folgendes Entsorgungsverfahren ist g ltig nur f r Maschinen die das Symbol der durchkreuzten M lltonne auf ihrer Datenplatte haben Dieses Produkt kann Substanzen enthalten die f...

Страница 205: ...Wir empfehlen dar ber hinaus weitere Ma nahmen zum Umweltschutz die interne und externe Verpackung mit der das Produkt geliefert wird dem Recycling zuf hren und die benutzten Batterien ordnungsgem en...

Страница 206: ...n die Atemwege Bei Einatmung st rkerer lnebel und ldampfkonzentrati onen die betroffene Person unverz glich an die frische Luft f hren und anschlie end den rztlichen Bereitschaftsdienst aufsuchen Auge...

Страница 207: ...m etwas festzuhalten oder mitzuziehen Pumpengruppe Gruppe bestehend aus Elektromotor und Hydraulikpumpe Werkzeuggruppe Gruppe von Werkzeugen f r das Abdr cken und die Demontage der Reifen Bedienpult F...

Страница 208: ...HTE NETZSPANNUNG VORHANDEN HL5 KONTROLLLEUCHTE BELEUCHTUNG KM1 FERNSCHALTER 2 GESCHWINDIGKEIT MOTOR M1 KM2 FERNSCHALTER 1 GESCHWINDIGKEIT MOTOR M1 KM3 FERNSCHALTER 2 GESCHWINDIGKEIT MOTOR M1 M1 MOTOR...

Страница 209: ...Deutsch Bedienungsanleitung 209...

Страница 210: ...4 MIKROSCHALTER WERKZEUG NACH RECHTS GEDREHT SQ5 N HERUNGSSCHALTER KETTENTEILUNG XC2 STECKVERBINDER SERIELLES KABEL XC2 STECKER KABEL PEDAL F R PROFILIERUNGSDREHUNG YV1 M V LABLAUF YV4 M V ARM LINKSVE...

Страница 211: ...Deutsch Bedienungsanleitung 211...

Страница 212: ...N SA11 BEFEHL DREHUNG SPANNT IM UHRZEIGERSINN SA12 BEFEHL ABDR CKSCHEIBE HOCH SA13 BEFEHL ABDR CKSCHEIBE HINUNTER SA14 BEFEHL WERKZEUG SUCHE AUF SA15 BEFEHL WERKZEUG SUCHE AB SA16 BEFEHL AUSWAHL DREHG...

Страница 213: ...Deutsch Bedienungsanleitung 213...

Страница 214: ...HTSDREHUNG SA12 BEFEHL ABDR CKSCHEIBE HOCH SA13 BEFEHL ABDR CKSCHEIBE HINUNTER SA14 BEFEHL WERKZEUG SUCHE AUF SA15 BEFEHL WERKZEUG SUCHE AB SA16 BEFEHL AUSWAHL DREHGESCHWINDIGKEIT SPANNTELLER SB1 STOP...

Страница 215: ...Deutsch Bedienungsanleitung 215...

Страница 216: ...ung HYDRAULIKSCHEMA C1 ZYLINDER SPANNTELLER C2 ZYLINDER SPANNARM C3 ZYLINDER ABDR CKSCHEIBE C4 ZYLINDER WERKZEUG C5 ZYLINDER DREHUNG WERKZEUGARM C6 ZYLINDER HOCHFAHREN WERKZEUGARM C7 ZYLINDER VERSCHIE...

Страница 217: ...Deutsch Bedienungsanleitung 217...

Страница 218: ...218 Deutsch Bedienungsanleitung...

Страница 219: ...BLOQUEO DE LA RUEDA 239 LUBRICACI N DE LOS NEUM TICOS 242 DESMONTAJE DE RUEDAS PARA USO AGR COLA 243 MONTAJE DE RUEDAS PARA USO AGR COLA 246 DESMONTAJE DE RUEDAS TUBELESS Y SUPERSINGLE 247 MONTAJE DE...

Страница 220: ...rativo entregado con la m qui na en una carpeta cerca de la misma para que los operadores puedan consultarla f cilmente La documentaci n t cnica que se suministra al cliente es parte integrante de la...

Страница 221: ...mperatura del ambiente para el almacena miento de la m quina 25 55 C Desplazamiento ATENCI N Ejecutar atentamente las operaciones de montaje y desplazamiento descritas El incumplimientodeestasrecomend...

Страница 222: ...carga y utilizar el punto de elevaci n adecuado Fig 4 PUESTA EN OBRA ATENCI N Llevar a cabo con sumo cuidado las operaciones de desembalaje montaje e instalaci n que se describen a continuaci n La ino...

Страница 223: ...ajo Se debe instalar la m quina sobre un piso estable y r gido para prevenir y evitar cualquier tipo de deformaci n de la estructura Colocar la m quina de manera que pueda ser accesible desde los cuat...

Страница 224: ...iniendoen el pie regulable correspondiente Fig 7a para obtener mayor estabilidad durante las fases de trabajo Encasoderuedasmuypesadas puede ser necesario intervenir nuevamente en la re gulaci n de lo...

Страница 225: ...tarlam quinaaunaconexi nel ctricapropiaprovistadeuninterruptorautom tico diferencial espec fico con sensibilidad de 30 mA y umbral de intervenci n de 100mA y de un interruptor autom tico magnetot rmic...

Страница 226: ...ecta y segura y que haya una supervisi n adecuada no tocar l neas o partes internas de motores o aparatos el ctricos antes de asegurarse de que se ha interrumpido la alimentaci n el ctrica leer deteni...

Страница 227: ...rante bajo y el autocentrante totalmente cerrado DESCRIPCI N DE LA DESMONTADORA DE NEUM TICOS La desmontadora de neum ticos tiene funcionamiento electrohidr ulico Trabaja sobre cualquier tipo de rueda...

Страница 228: ...ible como accesorio bajo pedido el autocentrante puede bloquear llantas con un di metro m ximo de hasta 60 Los valores de ruido indicados se refieren a niveles de emisi n y no representan necesaria me...

Страница 229: ...ticos ha sido dise ada exclusivamente para montar y desmontar neum ticos ATENCI N Cualquier otro uso diferente al descrito debe considerarse impropio e irrazonable PELIGRO El fabricante no ha previsto...

Страница 230: ...disposici n de todos los mandos Controlar cuidadosamente el correcto funcionamiento de todos los mandos de la m quina Para evitar accidentes y lesiones la m quina debe instalarse y accionarse de mane...

Страница 231: ...Espa ol Manual de uso 231 O Potenci metro P Display Q Side to side B C D E F G H I N M P L O Q A 11...

Страница 232: ...mientas y el suelo La m quina activa un indicador ac stico luminoso ubicado en el cuadro el ctrico cada vez que se efect an operaciones manuales o autom ticas potencialmente peligrosas El indicador lu...

Страница 233: ...de la llanta y adem s por razones de seguridad no dejar la rueda bloqueada en el mandril autocentrante durante los intervalos de trabajo Potencial peligro de aplastamiento de las manos Potencial peli...

Страница 234: ...y del carro herramientas 3 Movimiento vertical de descenso y ascenso del grupo de herramientas Movimiento horizontal de rotaci n autocentrante 4 Movimiento vertical de posici n de desmontaje y posici...

Страница 235: ...o 16 Pulsador de emergencia VERSI N CON MANIPULADOR A TIERRA FIG 14B 1 Movimiento horizontal de traslaci n del carro autocentrante y del carro de herramientas Movimiento vertical de ascenso y descenso...

Страница 236: ...ador de funci n que se debe presionar con el pulsador 12a para memorizar una posici n distinta de las preconfiguradas de las herramientas el pulsador 12b para conmutar las dimensiones de pulgadas a mi...

Страница 237: ...rso una transmisi n de datos desde la unidad emisora a la unidad receptora tras el accionamiento de uno o m s mandos Permanece encendido hasta que son accionados los mandos FUNCI N DEL LED ROJO F No u...

Страница 238: ...o el ctrico de la m quina Al lado de la caja de aluminio de la unidad RX est n presentes dos led de color blanco fig 15a e y rojo fig 15a f El led blanco LED RX ON se enciende de modo intermitente cua...

Страница 239: ...bater as el transmisor se activa s lo durante el impulso de mando led verde de la caja del mando radio encendido Si las pilas del transmisor estuviesen descargadas encendido del led amarillo ubicado e...

Страница 240: ...ida toda modificaci n del valor de calibraci n de la presi n de funciona miento de las v lvulas de m xima El fabricante declina toda responsabilidad por los da os que deriven de la alteraci n de dicha...

Страница 241: ...nda persona para mantener la rueda en posici n vertical Para desplazar ruedas con peso superior a 500 kg se aconseja utilizar una carretilla elevadora o una gr a No dejar la rueda bloqueada en el auto...

Страница 242: ...que cuentan con un peso superior a 300 kg se acon seja utilizar s lo la primera velocidad de rotaci n del mandril autocentrante De este modo se protege la integridad y la duraci n del reductor LUBRICA...

Страница 243: ...se ha desactivado Para las cubiertas que van de 19 5 a 60 en adelante las operaciones de desmontaje se describen en los apartados siguientes DESMONTAJE DE RUEDAS PARA USO AGR COLA Bloquear la rueda en...

Страница 244: ...onar el pulsador tangencia herra mienta para colocar en posici n la rueda con respecto a la herramienta de desmon taje fig 25 Posicionar la herramienta en contacto con el neum tico controlando mantene...

Страница 245: ...poyar la rueda en el suelo y hacer retroceder la llanta obteniendo de esta manera el es pacio necesario para extraerla fig 31 DESMONTAJE DEL TAL N TRASERO Accionar el mando S T S para poner el grupo d...

Страница 246: ...ar el autocentrante en sentido an tihorario MONTAJE DE RUEDAS PARA USO AGR COLA NOTA Al finalizar la fase de desmontaje la herramienta y la llanta se encuentran en la posici n exacta para iniciar la f...

Страница 247: ...rucciones indicadas para las ruedas para uso agr cola El desmontaje de Supersingle especial mente duros y de tubeless con llanta con hombro de borde muy alto se obtiene lubricando cuidadosamente y sig...

Страница 248: ...um tico con o sin anillo lateral Para evitar que el anillo lateral se des monte con el neum tico es posible antes de destalonar la cubierta fijar la llanta a la rueda con las mordazas sumi nistradas c...

Страница 249: ...io especial MODOS Y MEDIOS DE PARADA Colocando el interruptor general fig 18 que se encuentra en la caja de la instalaci n el ctrica a la posici n cero se interrumpe la alimentaci n el ctrica de la m...

Страница 250: ...nual Piezas de recambio no au toriza al usuario para intervenir en las m quinas salvo expl citas indicaciones encontrarioqueaparezcanenelManual de uso pero le permite proporcionar informaciones precis...

Страница 251: ...IO FINAL Esta indicaci n se puede producir solamente en el encendido e indica que el display est desconectado o es defectuoso y a la vez se pone un conmutador dip en on Basta con volver a poner el con...

Страница 252: ...ida de desplazamiento radial Controlar la conexi n del poten ci metro y su integridad Si el error persiste contactar con la asistencia t cnica E02 Falta de se al en el canal ana l gico 2 canal actualm...

Страница 253: ...de la m quina en la que se est trabajando o efectuar una acci n admitida Intermitencia lenta continua Modo de funcionamiento especial activo Utilizada en el SETUP MODE por ejemplo en calibraci n para...

Страница 254: ...si n del cilindro autocentrante P rdidas del distribuidor Sustituir el distribuidor Juntas desgastadas Sustituir las juntas Parada del motor durante su uso Intervenci n del salvamotor Abrir el cuadro...

Страница 255: ...etro que se visualiza en el display corresponda al de la llanta Limpiar el cristal de protecci n del l ser Si hay un mensaje de error en el display contactar con la Asistencia T cnica Solicitar el Ser...

Страница 256: ...do o chorros de agua para limpiar la m quina Al efectuar las tareas de limpieza proceder en todo lo posible tratando de evitar la formaci n o levantamiento de polvo Para mejorar el rendimiento y la du...

Страница 257: ...ce de la m quina quitarle antes todas las partes el ctricas electr nicas pl sticas y ferrosas Luego proceder a la eliminaci n selectiva conforme a lo dispuesto por las leyes vigentes INFORMACI N SOBRE...

Страница 258: ...umana si no es eliminado adecuadamente Por tanto le proporcionamos la siguiente informaci n para evitar el vertido de estas sustancias y para mejorar el uso de los recursos naturales Losaparatosel ctr...

Страница 259: ...das al medio ambiente INDICACIONES Y ADVERTENCIAS SOBRE EL ACEITE Eliminaci n del aceite usado No tirar el aceite usado al alcantarillado canalillos o cursos de agua recogerlo y en tregarlo a empresas...

Страница 260: ...Para escoger el extintor m s indicado consultar la tabla siguiente Materiales secos L quidos inflamables Equipos el ctricos H drico S NO NO Espuma S S NO Polvo S S S CO2 S S S ATENCI N Las indicacion...

Страница 261: ...rramientas Conjunto de herramientas para destalonar y desmontar las cubiertas Consola Unidad de mando a distancia que controla todos los movimientos de la m quina ne cesarios para las diferentes opera...

Страница 262: ...IGO PRESENCIA RED HL5 TESTIGO DE ILUMINACI N KM1 TELERRUPTOR 2 VELOCIDAD MOTOR M1 KM2 TELERRUPTOR 1 VELOCIDAD MOTOR M1 KM3 TELERRUPTOR 2 VELOCIDAD MOTOR M1 M1 MOTOR CENTRALITA HIDR ULICA M2 MOTOR AUTO...

Страница 263: ...Espa ol Manual de uso 263...

Страница 264: ...PTOR HERRAMIENTA GIRADA A LA DCH SQ5 SENSOR DE PROXIMIDAD PASO CADENA XC1 CONECTOR CABLE SERIE XC2 CONECTOR CABLE PEDAL ROTACI N DIBUJO YV1 E V DESCARGA ACEITE YV4 E V BRAZO TRANSLACI N IZQ YV5 E V BR...

Страница 265: ...Espa ol Manual de uso 265...

Страница 266: ...ACI N AUTOC SENTIDO HORARIO SA12 MANDO DISCO DESTALONADOR ARRIBA SA13 MANDO DISCO DESTALONADOR ABAJO SA14 MANDO HERRAMIENTA LOCALIZACI N ARRIBA SA15 MANDO HERRAMIENTA LOCALIZACI N ABAJO SA16 MANDO SEL...

Страница 267: ...Espa ol Manual de uso 267...

Страница 268: ...ISCO DESTALONADOR ARRIBA SA13 MANDO DISCO DESTALONADOR ABAJO SA14 MANDO HERRAMIENTA LOCALIZACI N ARRIBA SA15 MANDO HERRAMIENTA LOCALIZACI N ABAJO SA16 MANDO SELECCI N VELOCIDAD ROTACI N AUTOCENTRANTE...

Страница 269: ...Espa ol Manual de uso 269...

Страница 270: ...CILINDRO AUTOCENTRANTE C2 CILINDRO BRAZO AUTOCENTRANTE C3 CILINDRO DISCO DESTALONADOR C4 CILINDRO HERRAMIENTA C5 CILINDRO ROTACI N BRAZO PORTAHERRAMIENTAS C6 CILINDRO ELEVACI N BRAZO PORTAHERRAMIENTA...

Страница 271: ...Espa ol Manual de uso 271...

Страница 272: ...272 Espa ol Manual de uso...

Страница 273: ......

Страница 274: ...standards and Directives Valid only for EC marked machines FR D clarons que le materiel TBE 160 Matic objet de cette d claration dont nous avons labor le livret technique restant en notre possossion e...

Отзывы: