AT-2214 Head Crimp Tool
Doc No: ATS-640053400
Release Date: 06-23-03
UNCONTROLLED COPY
Page 3 of 7
Revision: B
Revision Date: 09-30-05
3.
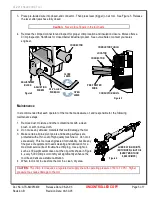
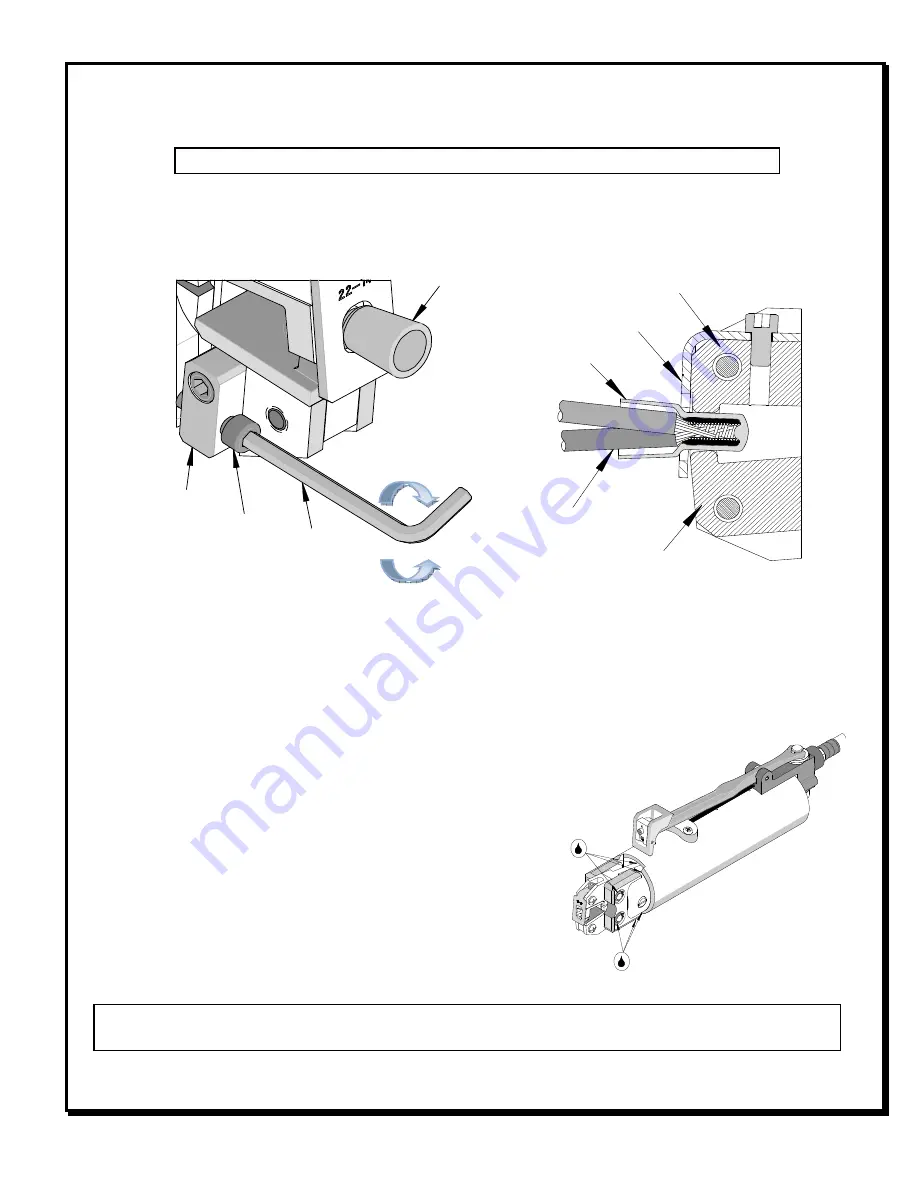
Place pre-twisted wire into closed-end connector. Than press lever (trigger) on air tool. See Figure 3. Release
the lever after jaws have fully closed
Caution:
Never place fingers in the tool nests.
4.
Remove the crimped connector and inspect for proper crimp location and insulation closure. Molex offers a
Crimp Inspection Handbook for closed barrel industrial product. See our website or contact your sales
engineer.
Maintenance
It is recommended that each operator of the tool be made aware of, and responsible for, the following
maintenance steps:
1.
Remove dust, moisture and other contaminants with a clean
brush, or soft, lint-free cloth.
2.
Do not use any abrasive materials that could damage the tool.
3.
Make certain all pins; pivot points and bearing surfaces are
protected with a thin coat of high quality machine oil. Do not oil
excessively. This tool was engineered for durability, but like any
fine piece of equipment it needs cleaning and lubrication for a
maximum service life of trouble-free crimping. Use a light oil,
such as 30 weight automotive oil at the oil points shown in Figure
4, every 5,000 crimps or monthly will significantly enhance the
tool life and ensure a stable calibration.
4.
When tool is not in use store the tool in a clean, dry area.
CAUTION:
This crimp tool requires a regulated air supply line with operating pressure of 60 to 70 PSI. Higher
pressure may cause damage to the tool.
Figure 3
LOCATOR
PRE-TWISTED
WIRE
CONDUCTOR PUNCH
CONDUCTOR ANVIL
CONNECTOR
ADJUSTMENT
BLOCK
CONNECTOR
Figure 2
3/32” ALLEN
WRENCH
ADJUSTING
SCREW
CLOSE
JAWS
OPEN
JAWS
LUBRICATION POINTS
(BOTH SIDES) LIGHT OIL
(EVERY MONTH OR
5,000 CRIMPS)
Figure 4


