


MOLECULAR DEVICES > CLONEPIX 2
ROBOT MANUAL
Molecular Devices > 19 of 39
Initial Operation
System Features
ClonePix 2 is constructed within a welded steel framework. The outer measurements are
given in the Technical Specifications section on page 6. Be aware that these dimensions do
not allow for opening robot doors.
The lifting door on the front of the machine, protected by an electro-mechanical interlock,
contains the working volume of the machine.
The bed of the machine contains the source and destination stackers, and the wash system,
which is used for cleaning the Picking Pins between cycles in order to eliminate pin blockage
and cross-contamination.
The stacker system can hold up to 10 standard microplates microplates.
The Z ball-screw drive carries a unique actuator system that accommodates the head.
This system allows for easy exchange and set-up of the head.
Pre-Power-Up Checklist
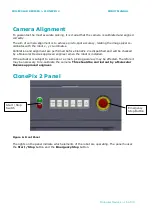
Check that the Emergency Stop button (see Figure 7 on page 15) is released (pulled
out). ClonePix 2 will not start if the button is pushed in.
Check that no items have been left on the bed of the instrument.
Check that all motor tracks are free of obstruction.
Check that there are no obstructions to head movement.
Check that the main robot axes, XY, are roughly in the centre of their respective travel
positions. The axes need to be away from their respective end-stops on ‘start up’ in order
that they may reference themselves correctly to their ‘home’ positions.
Check that the lifting door on the front of the robot is closed.
Ensure that there are no plates or cassettes in the stackers.
Power-Up Procedures
Turn on the power supply to the compressor.
Push the START button on the front panel. The red ‘Power On’ indicator (on the front
panel of the instrument) illuminates. If the system fails to ‘power on’, it is likely that the
lifting door is open or the emergency stop button is pushed in.
Check that the air supply indicator (on front panel) is on.
Once the computer has booted up, click on the ClonePix 2 icon. The first time ClonePix 2
is used, the three axes will sequentially go through their ‘Initialize drives’ routine. This
enables the drives to find their respective datum positions. ClonePix 2 must be allowed to
complete this process without interference to ensure that there is no damage to the
instrument or its ancillary equipment.


