


Customer Service 908-368-1025
︱
Page 5 of 10
STEP 5:
STEP 6:
www.modway.com
Bx3
B
7
8
11
2
Bx3
3
B
EEI-3860
Cabinet
Hardware required. Screwdriver not included
Hardware required. Screwdriver not included
B
B
B
B
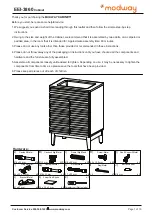
Carefully insert the
Camlock (B)
to secure all Rails to the
Left Side Panel (2).
Carefully insert the
Camlock (B)
to the pre- assembled Rails and carefully align the
Right Side Panel (3)
and secure the Panel by tightening all inserted
Camlocks (B) .
Securing
Middle Back Rail (8), Top Back Rail (7),
&
Middle Front Rail (11)
to the
Left Side Panel (2)
Securing
Middle Back Rail (8), Top Back Rail (7),
&
Middle Front Rail (11)
to the
Right Side Panel (3)
Mx1
Mx1