Mobility Research LiteGait 4Home Скачать руководство пользователя страница 17

17 


www.LiteGait.com 

1-800-332-9255 

Using Your 

Lite

Gait®


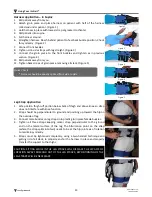
VI. Base and Casters 

LiteGait®  is  equipped  with  four  casters.    There  are  two 
total  locking  casters  and  two  directional  lock  casters.  
Each  leg  has  one  type  of  casters,  the  total  locking  are 
mounted on the Left Leg the Total Locking are mounted 
on the right. 

Directional Lock 

Total Lock 

Locking and Unlocking Casters  

Directional Locking Casters 

Directional  lock  casters  are  indicated  by  a  green 
sticker  in  the  locking  lever.    To  lock  the  directional 
locking  casters,  press  the  tab  and  align  the  caster  with 
the  frame.  Once  Aligned  this  locks  the  swivel  of  the 
casters and is beneficial for walking in a straight path or 
placing  Lite

Gait®

  over  a  treadmill.    Once  the  unit  is 

positioned over a treadmill, all four caster brakes need to 
be locked 

Directional Locking Casters with Treadmill 

Position  LiteGait®  near  the  treadmill  (or  where  you 

wish the patient to begin walking). 

Roll LiteGait® towards the front of the treadmill, until 

the  casters  line  up  parallel  to  the  treadmill  (or 
parallel  to  the  path  the  patient  will  follow—a 
hallway for example). 

Press the directional locks to lock swivel of casters 

LiteGait®  can  now  be  easily  rolled  back  and  forth  over 
the treadmill or on a straight path in the therapy room or 
hallway. 

NOTE:  While  locking  the  caster  prevents  rolling  of  the 
unit,  it  DOES  NOT  prevent  the  unit  from  sliding  on  a 
sloped, slippery floor. The unit should only be used on a 
flat  floor  away  from  stairs  or  ramps.  NEVER  leave  a 
patient unattended in the unit.


STEER 

Total Locking Casters 

Total  locking  casters  are  indicated  by  a  red 
sticker on the locking lever. To lock the total locking 
casters,  press  the  tab  until  the  brake  snaps  into 
place.  The  caster  will  lock  the  swivel  of  the  caster 
and  rotation  of  the  wheel.    Locking  all  four  casters 
will make the device stationary.  

BRAKE 

NOTE: Your 

Lite

Gait®


may look different than images above 

NOTE: Your 

Lite

Gait®


may look different than images above 


Press tab to lock


Locked Caster


Содержание LiteGait 4Home

Страница 1: ...Operator Service Manual LiteGait 4Home LiteGait is a Registered Trademark of Mobility Research Inc...

Страница 2: ......

Страница 3: ...Number of Your Device Note Please keep your serial number in a safe and secure location The serial number must be provided when seeking service for your LiteGait device The serial number provides us a...

Страница 4: ......

Страница 5: ...the direct supervision of a health care professional or caregiver Brakes should remain in the locked position at all times until transfer from one location to another is initiated Operate on smooth a...

Страница 6: ...6 www LiteGait com 1 800 332 9255...

Страница 7: ...7 www LiteGait com 1 800 332 9255 LiteGait 4 Home 110 LiteGait 4 Home 220 LiteGait 4 Home 330 LiteGait 4 Home 440 NOTE Your LiteGait may look different than images above...

Страница 8: ......

Страница 9: ...individual situation Our website also offers valuable information Like all quality therapy equipment LiteGait requires regular inspections Enclosed is a check list for your convenience Please complet...

Страница 10: ......

Страница 11: ...4 USING Your LiteGait 15 I Raising and Lowering 15 II Charging 15 III Adjusting Handle Bars 16 IV Base and Casters 17 V BiSym Scale Optional 18 VI Harness Application 18 Training with LiteGait 21 Unit...

Страница 12: ...terior box in order to expose equipment 4 Examine contents Report any damage to equipment immediately to Mobility Research Technical Sup port 6 Remove cardboard harness and accessories box 7 Open card...

Страница 13: ...bolts ensure one person holds actuator steady until secure Tighten bolts using 5 16 inch Allen wrench until snug do not to over tighten 19 Verify operation by moving actuator up down by pressing the a...

Страница 14: ...he harness allow for the connection of the groin piece The H shaped stitching on the groin piece denotes the top or body side of the piece ACTUATOR The mechanism that raises and lowers the yoke The ac...

Страница 15: ...he appropriate 110 volt Step 3 Leave LiteGait on charger for 6 8 hours or overnight once per week The time it takes to recharge the battery pack depends upon the health of the battery pack and how low...

Страница 16: ...cable that plug into the control box for the LiteGait During use the battery cable and hand switch cable should be connected When charging the charger cable should be plugged in and the LiteGait shoul...

Страница 17: ...the patient to begin walking Roll LiteGait towards the front of the treadmill until the casters line up parallel to the treadmill or parallel to the path the patient will follow a hallway for example...

Страница 18: ...atient 2 Adjust the groin strap buckles so there is symmetry in the straps equal strap length available on both ends of the padded groin piece and equal from side to side 3 Attach the groin piece to t...

Страница 19: ...eight evenly throughout harness wrap Attaching Groin Pieces 1 Route the groin piece between legs to front 2 Connect both buckles one on each side 3 Tighten the groin strap snugly so there is NO slack...

Страница 20: ...5 Straps must be tightened completely using a two handed technique and getting rid of all slack to properly anchor the harness in place and properly transfer the support to the thighs Harness Applicat...

Страница 21: ...all four casters to make the device stationary and adjust the yoke to the correct position giving the patient approximately 5 to 6 inches of head clearance 2 Extend the overhead straps until they are...

Страница 22: ...utic exercise postural support for ADL etc Please refer to your booklet Protocols for Partial Weight Bearing Gait and Balance Therapy for more information or email our clinical support department at c...

Страница 23: ...23 www LiteGait com 1 800 332 9255 Page left Intentionally Blank...

Страница 24: ...fection control procedures Use of bleach is discouraged and may effect the permeability of the harness material iHarness iGroin Pieces Overhead Straps Frequency Facility infection control guidelines C...

Страница 25: ...s Loose Rusted Bolts Discoloration Degradation Battery 24 30 Months Charger Hand Switch Harness Wrap 18 24 Months Groin Pieces 18 24 Months Overhead Straps Casters Knobs Pins Grips Covers Caps Buckles...

Страница 26: ...26 www LiteGait com 1 800 332 9255 Unit Care and Maintenance...

Страница 27: ...een in service for 30 months or more Contact Technical Support for replacement battery information 6 Possible Cause Resolution Other Power System Issue Contact Technical Support for further troublesho...

Страница 28: ...t rests below the rib cage Applying the harness and groin piece loosely will cause them to slide upward Symptom Frontal overhead straps are causing discomfort in the chest area of female patients 1 Po...

Страница 29: ...E 1 Small Adult Harness LG150 LG200 LG200MX Harness Wrap w Overhead straps covers and groin pieces HS 1 Small Adult Harness Wrap A rigid washable cloth wrap used with attachments that provide pos tura...

Страница 30: ...teGait com Education Department Education LiteGait com Sales Department Sales LiteGait com POSTAL ADDRESS Mobility Research P O Box 3141 Tempe AZ 85280 2015US LiteGait is a Registered Trademark of Mob...

Страница 31: ...LLER AGENT OR EMPLOYEE IS AUTHORIZED TO MAKE ANY MODIFICATION EXTENSION OR ADDITION TO THIS WARRANTY MOBILITY RESEARCH IS NOT RESPONSIBLE FOR DIRECT SPECIAL INCIDENTAL OR CONSEQUENTIAL DAMAGES RESULTI...

Отзывы: