background image

Lo scooter pieghevole Ulises gode di un design casual e moderno, confortevole 
e sicuro, facile da guidare, pieghevole e portatile; oltre che leggero e resistente. 

Caratteristiche:

1. Telaio in alluminio di alta qualità, leggero, ma anche resistente e durevole.
2.  Non  sono  necessari  ulteriori  arnesi  per  piegarlo  e  aprirlo,  infatti  si  tratta  di 
un’operazione molto semplice.
3. Il telaio anteriore e posteriore sono entrambi pieghevoli, rendendo il prodotto 
più comodo da trasportare. 
4. Super leggero e facile da trasportare nel bagagliaio di un'auto o sui mezzi di 
trasporto; ciò grazie al suo peso leggero e alle piccole dimensioni che assume 
una volta piegato.
5. Facile smontaggio della batteria, per agevolare il trasporto.
6. Comodo design ergonomico del sedile e dello schienale. Il manico può essere 
regolato  in  altezza  e  si  può  cambiare  il  suo  angolo  di  inclinazione  secondo  le 
necessità dell'utente.
7.  Ruote  solide;  le  anteriori  hanno  un  diametro  di  15cm,  mentre  le  posteriori  di 
18cm.
8. Avviamento fluido, frenata morbida e stabile.
9. Design lineare ed elegante, superficie liscia e brillante, ecocompatibile e dure

-

vole.

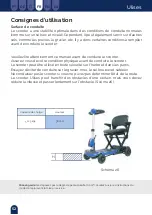
Lo scooter elettrico pieghevole modello Ulises è perfetto per persone anziane, 
disabili o che hanno difficoltà a camminare per lunghi tragitti, ma che non vogliono 
perdere la loro indipendenza. Si tratta di un prodotto affidabile. Può essere utiliz

-

zato sia dentro casa, che in parchi, centri commerciali e ospedali (Fig. 2). 

ES

EN

FR

IT

DE

PT

Ulises

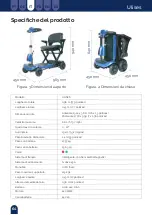
Figura 2

63

Содержание Ulises

Страница 1: ...trucciones Scooter Ulises Instrucciones en Espa ol User manual in English Mode d emploi en Fran ais Istruzioni in Italiano Gebrauchsanweisung auf Deutsch Manual de instru es em Portugu s ES EN FR IT D...

Страница 2: ...cto y par metros relevantes 3 Partes y elementos principales y sus funciones 4 C mo plegar y desplegar el scooter 5 Requisitos de seguridad 6 Caracter sticas de la bater a y c mo cargarla 7 Instruccio...

Страница 3: ...es a medida que consulte este manual Fig 1 Panel de control Manillar de altura ajustable Palanca de control de marcha adelante marcha atr s Sistema de ajuste del manillar Palanca para ajuste de ngulo...

Страница 4: ...o muy c modo la altura y la inclinaci n del asiento ergon mico y el manillar pueden regularse 7 Las ruedas son rmes las delanteras miden 15 24 cm y las traseras 17 78 cm 8 El arranque es suave el fre...

Страница 5: ...gitud total Anchura total Neum ticos ruedas macizas Velocidad m xima Pendiente segura Autonom a 6 km h 3 7 mph 0 12 15 km 9 32 millas Radio de giro 1 4 m 55 pulgadas Peso sin bater a 25 65 kg Peso con...

Страница 6: ...1 Gire el conmutador de llave en el sentido de las agujas del reloj para encender el scooter y comenzar a circular 2 Gire el conmutador de llave en sentido contrario a las agujas del reloj para apaga...

Страница 7: ...o ON el indicador del nivel de bater a mostrar el estado de esta Si aparece en color verde signi ca que tiene su ciente bate r a si aparece en color rojo signi ca que el nivel de bater a es bajo y nec...

Страница 8: ...se deslizar hacia abajo totalmente Coloque el manillar a la altura deseada y bloquee de nuevo la palanca del tubo para que quede en su sitio Fig 12 Receptor del mando El receptor del mando est situado...

Страница 9: ...orriente y despu s al puerto de entrada situa do en la parte trasera del scooter Coloque la llave en el conmutador y g rela para encender el scooter El indicador de bater a se iluminar y parpadear Pul...

Страница 10: ...a palanca se mover hasta que suene clack 3 Ahora pulse el bot n El scooter se plegar hasta la mitad mientras suenan las se ales sonoras 4 Cuando deje de o r las se ales vuelva a pulsar el bot n El sco...

Страница 11: ...la siguiente manera 1 Para desplegarlo autom ticamente pulse una vez el interruptor hacia el indica dor I El scooter se desplegar hasta la mitad y emitir las se ales sonoras Cuando deje de o rlas puls...

Страница 12: ...por completo recuerde plegar el respaldo del asiento Con el interruptor 1 Pulse el interruptor hacia el indicador II mant ngalo pulsado apenas unos segundos El pist n del mecanismo comenzar a moverse...

Страница 13: ...ular con el scooter Lea todo el manual antes de conducir el scooter El usuario puede circular con el scooter por el parque y sobre hierba Evite circular en gravilla muy suelta barro y arenisca No circ...

Страница 14: ...vimiento Compruebe el estado de la bater a cuando cargue el scooter en otros veh culos para su transporte No suba bordillos ni conduzca por el borde de las carreteras El scooter podr a quedar da ado d...

Страница 15: ...n te y otro en el puerto de carga del scooter Fig 28 Compruebe la conexi n antes de dejar que pase la corriente Una luz roja signi ca que el scooter est encendi do si es naranja indica que la carga es...

Страница 16: ...gar continuamente cuando conecte el cargador pero no se sobrecargar Sin embargo le recomendamos no cargar la bater a durante m s de 24 horas Qu signi can las luces LED indicadoras del cargador El carg...

Страница 17: ...ise o nicos Puede cargarse r pidamente y utilizarse durante un periodo largo cuando est totalmente cargada El scooter se entrega de f brica con la bater a totalmente cargada pero su funcionamiento ini...

Страница 18: ...cidad de la bater a alcanzar el 100 y aumentar la autonom a del scoo ter despu s de cuatro o cinco ciclos de carga y descarga C mo se puede garantizar la m xima vida til de la bater a Cuando la bater...

Страница 19: ...la palanca de control de velocidad El freno se puede bloquear autom ticamente cuando el scooter se haya parado por completo Parada Detenga el scooter por completo Gire el conmutador de la llave a la p...

Страница 20: ...ntes el ctricos se da en no someta el scooter a un chorro de agua directa mente Cojinetes y motor piezas de transmisi n Durante la fabricaci n se inyecta lubricante en los componentes y se sellan Por...

Страница 21: ...oce el funcionamiento y mantenimiento adecuados 2 Si no se utilizan los repuestos adecuados y se producen da os 3 En caso de fallo mec nico debido a un accidente 4 Los insumos como el n cleo interno y...

Страница 22: ...2 Product Speci cations and Relevant Parameters 3 Main Parts and Relevant Function 4 The Folding and Unfolding 5 Safety Requirements 6 Battery and Battery Charging 7 Operation Instruction 8 Basic Tro...

Страница 23: ...ferences throughout the Owner s Manual Fig 1 Control Panel Adjustable Height Handle Forward Reverse Control Lever Handle Switch Tiller Angle Adjustment Front Cover Battery Compartment Front Wheel Foot...

Страница 24: ...nd unload and also convenient for user to carry 6 Comfortable with the ergonomic seat and the handle tube that can be adjus ted to a comfortable height and gradient 7 6 inch 15 24cm solid front tires...

Страница 25: ...th Tires solid wheels Maximum Speed Safe Gradient Range Up To 6 km h 3 7 mph 0 12 15 km 9 32 miles Turning Circle 1 4 m 55 inches Weight without battery pack 25 65 kg 56 55 pounds Weight with battery...

Страница 26: ...Power Switch Key switch Fig 6 1 Turn the key switch clockwise to ON to able to drive 2Turn the key switch anticlockwise to OFF to stop driving Please turn the power o when stop diving Notice Do not p...

Страница 27: ...8 Switch the rocker switch to ON the power indicator will show the power condition Green means the power is enough yellow means the power is weak red means it needs recha ging Direction Control Lever...

Страница 28: ...ward Fig 11 until it is loose Then the handle back down Buckle up the handle switch after the handle drawtube draw back in place Fig 12 Controller Controller is xed in the rear cover and it receives t...

Страница 29: ...button again to end the process When the scooter is fully deployed it will beep three times Place the battery you will need to exert some pressure to make it t Unfold the backrest adjust the handleba...

Страница 30: ...top hearing the beep hold the button again The scooter will beep again and the lever will move until you hear a click 3 Press the button The scooter will fold up to a half while beeping 4 Once it stop...

Страница 31: ...sign again The scooter will unfold completely please remember to unfold the backrest 2 Press the II button to fold the scooter automatically The scooter will fold up to the half while beeping Once you...

Страница 32: ...beep 2 Once it stops beeping press the II sign again The scooter will beep again and the lever will move until you hear a click 3 Press the I sign afterwards The scooter will fold up to the half while...

Страница 33: ...scooter Make sure your physical condition is adequate before driving the scooter The scooter can be used in the park and grass safely Try to avoid driving in the loose gravel covered soil and sandsto...

Страница 34: ...hen your scooter is on the other vehicles for trans portation Climbing or driving along the edges of roads is forbidden otherwise the scooter will be damaged permanently Do not exceed the maximum tole...

Страница 35: ...ousehold power then insert the other plug the socket of the charger FIG 28 Verify the connection before you turn on the main power switch Red light indicates power on orange light indicates on chargin...

Страница 36: ...Therefore the battery will continously charge after connecting the charge but will not overcharge It is better to charge no more than 24 hours How does the indicator light LED in charger display Ther...

Страница 37: ...ycle battery uses the unique chemical technology and design It can be charged quickly and can be used for a long time after full charged The battery is fully charged already before leaving the factory...

Страница 38: ...p to 90 capacity The battery capacity will top to 100 and extend the driving time after four to ve charging and discharging cycles How to ensure the battery life A fully charged battery will provide g...

Страница 39: ...peed control lever until scooter has slowed down or fully stopped Brake can be automatic locked when scooter fully stopped Finish Operating Make scooter fully stopped O the switch and remove the key o...

Страница 40: ...nt the electrical components from damage do not wash the scooter from the tap directly Bearings and Motor Transmission Parts The components have injected lubricant and are sealed therefore it is unnec...

Страница 41: ...he proper use of operation and maintenance 2 Not using regular spare parts and causing damage 3 Mechanical damage caused by accidents 4 Consumables such as the inner core and outer tires bearings ligh...

Страница 42: ...tionnalit s di Ulises 2 Caract ristiques et param tres du produit 3 Pi ces et fonctions 4 Pliage et d pliage 5 Consignes de s curit 6 Batterie et charge 7 Consignes d utilisation 8 D pannage de base 9...

Страница 43: ...de l utilisateur Sch ma 1 Tableau de commande Guidon r glable en hauteur Manette de commande avant arri re d accoudoir Loquet du guidon Ajusteur de l angle du guidon Couvercle avant Batterie Compartim...

Страница 44: ...un 5 La batterie est facile charger et retirer et elle est galement facile trans porter pour l utilisateur 6 Ce scooter lectrique est confortable gr ce au si ge ergonomique et au guidon il est possibl...

Страница 45: ...rgeur totale Pneus roues pleines Vitesse maximale Degr de pente s r Distance jusqu 6 km h 3 7 mph 0 12 15 km 9 32 miles Rayon de braquage 1 4 m 55 pouces Poids sans batterie 25 65 kg Poids avec batter...

Страница 46: ...nterrupteur cl dans le sens des aiguilles d une montre sur ON pour d marrer le scooter 2 Tournez l interrupteur cl dans le sens contraire des aiguilles d une montre sur OFF pour teindre le scooter lor...

Страница 47: ...nterrupteur bascule sur ON L indicateur d alimentation indique l tat de l alimentation vert signi que que la puissance est su sante jaune signi e que la puissance est faile rouge signi que que la batt...

Страница 48: ...ext rieur Sch ma 11 a n qu il soit en position l che Le tube du guidon descendra Refermez le loquet du guidon apr s le repli du tube Sch ma 12 R gulateur Le r gulateur se situe dans le couvercle arri...

Страница 49: ...erie vous devez brancher le scooter sur la prise de courant Voici les tapes suivre Sortez le scooter de sa bo te Retirez tous les emballages et les dispositifs de protection du scooter Branchez le cha...

Страница 50: ...et le levier bougera jusqu mettre un clack 3 Appuyez maintenant sur le bouton Des signales sonores vous indiqueront que le scooter est en tra n de se plier en deux 4 Quand le signale s arr te appuyez...

Страница 51: ...en deux et commencera mettre un signal sonore Quand le signale s arr te appuyez de nouveau sur l interrupteur vers l ic ne I Le scooter se d pliera compl tement rappelez vous de plier le dossier du si...

Страница 52: ...rappelez vous de plier le dossier du si ge avant de plier le scooter Pliage avec interruptor 1 Appuyez sur l interrupteur vers l ic ne II pour quelques secondes Le piston com mencera bouger et le sco...

Страница 53: ...ssurez vous de votre condition physique avant de conduire le scooter Le scooter peut tre utilis en toute s curit sur l herbe et dans les parcs Essayez d viter de conduire sur le gravier mou le sol bou...

Страница 54: ...urit des batteries lorsque votre scooter est dans d autres v hicules de transport Il est interdit de grimper ou de rouler sur le bord des routes sous peine d endom mager le scooter de fa on permanente...

Страница 55: ...rant domestique puis ins rez l autre che dans la prise du chargeur Sch ma 29 V ri ez la connexion avant de mettre sous tension l interrupteur principal Le voyant rouge indique la mise sous tension le...

Страница 56: ...e est pleine le chargeur n mettra presque aucun courant Par cons quent la batterie se chargera continuellement apr s la connexion du char geur mais elle ne se surchargera pas Il est conseill de ne pas...

Страница 57: ...ouvelle batterie est elle faible La batterie cycle prolong utilise une technologie et une conception chimiques uniques Elle peut tre recharg e rapidement et utilis e pendant une longue p riode apr s u...

Страница 58: ...sera prolong apr s quatre ou cinq cycles de charge et de d charge Comment assurer une dur e de vie optimale de la batterie Une batterie compl tement charg e fournira de bonnes performances et une dur...

Страница 59: ...e le scooter ralentisse ou s arr te compl tement Le frein peut tre verrouill automatiquement lorsque le scooter est compl te ment arr t Fin du fonctionnement Arr tez compl tement le scooter Retirez la...

Страница 60: ...cette fa on le contr le sera alors jumel Entretien Peu de pi ces du scooter Ulises n cessitent un entretien Les points suivants doivent tre v ri s et entretenus r guli rement La connexion de la batter...

Страница 61: ...s les roulements les ampoules etc ne sont pas couverts par la garantie 5 Toute modi cation non autoris e de la conception du v hicule 6 Toute catastrophe naturelle ou accident tel que typhons ouragans...

Страница 62: ...ooter 2 Speci che del prodotto 3 Principali componenti e funzioni 4 Come aprire e ripiegare lo scooter Ulises 5 Istruzioni sulla sicurezza 6 Batteria e come ricaricarla 7 Come utilizzare Ulises 8 Ripa...

Страница 63: ...io questo manuale d istruzioni Pannello di controllo Manubrio Comando direzionale Regolatore dell altezza del manubrio Leva del manubrio Copertura anteriore Batteria Ruotta anteriore Pedana Leva manua...

Страница 64: ...assume una volta piegato 5 Facile smontaggio della batteria per agevolare il trasporto 6 Comodo design ergonomico del sedile e dello schienale Il manico pu essere regolato in altezza e si pu cambiare...

Страница 65: ...a totale Dimensioni ruote Velocit massima Grado max di sicurezza Autonomia 6 km h 3 7 mph 0 12 15 km 9 32 miglios Peso Diametro di sterzata 1 4 m 55 pollices Peso senza batteria 25 65 kg Peso con batt...

Страница 66: ...ore a chiave Fig 6 1 Girare la chiave in senso orario a ON per accendere 2 Girare la chiave in senso antiorario a OFF per spegnerlo Attenzione Non lasciare il pannello di controllo in ambienti umidi S...

Страница 67: ...ca il livello di carica della batteria Le linee verdi indicano alto livello di batteria le gialle indicano un livello medio di batteria e le lineette rosse Indicano batteria quasi scarica e che ora di...

Страница 68: ...verso l esterno Fig 11 e spingere il manico verso il basso o tirarlo verso l alto Una volta selezionata la altezza desiderata richiudere la levetta per fermare il manico nella posizione corretta Fig...

Страница 69: ...seguito ti indichiamo i passi da seguire Tira fuori lo scooter dalla scatola Togli tutti i rivestimenti e protezioni di sicurezza dello scooter Collega il carica batteria alla presa di corrente e succ...

Страница 70: ...il pulsante Lo scooter emet ter un altro suono e la leva si muover no a sentire un click 3 A questo punto premi il pulsante Lo scooter si chiuder no alla met e conti nuer ad emettere dei suoni 4 Quan...

Страница 71: ...aticamente no alla met e emetter dei suoni Quando non sentirai pi nessun suono spingi di nuovo l interruttore verso il simbo lo II Lo scooter si chiuder completamente ricorda di chiudere lo schienale...

Страница 72: ...ngi nuovamente l interruttore verso il simbolo II Lo scooter emetter un altro suono e la leva si muover no a sentire un click 3 Ora spingi l interruttore verso il simbolo I Lo scooter si piegher no al...

Страница 73: ...nte le istruzioni prima di utilizzare lo scooter Veri care che la persona che lo condurr sia in salute e in grado di guidare lo scooter Lo scooter pu essere usato in tutta sicurezza in parchi e prato...

Страница 74: ...li in movimento Controllare sempre che la batteria sia in un luogo sicuro quando si trasporta lo scooter su un altro veicolo Non superare la pendenza massima consentita per questo scooter Non trasport...

Страница 75: ...rie 1 Inserire l altra estremit del cavo caricabatterie nella presa della corrente domes tica Fig 29 e veri care che sia correttamente collegato La luce rossa indica l inizio della ricarica la luce ar...

Страница 76: ...la batteria piena il caricabatterie rilascer pochissima corrente quasi nulla Quindi la batteria continuer a caricarsi ma non si sovraccaricher eccessivamente Si sconsiglia di ricaricare la batteria pe...

Страница 77: ...costante Evitare la guida intermittente Perch la nuova batteria debole La batteria utilizza una tecnologia chimica e pu essere caricata rapidamente Pu essere utilizzata per molto tempo dopo essere sta...

Страница 78: ...o di guida dopo quattro o cinque cicli di ricarica scarica Come garantire una lunga durata della batteria Una batteria completamente carica fornir buone prestazioni e prolungher la durata e l e cacia...

Страница 79: ...terruttore O e rimuovere la chiave Scendere lentamente e in sicurezza Piegare e richiudere lo scooter come mostrato nelle Fig 22 25 Riparazione Occasionalmente potrebbero veri carsi guasti elettrici c...

Страница 80: ...utenzio ne Tali aree necessitano un controllo e una manutenzione periodica Collegamento degli elettrodi della batteria Assicurarsi che le connessioni degli elettrodi siano ben ssati e privi di corrosi...

Страница 81: ...guenti casi 1 Uso incorretto del probotto e mancanza di manutenzione 2 Utilizzo di pezzi di ricambio non originali 3 Danni meccanici causati da incidenti 4 Rottura di parti soggette al deterioramento...

Страница 82: ...onen und relevante Parameter 3 Hauptkomponenten und relevante Funktionen 4 Das Elektromobil auseinander und zusammenfalten 5 Sicherheitsanforderungen 6 Akku und Lademethode 7 Bedienungsanleitung 8 Gr...

Страница 83: ...en Begri en vertraut um die Teilereferenz im Han dbuch besser zu verstehen vgl Abbildung 1 Bedienfeld Lenker Steuerkn ppel Schalter Am Gri Ruderhebel Frontabdeckung Batterien Fach Vorderr der Fu platt...

Страница 84: ...leicht demontieren und montieren sowie leicht mitbringen 6 Komfort ergonomisch geformte Sitzkissen und Sitzlehne h henverstellbarer Sitz 7 15 25 cm massives Vorderrad und 17 78 cm massives Hinterrad...

Страница 85: ...tl nge Gesamtbreite Reifengr e Blockreifen h chste Geschwindigkeit sichere maximale Neigung Fahrstrecke 6 km h 3 7 mph 0 12 15 km 9 32 Meilen Wenderadius 1 4 m 55 Zoll Gewicht des Roller ohne Akku 25...

Страница 86: ...nenten wie Abbildung 5 Netzschalter Schl sselschalter Abbildung 6 1 Drehen Sie ihn imm Uhrzeigersinn auf ON um zu fahren 2 Drehen Sie ihn gegen den Uhrzeigersinn auf OFF um nicht zu fahren Achtung Leg...

Страница 87: ...nd der Roller wird eingeschaltet Die Akkustandsanzeige zeigt die Akkuleistung an Der gr ne Teil zeigt an dass der Strom des Akkus voll ist der gelbe Teil zeigt an dass der Strom des Akkus niedrig ist...

Страница 88: ...Dann zieht sich der Standrohr nach unten Dr cken Sie mit Hand den Standrohr nach unten auf bestimmte Position und schlie en Sie den Gri schalter wieder Abbildung 12 Steuerger t Das Steuerger t ist im...

Страница 89: ...en und die Batterie einset zen zu k nnen m ssen Sie den Roller an die Steckdose anschlie en Hier sind die Schritte die Sie befolgen m ssen Nimm den Roller aus der Box Entfernen Sie alle Verpackungen u...

Страница 90: ...en aufh rt Der Scooter wird erneut das akustische Signal wiedergeben und der Hebel bewegt sich bis Sie ein Klicken h ren 3 Dr cken Sie nun den Knpof Der Scooter faltet sich bis zur H lfte und gibt dab...

Страница 91: ...l aufh rt dr cken Sie die Taste erneut in dieselbe Richtung Das Mobil wird sich dann komplett auseinanderfalten denken Sie daran die R ckenlehne auszuklappen 2 Um es automatisch zusammenzufalten bet t...

Страница 92: ...d das Piepen aufh rt Das Mobil wird sich komplett zusammenfalten die R ckenlehne muss manuell zusammengeklappt werden Mit dem Schalter am Mobil 1 Dr cken Sie den Schalter in Richtung II und halten Sie...

Страница 93: ...en Sie fest ob Ihr k rperlicher Stand f r sichres Fahren geeignet ist Sie k nnen den Ulises Roller sicher in Parks und auf der Wiese fahren Vermeiden Sie das Fahren auf losem Kies bedecktem Boden und...

Страница 94: ...der Roller auf anderen Fahrzeugen platziert und transportiert ist stellen Sie sich bitte die Sicherheit der Akku sicher Es ist verboten mit dem Roller steigen oder am Stra enrand entlang fahren da der...

Страница 95: ...e in die Ladebuchse des Ladeger ts siehe Abbildung 28 Nachdem Sie die Verbindung best tigt haben schalten Sie den Netzschalter ein Wenn die rote Leuchte leuchtet zeigt es an dass das Ladeger t sich im...

Страница 96: ...t der Ladestrom nahe zu Null Wenn Sie den Akku mit dem Ladeger t verbinden wird der Akku aufgeladen aber nicht berm ig aufgeladen Die Ladezeit sollte nicht 24 Stunden berschreiten Wie zeigt die Anzeig...

Страница 97: ...om des neuen Akkus niedrig ist Der Tiefzyklusakku ist mit einzigartiger chemischer Technologie konstruiert Er dauert lange nach einer Ladung und kann schnell aufgeladen werden Der neue Akku ist vor de...

Страница 98: ...kann die Lebensdauer des Akkus verl ngert werden Eine vollst ndige Ladung h lt den Akku in gutem Zustand und verl ngert seine Lebensdauer In jeder Zeit halten Sie den Akku voll so weit wie m glichst...

Страница 99: ...en biegt den Roller nach recht ab Wenn Sie den Lenker in der Mitte halten f hrt der Roller geradeaus Wenn Sie den Steuerkn ppel loslassen bremst der Roller bis er ganz stoppt Wenn der Roller vollst nd...

Страница 100: ...ht der Roller eine regelm ige Pr fung und Wartung Elektrodenanschl sse Der Akku muss horizonrtal im Batteriehalter platziert werden Stellen Sie sicher dass die Elektrodenanschl sse fest und korrosions...

Страница 101: ...echend der korrekten Weise betreiben und warten und eine Besch diung f hrt 2 Wenn man nicht die von regul ren Herstellern hergestellten Teilen verwenden und eine Besch diung der Teilen f hrt 3 Besch d...

Страница 102: ...speci ca es e par metros do produto 3 Principais componentes e fun es relevantes 4 Desdobramento e dobramento de scooter 5 Requisitos de seguran a 6 Bateria e m todo de carregamento 7 M todo de opera...

Страница 103: ...al do Usu rio Como mostrado na Figura 1 Painel de controle Guid o Alavanca de opera o direcional Interruptor do guid o Alavanca de ajuste de leme Inv lucro dianteiro Bater a Roda dianteira Pedal Alava...

Страница 104: ...sento que aten dem ao design ergon mico um guid o regul vel para cima e para baixo f cil de ajustar uma altura e um ngulo de inclina o dianteiro e traseiro para serem mais confort vel ao usu rio 6 pro...

Страница 105: ...adas Comprimento total Largura total Tamanho do pneu Velocidade m xima Inclina o segura m xima Viagem 6 km h 3 7 mph 0 12 15 km 9 32 milhas Raio de giro 1 4 m 55 polegadas Peso do carro excepto bateri...

Страница 106: ...rado na Figura 5 Interruptor de alimenta o Interruptor de chave Figura 6 1 Gire no sentido hor rio para ON e pode dirigir 2 Gire no sentido anti hor rio para OFF e n o pode dirigir Desligue a fonte de...

Страница 107: ...posi o ON ligando O indicador de carga de bateria vai mostrar a carga da bateria a parte verde indica que a carga est forte a parte amarela indica que a carga est fraco e a parte vermelha indica que...

Страница 108: ...momento o tubo de eleva o d al a se contrair para baixo depois de pressionar o tubo de eleva o da al a no lugar com a m o a vela o interruptor da al a como mostrado na Figura 12 Controlador O control...

Страница 109: ...ui est o os passos a seguir Tira a scooter da caixa Retire todos os envolt rios e protec es de seguran a da scooter Ligue o carregador tomada el ctrica e depois porta de entrada na parte de tr s da sc...

Страница 110: ...mover ate ouvir um claque 3 Agora prima o bot o A scooter se dobrar at a metade enquanto tocam os sinais 4 Quando deixar de ouvir os sinais volte a premir o bot o A scooter se ir dobrar por completo...

Страница 111: ...guinte forma 1 Para desdobr la automaticamente prima uma vez o interruptor em dire o ao indicador I A scooter se desdobrar at a metade e emitir os sinais de som Quando deixar de ouvi las prima de novo...

Страница 112: ...rar por completo lembre se de dobrar o encosto do assento Com o interruptor 1 Prima o interruptor em dire o ao indicador II mantenha o premido apenas uns segundos O pist o do mecanismo come ar a mover...

Страница 113: ...es primeiro e inicie a opera o Por favor determine se sua condi o sica segura para dirigir Pode usar o scooter ULISES em parques e prados Tente evitar dirigir em cascalho solto solo coberto e areia S...

Страница 114: ...o assento Quando o scooter colocado em outros ve culos para transportar por favor assegure a seguran a da bateria proibido subir ou dirigir ao longo da borda da estrada caso contr rio ir dani car perm...

Страница 115: ...terminal inserido no soquete de carre gamento como mostrado na Figura 29 Depois de con rmar a conex o ligue o interruptor de fonte de alimenta o se a luz vermelha estiver acesa indica que o carregador...

Страница 116: ...totalmente carregada a corrente de carga quase zero Assim quando o carregador est ligado a bateria carregada continuamente mas n o ocorre a carregamento de interfer ncia ben co que a dura o de carreg...

Страница 117: ...exclusivo com tecnologia qu mica exclusiva Pode se usar muito tempo ap s uma carga e pode ser carregada rapidamente A nova bateria est totalmente carregada antes de sair da f brica e a bateria pode a...

Страница 118: ...neste momento a capacida de da bateria pode atingir a 100 e o tempo de descarga pode ser prolongado Como garantir a vida da bateria Uma bateria totalmente carregada mant m a bateria em bom desempenho...

Страница 119: ...e o e o scooter desacelera at parar completamente Quando o scooter est parado completamente os freios s o acionados automati camente Completamento de condu o Estacione o scooter completamente Pression...

Страница 120: ...e manuten o peri dicas nas reas a seguir Conex o do eletrodo da bateria Certi que se de que as conex es do eletrodo estejam rmes e sem corros o A bateria deve ser colocada no suporte da bateria Conect...

Страница 121: ...cipalmente aos pneus internos e externos os rolamentos as l mpadas etc 5 A empresa n o permite modi car o design do scooter sem autoriza o 6 Desastres naturais como tuf es inunda es e terremotos Distr...

Отзывы: