background image

MMP SA-2550A 

Page 12 of 
24 


Midwest Motion Products 

DESIGN, MANUFACTURING & DISTRIBUTION  -  MOTION CONTROL EQUIPMENT 

www.midwestmotion.com

         email:  

[email protected]


How to reverse a brushless DC motor 


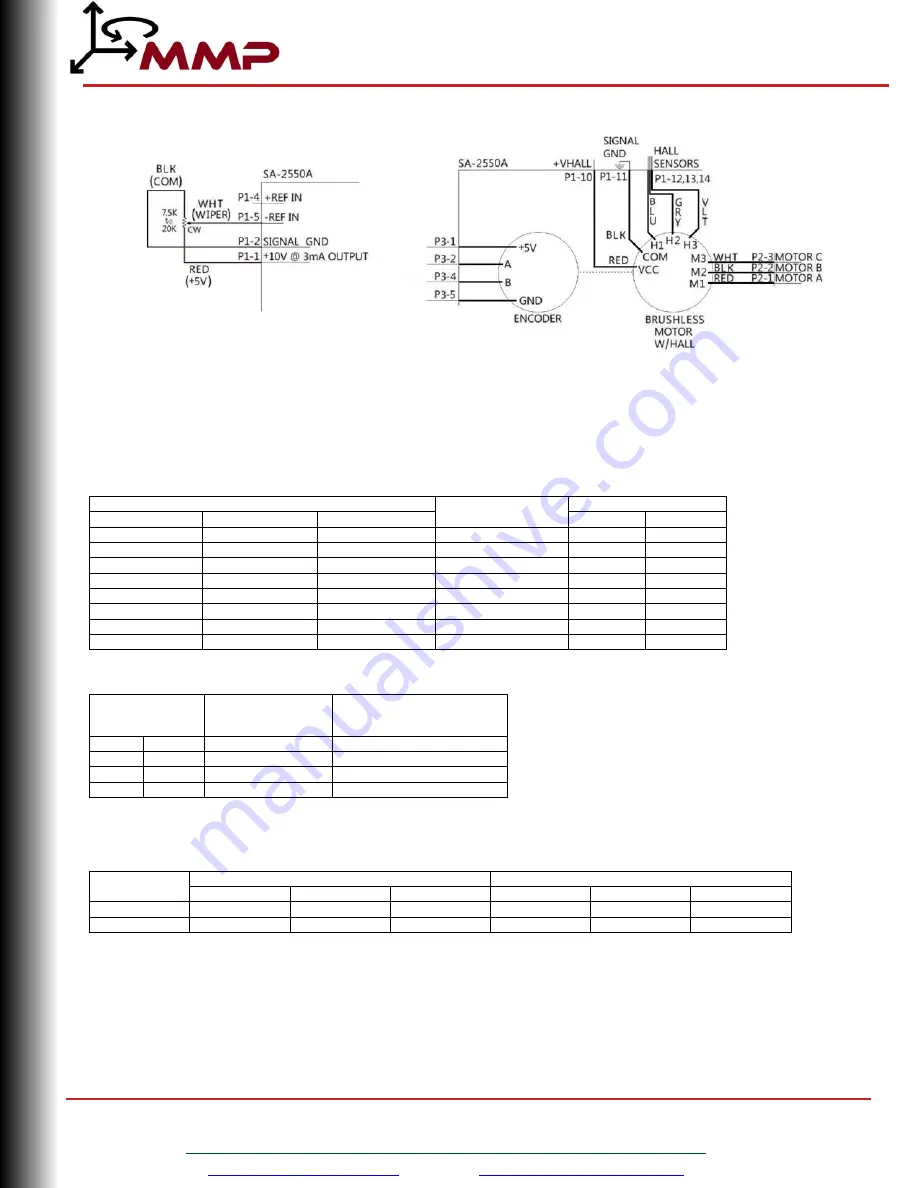
Figure 2. Typical Wiring Solution of a Brushless Motor with Encoder. 

 
The typical wiring solution shown above results in the brushless motor to run forward (CW rotation) with the potentiometer max at 

the CW position. Methods to reverse the brushless motor direction via wiring are as follows: 


-


Change the wiring connections of the potentiometer or jump leads. There are many ways to wire a potentiometer to the 

servo amplifier or jump the potentiometer leads. Consult the tables below for what leads to connect to which pins. 


Potentiometer Wiring Solutions 

Connect Potentiometer Leads to Pins 

Motor Direction 

of Rotation* 

Potentiometer 

RED (+5V) 

BLK (GND) 

WHT (WIPER) 

Range 

Rotation 

P1-1 

P1-2 

P1-5 

FWD 

0-100% 

CW 

P1-3 

P1-2 

P1-4 

FWD 

0-100% 

CW 

P1-1 

P1-2 

P1-4 

REV 

0-100% 

CW 

P1-3 

P1-2 

P1-5 

REV 

0-100% 

CW 

P1-2 

P1-3 

P1-4 

FWD 

100-0% 

CCW 

P1-2 

P1-1 

P1-5 

FWD 

100-0% 

CCW 

P1-2 

P1-1 

P1-4 

REV 

100-0% 

CCW 

P1-2 

P1-3 

P1-5 

REV 

100-0% 

CCW 

*Assumes that Hall Sensors and Motor Leads are wired in accordance with the above diagram. 


Wire without Potentiometer (direct pin connections) 

Connect Leads 

Motor Direction 

of Rotation* 

Simulated 

Potentiometer Output 

P1-1 

P1-5 

FWD 

100% 

P1-3 

P1-4 

FWD 

100% 

P1-1 

P1-4 

REV 

100% 

P1-3 

P1-5 

REV 

100% 

*Assumes that Hall Sensors and Motor Leads are wired in accordance with the above diagram. 


-


Change Motor and Hall Sensor Leads. To reverse motor direction, consult the below table to properly change motor and hall 

sensor leads. 


Motor 

Direction 

Hall Sensor Connection to Drive 

Motor Connection to Drive 

H1 (BLU) 

H2 (GRY) 

H3 (VLT) 

M1 (RED) 

M2 (BLK) 

M3 (WHT) 

FWD 

P1-12 

P1-13 

P1-14 

P2-1 

P2-2 

P2-3 

REV 

P1-14 

P1-13 

P1-12 

P2-2 

P2-1 

P2-3 


WARNING : DO NOT reverse the servo amplifier input power leads, HV (P2-5) and GND (P2-4) to reverse the direction of motor 

rotation. This can cause severe, irreversible damage to the servo amplifier. 


MIDWEST M

O

TION

 P

RODUCTS


Содержание SA-2550A

Страница 1: ...nsors or a tachometer for velocity control Continuous Current 25 A Supply Voltage 20 80 VDC Features Four Quadrant RegenerativeOperation DIP Switch Selectable Modes DIP Switch Configurable Loop Tuning...

Страница 2: ...Regenerative Braking with the Servo Amplifier 13 Loop Tuning Switch Functions 16 Mechanical Information 17 Mounting Dimensions 18 Troubleshooting Guide Red LED Causes and Solutions 19 Current Loop Tun...

Страница 3: ...on electronics UL registered under file number E140173 Note that machine components compliant with UL are considered UL registered as opposed to UL listed as would be the case for commercialproducts C...

Страница 4: ...pported Three Phase Brushless Single Phase Brushed Voice Coil Inductive Load Hardware Protection Over Current Over Temperature Over Voltage Under Voltage Short Circuit Phase Phase Phase Ground Primary...

Страница 5: ...ve SW1 2 ON Pull to ground to enable drive SW1 2 OFF Inhibit turns off all power devices I 10 V HALL 30mA OUT Low Power Supply For Hall Sensors 6 V 30 mA Referenced to signal ground Short circuit prot...

Страница 6: ...feedback polarity may be required to prevent a motor run away condition Standard Inverted 8 Mode Selection See mode selection table below 9 Reserved 10 60 120 degree commutation phasing setting 120 d...

Страница 7: ...5 OFF ON OFF ON OFF ON OFF ON SW4 6 OFF OFF ON ON OFF OFF ON ON SW4 7 OFF OFF OFF OFF ON ON ON ON Peak and Continuous Current Scaling Table Default switch settings are shaded Switch Peak and Continuo...

Страница 8: ...nd output current to the motor phases are the same amplitude Due to the nature of the MMP SA 2550A the input and output currents usually correlate but are not always equal To ensure the motor is recei...

Страница 9: ...ecifications table page 4 As long as the input frequency is no less than 10 Hz and does not exceed the maximum frequency the servo amplifier is able to control speed smoothly Typically an encoder reso...

Страница 10: ...VDC is used in place of a potentiometer then wire as shown below Remove connection to P1 1 and connect the signal positive to pin 5 for 0 100 POT effect Ensure VCOM is grounded to P1 2 Figure 2 Encode...

Страница 11: ...toward the outside of the servo amplifier as shown in the picture below Note Make sure to disconnect all Hall sensor inputs Figure 1 120 60 Phasing Switch Example Motor Connections With the 120 60 PHA...

Страница 12: ...P1 4 FWD 0 100 CW P1 1 P1 2 P1 4 REV 0 100 CW P1 3 P1 2 P1 5 REV 0 100 CW P1 2 P1 3 P1 4 FWD 100 0 CCW P1 2 P1 1 P1 5 FWD 100 0 CCW P1 2 P1 1 P1 4 REV 100 0 CCW P1 2 P1 3 P1 5 REV 100 0 CCW Assumes th...

Страница 13: ...egenerated energy can charge the power supply capacitors to levels above that of the drive over voltage shutdown level If the power supply capacitance is unable to handle this excess energy or if it i...

Страница 14: ...load J m mass of the load kg g gravitational acceleration 9 81 m s2 h vertical height of the load m During regeneration the kinetic and potential energy will be stored in the power supply s capacitor...

Страница 15: ...y the for a shunt regulator by operating the servo drive under the worst case braking and deceleration conditions If the drive shuts off due to over voltage a shunt regulator is necessary Continuous R...

Страница 16: ...OFF OFF ON ON OFF OFF ON ON OFF OFF SW3 3 ON ON ON ON OFF OFF OFF OFF ON ON ON ON OFF OFF OFF OFF SW3 4 ON ON ON ON ON ON ON ON OFF OFF OFF OFF OFF OFF OFF OFF SW3 5 ON ON ON ON ON ON ON ON ON ON ON...

Страница 17: ...e Yes 15 VEL MONITOR OUT 13 HALL 2 11 GND 9 INHIBIT ENABLE 7 ENCODER A IN 5 REF IN 3 10V 3mA OUT 1 10V 3mA OUT 2 SIGNAL GND 4 REF IN 6 ENCODER B IN 8 CURRENT MONITOR 10 V HALL 30mA OUT 12 HALL 1 14 HA...

Страница 18: ...SA 2550A Page 18 of 24 Midwest Motion Products DESIGN MANUFACTURING DISTRIBUTION MOTION CONTROL EQUIPMENT www midwestmotion com email sales midwestmotion com MOUNTING DIMENSIONS MIDWEST MOTION PRODUC...

Страница 19: ...using a brushless motor connect Hall sensor inputs and set the 60 120 phasing switch to the correct position according to the motor Apply power to the drive and rotate the motor by hand If the LED is...

Страница 20: ...ce in the table below 60 Degree 120 Degree 60 Degree 120 Degree Hall A Hall B Hall C Hall A Hall B Hall C 1 0 0 1 0 0 1 1 0 1 1 0 1 1 1 0 1 0 Valid 0 1 1 0 1 1 Green 0 0 1 0 0 1 LED 0 0 0 1 0 1 1 0 1...

Страница 21: ...ower ground and AC ground Make sure the motor phases are not shorting to AC ground through the motor housing or shielding on the motor power cable Over current An over current fault will occur if comm...

Страница 22: ...near the drive s upper voltage limit Low power supply voltage power supply voltage is near the drive s lower voltage limit To perform current loop tuning first locate the relevant potentiometer POT 1...

Страница 23: ...tiometers are preset the correlation of command voltage to motor speed may result in less control of motor speed then desired A typical command curve would appear as below if potentiometer at full CCW...

Страница 24: ...mail sales midwestmotion com The respective potentiometers have the following effects on the command curve As noted in the Potentiometer Functions table on page 6 each potentiometer has approximately...

Отзывы: