background image

6

••••••••••••••••••••••••••••••••••••••••••••••••••••••••••••••••••••••••••••••••••••••••••••••••••••••••••••••••••••••••••••••••••••••••••••••

Basic Operations

 Multiplexer functions

Buttons on the front of the unit can be used to perform
some of the multiplexer functions.

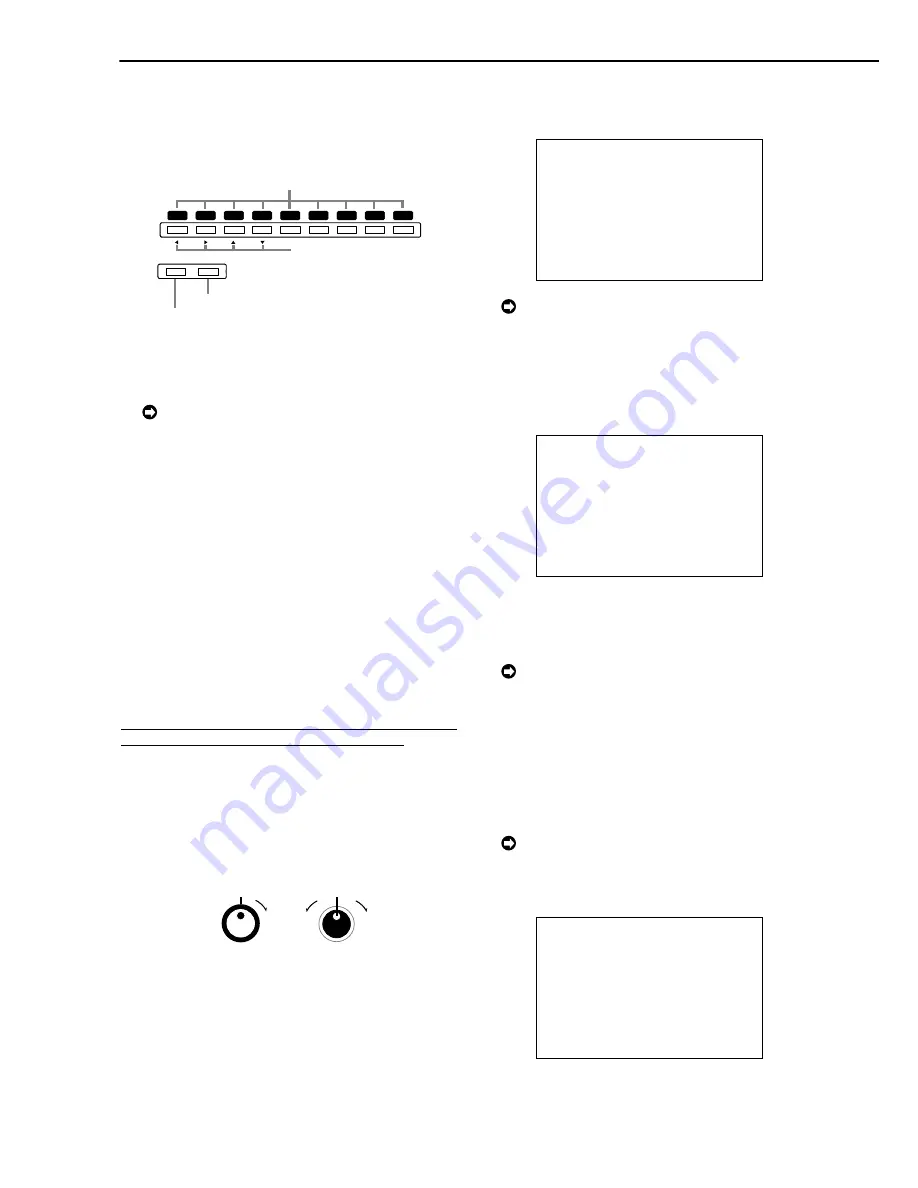
 Multiplexer buttons

MOVE button

2 SPLIT/SEQUENCE button

3 ZOOM button

1 Camera number buttons (1 to 9)

SPLIT/

SEQUENCE

ZOOM

5

6

7

8

9

1

2

3

4

1. Camera number buttons (1 to 9)
Video images of cameras connected to CAMERA IN ter-
minals 1 to 9 on the rear of the unit are displayed.

 By pressing a camera number button, video

image can be displayed even if the camera is not
set for recording.

2. SPLIT/SEQUENCE button
The screen switches in order of SPLIT9, 3 types of SPLIT4
SCREEN SETTING (a, b, c), SPLIT4 SEQUENTIAL, and
SINGLE SEQUENTIAL set in the <MPX DISPLAY SET-
TING> screen (SEQUENTIAL display is skipped during
playback).

3. ZOOM button
When this button is pressed during single screen display,
MAGNIFICATION 100% screen appears and the magnifi-
cation centre point (X) is displayed at the centre. Pressing
the button again will switch the magnification to 200% and
then 400%. By pressing the MOVE buttons, the magnified
screen can be moved vertically/horizontally with the cen-
tre point as the axis.

When the ZOOM button is pressed, camera number
buttons 1 ~ 4 switches to the MOVE buttons.

■ 

Menu settings

The operational conditions of this unit can be set in the
menu screens according to use. Although the setting
method will differ slightly depending on the menu screen,
the basic setting method of using the JOG dial and SHUT-
TLE ring will be used for setting the display mode as an
example.

SHUTTLE ring


JOG dial

Example : Set DISPLAY MODE to “3” ( default : “1” ).

1. Set the MAIN switch on the rear of the unit to ON. Press
the POWER button on the front after the ACCESS indicator
turns off.

• “SETTING UP...” appears on the screen and the unit is
booted.
• POWER button operation will not be accepted while the
ACCESS indicator is flashing. Press the POWER button after
the indicator turns off.

2. After boot-up, press a SET UP button inside the door on
the front of the unit.

• The <SETTINGS> screen appears.

  <SETTINGS>
  >>TIME DATE/DISPLAY SETTINGS
   MPX DISPLAY SETTINGS
   MOTION DETECTION SETTINGS
   RECORD SETTINGS
   TIMER PROGRAM SETTINGS
   INITIAL SET UP/INFORMATION

   QUICK SETTINGS

   MEMO:

 When a SET UP button is pressed and the menu

screen appears, the background darkens and the
displayed characters become easier to see.

3. Check to see that the cursor (>>) is positioned at “TIME
DATE/DISPLAY SETTINGS”, and then turn the SHUTTLE ring
clockwise.

• The <TIME DATE/DISPLAY SETTINGS> screen appears.

  <TIME DATE/DISPLAY SETTINGS>
  >>TIME DATE ADJUST
   DISPLAY MODE                1
   CLOCK LOCATION SETTING
   CAMERA DISPLAY         NUMBER
   CAMERA TITLE/MEMO SETTING
   DUPLEX MODE DISPLAY    BOTTOM

  <MODE1>

  01-01-2002 00:00:00

4. Turn the JOG dial to move the cursor to “DISPLAY MODE”
and turn the SHUTTLE ring clockwise.

• The background of the “DISPLAY MODE” setting turns red
and flashes.

 When turning the JOG dial clockwise, the cursor

(>>) moves down. When turning counterclockwise,
the cursor (>>) moves up.

5. Turn the JOG dial to display “3”.

• The display mode sample on the bottom of the screen
changes to <MODE3>.

6. Turn the SHUTTLE ring clockwise.

• The setting is confirmed and flashing stops.
• To continue with other settings, repeat steps 4 and 5.

 When turning the SHUTTLE ring counterclockwise

while the setting is flashing, the setting will return to
the previous setting. To exit the screen, turn the SHUT-
TLE ring counterclockwise.

  <TIME DATE/DISPLAY SETTINGS>
   TIME DATE ADJUST
  >>DISPLAY MODE                3
   CLOCK LOCATION SETTING
   CAMERA DISPLAY         NUMBER
   CAMERA TITLE/MEMO SETTING
   DUPLEX MODE DISPLAY    BOTTOM

  <MODE3>

  01-01-2002 TUE 
  00:00:00 12.5P   99

%

 A00001

Содержание DX-TL800EZ

Страница 1: ...1 CASTELLANO ENGLISH FRAN AIS DEUTSCH DIGITAL RECORDER OPERATION QUICK GUIDE MODEL DX TL800EZ THIS INSTRUCTION MANUAL IS IMPORTANT TO YOU PLEASE READ IT BEFORE USING YOUR DIGITAL RECORDER...

Страница 2: ...BADOR DIGITAL GU A R PIDA DE FUNCIONAMIENTO MODELO DX TL800E120 ESTE MANUAL DE INSTRUCCIONES ES IMPORTANTE PARA EL USUARIO ROGAMOS QUE SEA LE DO ATENTAMENTE ANTES DE UTILIZAR EL GRABADOR DIGITAL CON L...

Страница 3: ...ndo la alarma la grabaci n se para Durante la grabaci n programada no se parar aunque se pulse el bot n 6 Anillo SHUTTLE Se utiliza para ajustar varios men s y funciones de b squeda ajustar la velocid...

Страница 4: ...zar para cambiar el intervalo de reproducci n durante el modo de reproducci n y de reproducci n hacia atr s 14 Bot n LOCK P lselo con un objeto puntiagudo tal como un bol grafo mientras est conectado...

Страница 5: ...hora actual 10 Terminales ALARM IN Terminal de entrada para se al de alarma 11 Terminales I O Terminal CLOCK ADJ Terminal de entrada para ajustar la hora actual La visualizaci n de la hora se ajustar...

Страница 6: ...MODE SHUTTLE HOLD TIMER ENTER FF CLEAR REW REC STOP M DET PRE ALARM EMERGENCY LOCK SPLIT SEQUENCE ZOOM ACCESS POWER 5 6 7 8 9 1 2 3 4 Bot n EXPULSI N COPY ZOOM SPLIT SEQUENCE La tarjeta Compact Flash...

Страница 7: ...se apague el indicador ACCESS Aparece SETTING UP en la pantalla y se efect a la inicializaci n de la unidad No se podr activar el bot n POWER mientras est parpadeando el indicador ACCESS Pulse el bot...

Страница 8: ...eando significa que la configuraci n no ha sido confirmada Para confirmar consulte el procedimiento de configuraci n de arriba Para continuar con las otras configuraciones o verificar el elemento de c...

Страница 9: ...capacidad de grabaci n Esta unidad visualiza en pantalla el espacio utilizado del dispositivo de grabaci n especificado HDD cuando RE MAIN HDD de REAR TERMINAL SETTINGS est ajustado a HDD El indica la...

Страница 10: ...anterior STOP PAUSE REV PLAY PLAY Cuando el elemento HDD REPEAT PLAY en HDD SETTINGS se encuentra ajustado a OFF la reproducci n cesa al llegar al final del HDD f sico o de la secci n grabada Cuando...

Страница 11: ...sa 4 Gire el anillo JOG para invertir la visualizaci n de MONTH y gire el anillo SHUTTLE hacia la derecha El fondo del elemento de configuraci n cambia a rojo y parpadea 5 Gire el dial JOG para visual...

Страница 12: ...n en la hora ajustada se visualizar en cuadro fijo el v deo grabado en la hora y fecha m s cercana para el n mero de c mara ajustado Dependiendo de las condiciones de grabaci n puede suceder que TIME...

Страница 13: ...8h 221h 299h 573h 127h 172h 270h 360h 678h 152h 199h 316h 417h 775h 203h 255h 401h 535h 929h 242h 319h 488h 630h 1058h 541h 669h 929h 1123h 1609h 892h 1019h 1339h 1534h 1922h 2808h 3716h 6049h 8512h 1...

Страница 14: ...EFGHIJKLMNOPQRSTUVWXYZ abcde f gh i j k l mnopqrs t uvwxyz SHUTTLE GO BACK MPX DISPLAY SETTINGS SPLIT4 SCREEN SETTING SPLIT9 SCREEN SETTING SEQUENCE SETTING INTERLASE ON SPLIT4 SCREEN SETTING SPLIT4 a...

Страница 15: ...C NORMAL ALARM SET REC MODE D NORMAL ALARM SET ALARM REC DURATION 5S PRE ALARM REC SHORT REC MODE A ALARM PLUS NO PPS GRADE A PPS A GRADE 1 389P STD 1 389P STD 1 389P STD 1 389P STD 1 389P STD 1 389P...

Страница 16: ...ND INFORMATION SERVICE HDD INFORMATION CFC INFORMATION WARNING LOG LIST SETTING DATA INITIALIZE HDD DATA CLEAR CFC DATA CLEAR ELAPSED TIME 10H WARNING LOG LIST NO DATE TIME WARNING 0001 01 01 02 00 00...

Страница 17: ...IP SEARCH EXECUTE FORWARD EXECUTE REVERSE PUSH SEARCH KEY FOR SEARCH SELECTION ALARM INDEX SEARCH INDEX 01 EXECUTE FORWARD EXECUTE REVERSE START END PUSH SEARCH KEY FOR SEARCH SELECTION SEARCH SELECTI...

Страница 18: ...1 DX TL800EZ...

Страница 19: ...UENCE ZOOM ACCESS REC STOP DIGITAL RECORDER DX TL800E POWER 5 6 7 8 9 1 2 3 4 10 14 13 12 11 8 9 7 6 5 1 2 3 4 1 POWER MAIN ON 2 ACCESS 3 1 9 4 TIMER 1 5 REC STOP 1 6 SHUTTLE 7 JOG 8 SPLIT SEQUENCE SP...

Страница 20: ...REC STOP M DET PRE ALARM EMERGENCY LOCK SPLIT SEQUENCE ZOOM ACCESS POWER 5 6 7 8 9 1 2 3 4 14 LOCK MAIN 5 PASSWORD LOCK SETTING PASSWORD 15 ANALOG OUT VIDEO OUT RCA AUDIO OUT RCA 16 COMPACT FLASH X C...

Страница 21: ...OUT GND CAMERA OUT RS 232C RESET CAMERA IN IN OUT VIDEO OUT MIC GND AUDIO 100 240V 12 11 10 9 8 7 6 5 1 2 3 4 6 AUDIO AUDIO IN RCA AUDIO OUT RCA 7 GND GND 8 MIC 600 MIC AUDIO IN 9 RESET 10 ALARM IN 11...

Страница 22: ...OWER ON 30 12 RS 232C RS 232C 1 COMPACT FLASH 2 FSM1 Mitsubishi FSM1 CFC DATA CLEAR INFORMATION SERVICE 1 2 COMPACT FLASH SEARCH COPY SET UP VIDEO OUT AUDIO OUT COMPACTFLASH STOP PAUSE REV PLAY PLAY P...

Страница 23: ...TIMER PROGRAM SETTINGS INITIAL SET UP INFORMATION QUICK SETTINGS MEMO SET UP 3 TIME DATE DISPLAY SETTINGS SHUTTLE TIME DATE DISPLAY SETTINGS TIME DATE DISPLAY SETTINGS TIME DATE ADJUST DISPLAY MODE 1...

Страница 24: ...DAYLIGHT SAVING OUT DAY 01 MONTH 01 YEAR 2002 TIME 00 00 00 5 JOG 28 SHUTTLE TIME DATE ADJUST DAYLIGHT SAVING OUT DAY 28 MONTH 01 YEAR 2002 TIME 00 00 00 6 JOG MONTH JOG 7 4 6 MONTH YEAR 8 JOG TIME S...

Страница 25: ...P PPS 1 2 3 4 5 6 7 8 9 ALARM RECORDING GRADE STD SUPER HIGH STD STANDARD BASIC LONG PPS 1 0 556P GRADE HIGH 1 SET UP SETTINGS 2 JOG RECORD SETTINGS SHUTTLE RECORD SETTINGS RECORD SETTINGS RECORD SETT...

Страница 26: ...389P STD 1 389P STD 1 389P STD SET UP 8 JOG HIGH SHUTTLE 1 2 3 RECORD SETTING ALARM PLUS NO PPS GRADE A PPS A GRADE 0 556P HIGH 1 389P STD 1 389P STD 1 389P STD 1 389P STD 1 389P STD ESTD TIME ESTD TI...

Страница 27: ...AMERA NO SHUTTLE 9 JOG 3 SHUTTLE ALL ALL 1 2 3 4 5 6 7 8 9 ALL 1 9 SEARCH SELECTION SEARCH TYPE TIME DATE SELECTION CAMERA NO PLAYBACK DEVICE HDD START 02 02 2002 00 00 00 END 04 04 2002 12 30 15 3 10...

Страница 28: ...41h 2808h 3716h 6049h 8512h 18883h 5617h 7432h 12099h 17025h 37767h 2 566 000 3 383 000 5 483 000 7 700 000 17 034 000 12 8 PPS GRADE SUPER HIGH STD BASIC LONG 25P 12 5P 8 333P 6 25P 5P 4 167P 3 125P...

Страница 29: ...01 MONTH 01 YEAR 2002 TIME 00 00 00 01 01 2002 00 00 00 CAMERA TITLE MEMO SETTING MEMO SHUTTLE CHARACTERS CHARACTERS 0123456789 ABCDEFGHIJKLMNOPQRSTUVWXYZ abcde f gh i j k l mnopqrs t uvwxyz SHUTTLE G...

Страница 30: ...E B NORMAL ALARM SET REC MODE C NORMAL ALARM SET REC MODE D NORMAL ALARM SET ALARM REC DURATION 5S PRE ALARM REC SHORT REC MODE A ALARM PLUS NO PPS GRADE A PPS A GRADE 1 389P STD 1 389P STD 1 389P STD...

Страница 31: ...ART END INFORMATION SERVICE HDD INFORMATION CFC INFORMATION WARNING LOG LIST SETTING DATA INITIALIZE HDD DATA CLEAR CFC DATA CLEAR ELAPSED TIME 10H WARNING LOG LIST NO DATE TIME WARNING 0001 01 01 02...

Страница 32: ...KEY FOR SEARCH SELECTION ALARM SKIP SEARCH EXECUTE FORWARD EXECUTE REVERSE PUSH SEARCH KEY FOR SEARCH SELECTION ALARM INDEX SEARCH INDEX 01 EXECUTE FORWARD EXECUTE REVERSE START END PUSH SEARCH KEY F...

Страница 33: ...872C292A4 PRINTED IN MALAYSIA...

Страница 34: ...alarm recording recording stops During timer recording recording will not stop even if the button is pressed 6 SHUTTLE ring Used to set various menus and search functions adjusting the playback speed...

Страница 35: ...f there is no card in the COMPACT FLASH slot 18 ALARM INTERRUPT button When pressing this button the unit will not accept alarm signals or motion detection for 5 minutes Dur ing this time the button w...

Страница 36: ...29 59 it will be reset to 11 00 00 and if the current time is 11 30 00 it will be reset to 12 00 00 1 MAIN switch This is the main power switch When using this unit set this switch to ON Otherwise the...

Страница 37: ...de scribed in the manual included with Compact Flash Card Inserting Card 1 Remove the COMPACT FLASH slot cover attached to the unit 2 Please turn down the side which contains notch in right and left...

Страница 38: ...CCESS indicator turns off SETTING UP appears on the screen and the unit is booted POWER button operation will not be accepted while the ACCESS indicator is flashing Press the POWER button after the in...

Страница 39: ...TINGS screen 2 Check to see that the cursor is positioned at TIME DATE DISPLAY SETTINGS and then turn the SHUTTLE ring clockwise The TIME DATE DISPLAY SETTINGS screen appears 3 Check to see that the c...

Страница 40: ...DE to HIGH for normal recording 1 Press the SET UP button to display the SETTINGS screen 2 Turn the JOG dial to move the cursor to RECORD SETTINGS and turn the SHUTTLE ring clockwise The RECORD SETTIN...

Страница 41: ...cordable time is displayed as ESTD TIME depending on the PPS and GRADE settings The time will not change when changing the alarm recording settings 9 When completed with setting turn the SHUTTLE ring...

Страница 42: ...out searching turn the SHUTTLE ring counterclockwise or press the SEARCH button twice 7 Press the SEARCH button to display the SEARCH SELECTION screen 8 Check to see that the cursor is positioned at...

Страница 43: ...tly To display a single screen by selecting a camera number from the SPLIT9 screen of the search re sult when ALL is selected in the SELECTION CAMERA NO setting press the SEARCH button to clear the SE...

Страница 44: ...h 325h 80h 103h 169h 232h 457h 107h 138h 221h 299h 573h 127h 172h 270h 360h 678h 152h 199h 316h 417h 775h 203h 255h 401h 535h 929h 242h 319h 488h 630h 1058h 541h 669h 929h 1123h 1609h 892h 1019h 1339h...

Страница 45: ...O SHUTTLE CHARACTERS CHARACTERS 0123456789 ABCDEFGHIJKLMNOPQRSTUVWXYZ abcde f gh i j k l mnopqrs t uvwxyz SHUTTLE GO BACK MPX DISPLAY SETTINGS SPLIT4 SCREEN SETTING SPLIT9 SCREEN SETTING SEQUENCE SETT...

Страница 46: ...B NORMAL ALARM SET REC MODE C NORMAL ALARM SET REC MODE D NORMAL ALARM SET ALARM REC DURATION 5S PRE ALARM REC SHORT REC MODE A ALARM PLUS NO PPS GRADE A PPS A GRADE 1 389P STD 1 389P STD 1 389P STD 1...

Страница 47: ...NFORMATION SERVICE HDD INFORMATION CFC INFORMATION WARNING LOG LIST SETTING DATA INITIALIZE HDD DATA CLEAR CFC DATA CLEAR ELAPSED TIME 10H WARNING LOG LIST NO DATE TIME WARNING 0001 01 01 02 00 00 00...

Страница 48: ...EY FOR SEARCH SELECTION ALARM SKIP SEARCH EXECUTE FORWARD EXECUTE REVERSE PUSH SEARCH KEY FOR SEARCH SELECTION ALARM INDEX SEARCH INDEX 01 EXECUTE FORWARD EXECUTE REVERSE START END PUSH SEARCH KEY FOR...

Страница 49: ...0 Um zu gew hrleisten da dieses Ger t richtig und sicher betrieben wird lesen Sie sich bitte vor der Inbetriebnahme das beigef gte Handbuch gr ndlich durch Bewahren Sie es an einem sichern Ort auf und...

Страница 50: ...armaufnahme gedr ckt wird h lt die Aufnahme an W hrend Timeraufnahme wird die Aufnahme auch durch Druck auf diese Taste nicht angehalten 6 SHUTTLE Ring Zum Einstellen verschiedener Men s und Suchfunkt...

Страница 51: ...f r COMPACT FLASH ist 18 Taste ALARM INTERRUPT Alarmunterbrechung Bei Druck auf diese Taste nimmt das Ger t 5 Minuten lang keineAlarmsignale oder Bewegungsentdeckung an W hrend dieser Zeit blinkt die...

Страница 52: ...s CLOCK ADJ auf die n chstliegende volle Stunden gestellt werden Wenn es beim Anlegen des Signals 11 29 59 ist wird auf 1 00 00 gestellt und wenn es 11 30 00 ist wird auf 12 00 00 gestellt Betriebsvor...

Страница 53: ...Bringen Sie die Abdeckung f r den COMPACT FLASH Kartenschlitz an SEARCH COPY SET UP VIDEO OUT AUDIO OUT COMPACTFLASH STOP PAUSE REV PLAY PLAY PLAY MODE SHUTTLE HOLD TIMER ENTER FF CLEAR REW REC STOP...

Страница 54: ...Allgemeine Betriebsvorg nge Multiplexer Funktionen Einige der Multiplexer Funktionen k nnen mittels Tasten an der Vorderseite des Ger tes durchgef hrt werden Multiplexer Tasten Taste Bewegen 2 Taste...

Страница 55: ...gen mit JOG W hlscheibe SHUTTLE Ring wird erkl rt 1 Stellen Sie sicher dass der Einstellpunkt nicht mehr blinkt und dass der Punkt zur gew nschten Einstellung ge ndert worden ist Die Einstellung ist n...

Страница 56: ...den Einstellungen f rALARM RECORD ING Alarmaufnahme Die Intervallanzeige ist entsprechend dem folgenden Diagramm Einstellung von GRADE Vorgabe STD SUPER HIGH hoch STD Standard BASIC grundlegend LONG...

Страница 57: ...389P STD 1 389P STD 1 389P STD 1 389P STD 1 389P STD Zu ESTD TIME gesch tzte Zeit Die f r Aufnahme verbleibende Zeit wird abh ngig von den Einstellungen f r PPS und GRADE als ESTD TIME angezeigt Die Z...

Страница 58: ...Sie zur Fortsetzung der Wiedergabe erneut die Taste PAUSE oder die Taste PLAY 3 Dr cken Sie die Taste STOP um die Wiedergabe anzuhalten W hrend HDD Wiedergabe Pause beginnt die n chste Wiedergabe an d...

Страница 59: ...0 00 00 END 04 04 2002 12 30 15 PUSH SEARCH KEY FOR SEARCH SELECTION Wenn keine Aufnahme f r die eingestellte Zeit vorhanden ist wird as Video f r die n chstgelegene Zeit und das n chstgelegene Datum...

Страница 60: ...h 80h 103h 169h 232h 457h 107h 138h 221h 299h 573h 127h 172h 270h 360h 678h 152h 199h 316h 417h 775h 203h 255h 401h 535h 929h 242h 319h 488h 630h 1058h 541h 669h 929h 1123h 1609h 892h 1019h 1339h 1534...

Страница 61: ...SHUTTLE CHARACTERS CHARACTERS 0123456789 ABCDEFGHIJKLMNOPQRSTUVWXYZ abcde f gh i j k l mnopqrs t uvwxyz SHUTTLE GO BACK MPX DISPLAY SETTINGS SPLIT4 SCREEN SETTING SPLIT9 SCREEN SETTING SEQUENCE SETTI...

Страница 62: ...DE C NORMAL ALARM SET REC MODE D NORMAL ALARM SET ALARM REC DURATION 5S PRE ALARM REC SHORT REC MODE A ALARM PLUS NO PPS GRADE A PPS A GRADE 1 389P STD 1 389P STD 1 389P STD 1 389P STD 1 389P STD 1 38...

Страница 63: ...INFORMATION SERVICE HDD INFORMATION CFC INFORMATION WARNING LOG LIST SETTING DATA INITIALIZE HDD DATA CLEAR CFC DATA CLEAR ELAPSED TIME 10H WARNING LOG LIST NO DATE TIME WARNING 0001 01 01 02 00 00 0...

Страница 64: ...ALARM SKIP SEARCH EXECUTE FORWARD EXECUTE REVERSE PUSH SEARCH KEY FOR SEARCH SELECTION ALARM INDEX SEARCH INDEX 01 EXECUTE FORWARD EXECUTE REVERSE START END PUSH SEARCH KEY FOR SEARCH SELECTION SEARC...

Страница 65: ...GUIDE D UTILISATION RAPIDE MODELE DX TL800E120 Veuillez lire ce manuel avant d utiliser cette unit pour vous assurer de l utiliser correctement et sans danger Veuillez con server ce manuel dans un li...

Страница 66: ...us appuyez sur la touche 6 Bague acc l ratrice SHUTTLE Elle permet de r gler divers menus et fonctions de re cherche de r gler la vitesse de lecture et de faire d filer l image rapidement vers l arri...

Страница 67: ...te COMPACT FLASH 18 Touche d interruption d alarme ALARM INTERRUPT Si vous appuyez sur la touche l appareil n acceptera pas les signaux d alarme ni la d tection de mouvement pendant 5 minutes Pendant...

Страница 68: ...r e du signal d alarme 11 Prises d entr e sortie I O Prise de r glage de l horloge CLOCK ADJ Prise d entr e pour le r glage de l heure L affichage de l heure se r gle l heure la plus proche 00 min ute...

Страница 69: ...vec prise RS 232C Vous pouvez piloter l appareil via un autre appareil par cette prise Insertion jection de la carte Compact Flash Avant d utiliser la carte lisez les pr cautions qui figurent dans le...

Страница 70: ...l indicateur ACCESS est teint SETTING UP s affiche l cran et l appareil d marre Le fonctionnement de la touche POWER n est pas accept tant que l indicateurACCESS clignote Appuyez sur la touche POWER d...

Страница 71: ...rubrique de r glage ne clignote plus et qu elle est maintenant r gl e sur le param tre voulu Le param tre n est pas valid si la rubrique clignote Pour confirmer le r glage voyez la proc dure de r glag...

Страница 72: ...u disque dur Fonction d affichage de capacit enregistr e L appareil affiche l espace utilis sur le support d enregistrement sp cifi HDD l cran lorsque REMAIN HDD de l cran REAR TERMINAL SETTINGS est r...

Страница 73: ...pour s lectionner HIGH et tournez la bague SHUTTLE en sens horaire Le r glage est confirm et le clignotement cesse 1 2 3 RECORD SETTING ALARM PLUS NO PPS GRADE A PPS A GRADE 0 556P HIGH 1 389P STD 1...

Страница 74: ...ficher l cran SEARCH SELECTION et s lectionnez CFC carte Compact Flash dans PLAYBACK DEVICE 2 Pour arr ter provisoirement la lecture appuyez sur la touche PAUSE Pour reprendre la lecture appuyez nouve...

Страница 75: ...2002 00 00 00 END 04 04 2002 12 30 15 PUSH SEARCH KEY FOR SEARCH SELECTION S il n y a pas d enregistrement pour la date r gl e la s quence vid o de l heure et de la date les plus proches pour la cam...

Страница 76: ...221h 299h 573h 127h 172h 270h 360h 678h 152h 199h 316h 417h 775h 203h 255h 401h 535h 929h 242h 319h 488h 630h 1058h 541h 669h 929h 1123h 1609h 892h 1019h 1339h 1534h 1922h 2808h 3716h 6049h 8512h 1888...

Страница 77: ...6789 ABCDEFGHIJKLMNOPQRSTUVWXYZ abcde f gh i j k l mnopqrs t uvwxyz SHUTTLE GO BACK MPX DISPLAY SETTINGS SPLIT4 SCREEN SETTING SPLIT9 SCREEN SETTING SEQUENCE SETTING INTERLASE ON SPLIT4 SCREEN SETTING...

Страница 78: ...RMAL ALARM SET REC MODE C NORMAL ALARM SET REC MODE D NORMAL ALARM SET ALARM REC DURATION 5S PRE ALARM REC SHORT REC MODE A ALARM PLUS NO PPS GRADE A PPS A GRADE 1 389P STD 1 389P STD 1 389P STD 1 389...

Страница 79: ...RMATION SERVICE HDD INFORMATION CFC INFORMATION WARNING LOG LIST SETTING DATA INITIALIZE HDD DATA CLEAR CFC DATA CLEAR ELAPSED TIME 10H WARNING LOG LIST NO DATE TIME WARNING 0001 01 01 02 00 00 00 ALM...

Страница 80: ...TION ALARM SKIP SEARCH EXECUTE FORWARD EXECUTE REVERSE PUSH SEARCH KEY FOR SEARCH SELECTION ALARM INDEX SEARCH INDEX 01 EXECUTE FORWARD EXECUTE REVERSE START END PUSH SEARCH KEY FOR SEARCH SELECTION S...

Отзывы: