background image

Page 30

Purpose:

Measuring

Instrument

Test Point

Measuring

Range

Input Signal

Ext. Trigger

Input Terminal

Symptom:

Purpose

Measuring

Instrument

Test Point

Measuring

Range

Input Signal

Ext. Trigger

Input Terminal

Symptom:

MODEL: WT-42313 / WT-42413

-----

-----

------

------

Video Signal (HD/NTSC)

ANT-A/DTV

[On Screen Display]

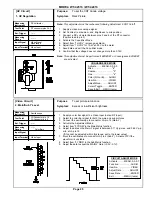
12.Character Position

To position the character display horizontally.

Incorrect display position

1. Supply a Monoscope signal to the Video or RF Input.
2. Select the Monoscope as the source for the main picture (Input button).
3. Activate the Service Mode, HR Function.
4. Use the Adjust Right/Left buttons to center the display horizontally.

(A = B)

5. Save data and exit the Service Mode..

-----

-----

------

------

Monscope & Crosshatch

Video Input

[CRT Circuit]

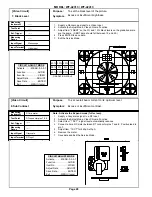
11. Electrostatic Focus

To set electrostatic focus to the optimum point.

Poor focus.

Note:


This adjustment must be performed after the Sub Contrast adjustment.

Static Focus Adjustment

1. Supply a Monoscope signal to a Video Input
2. Activate A/V Reset
3. Select Red, Green or Blue rasters using the table below.
3. Set the Red, Green and Blue Focus VRs for optimum focus at the top center of

the picture..

Raster Color Selection

Color Raster

Activation Code

Red

MENU-0-3-5-9-1

Green

MENU-0-3-5-9-2

Blue

MENU-0-3-5-9-3

Содержание WT-42313

Страница 1: ...S Power AC 120V 60Hz 240W Frequency VHF 54 470MHz Range UHF 470 806MHz Antenna Input VHF UHF 75Ω unbalanced CRT Size 7 inches High Voltage 32 0kV at 0A Cabinet 39 W x34 H x25 D Demensions Weight 105 lbs Speaker Two 5 round full range 8Ω 5W Input Level VIDEO IN JACK RCA Type 1 0Vp p 75Ω unbalanced AUDIO IN JACK RCA Type 4 7dBm 43kΩ unbalanced S VIDEO IN JACK Y C separate Y 1 0 Vp p C 0 286Vp p BURS...

Страница 2: ......

Страница 3: ...Initial Setup 16 Main Menu Defaults 16 LED Indicator Diagnostics 17 CircuitAdjustment Mode 18 Service Mode Reset 19 ConvergenceAdjustment Mode 19 Adjustment Items List 21 Adjustment Test Points 24 Adjustment Procedures High Voltage Regulation 25 Main Sub Y Level 25 Main Sub Color Level 26 CRTCutoff 26 White Balance NTSC 27 White Balance HD 27 Black Level 28 Sub Contrast 28 Dynamic Focus Preset 29 ...

Страница 4: ...nc Signal Path 55 Deflection HV 56 X Ray Protect 57 HV Regulation 58 Sound Signal Path 59 Convergence 60 Control Circuitry 61 Schematic Diagrams SCHEMATIC DIAGRAMS BLOCK DIAGRAM S1 PCB SIGNAL 2 Micro S2 PCB SIGNAL 3 VCJ_ S3 PCB TERMINAL 1 AV SW Decoder S4 PCB UNI S5 PCB CRT CONTROL FRONT AI See VK20 Service Manual PCB MAIN See VK20 Service Manual PCB SIGNAL 1 See VK20 Service Manual PCB SIGNAL 4 S...

Страница 5: ...tic and block diagrams of the above listed models are included in this service manual for better under standing of the circuitry PCB drawings are also included for easy location of parts and test points PRODUCT SAFETY NOTICE Many electrical and mechanical parts in television receivers have special safety related characteristics These characteristics are often not evident from visual inspection nor...

Страница 6: ...ion High voltage must be set as prescribed under the section titled Electrical Adjustments Leakage current check Before returning the receiver to the customer it is recommended that leakage current be measured according to the following methods 1 Cold Check With the alternating current AC plug removed from the AC source place a jumper across the two AC plug prongs Connect one lead of an ohm meter ...

Страница 7: ...CABINET DISASSEMBLY FRONT VIEW Front Cabinet Disassembly 1 Remove the Speaker Grille by pulling forward 2 Remove the Board Front by removing 3 screws a 3 Remove 3 screws b and then remove the Front Mask and Diamond Shield 4 Remove 8 screws c and then the Assembly Screen ...

Страница 8: ...3 CABINET DISASSEMBLY REAR VIEW Rear Cabinet Disassembly 1 Remove the Back Board by removing screws 7 a 2 Remove 6 screws b securing the Light Box Assembly 3 Disconnect connector EJ 4 Slide the Light Box Assembly out of the cabinet ...

Страница 9: ...om the Assembly Screen as shown below Note When separating the Lenticular Screen from the Fresnel Lens use caution while prying the Screen and Lens apart Use a slot type screw drive and remove the pressure sensitive double sided tape 2 Installation of the Lenticular Screen and Fresnel Lens Note Store the Lenticular Screen and Fresnel Lens in a cool dry place High humidity may deform the Lenticular...

Страница 10: ...cess the Main Chassis 1 Remove the Light Box Assembly refer to the Cabinet Rear Disassembly 2 The shelf in the front of the Light Box Assembly is removable refer to Figure 1 3 Release the shelf lock Apply pressure to the shelf lip on the right side downward and towards the front Refer to Figure 2 4 Hold both sides of the shelf pull forward and then upward to remove the shelf ...

Страница 11: ...MODEL WT 42313 WT 42413 Page 11 PCB Locations Major Parts Locations ...

Страница 12: ...ly 2 Remove the three Anode Lead Wires from the Flyback transformer and discharge the CRTs Use the above procedure 3 Unplug the three PCB CRTs 4 Remove 4 screws a retaining the Optical Unit Figure 1 5 Remove 4 screws b retaining the Lens of the respective CRT 6 Lift the Optical Unit from the Light Box and set it lens down on a flat surface 7 Remove 4 screws c retaining the CRT Figure 2 Note DO NOT...

Страница 13: ...the CRT and the CRT Spacer causing leakage of the CRT Coolant 2 Installation of the CRT Note The replacement CRT is supplied as an assembly comprised of the CRT and the Inner Lens with the space between them filled with ethylene glycol Care should be taken during handling and installation to prevent shock from disrupting the seal or alignment between the CRT and Inner Lens Figure 4 Figure 3 Figure...

Страница 14: ... Adjustment Set Screw faces the rear of the TV Figure 5 b Install the Lens mounting screws b Figure 1 4 Insert the Optical Unit into the Light Box Assemblyand secure it with 4 screws a Figure 1 5 Plug in the PCB CRTs 6 Insert the Anode Lead Wires into the Flyback Transformer 7 Re clamp the Lead Wire in its original position Figure 5 Adjustment procedures after replacing the CRT s CRT Cut Off White...

Страница 15: ...pecified use 10 1 probes Signal Generator both SD and HD capable Frequency Counter Direct Current Voltmeter Direct Current Power Supply Multiplex Audio Signal Generator Direct Current Ampere Meter 2 Test Signal A Monoscope Signal Note If you do not have a monoscope signal source connect the unit to a VCR and play a Monoscope alignment tape Part Number 859C568060 B Color Bar Signal Use the color ba...

Страница 16: ...ip Start Time 12 00AM TV Balance 50 Input 2 Input 2 V Chip Stop Time 12 00AM TV Surround Off Input 3 Input 3 Lock by Time Off TV Listen To Stereo MonLink MonLink Lock Time N A TV Level Sound Off Unlock Time N A VIDEO SETTINGS Clock Setting Manual TV Contrast Max Time Zone NA Video Mute On TV Brightness 50 Daylight Savings Time NA Black Enhancement On TV Sharpness 50 Clock Time 12 00pm TV Color 50 ...

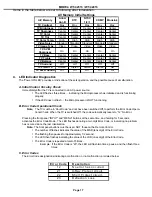
Страница 17: ...e of the MSD tens digit of the Error Code The flashing then pauses for approximately 1 2 second The LED then flashes indicating the value of the LSD ones digit of the Error Code The Error Code is repeated a total of 5 times Example If the Error Code is 23 the LED will flash two times pause and then flash three times C Error Codes The Error Code designations indicating a malfunction or no malfuncti...

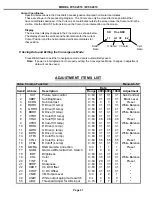
Страница 18: ...ncludes the specific adjustment item to be selected Then select the adjustment item Refer to the following pages for the listing of adjustment functions and adjustment items 1 Press the AUDIO button on a remote hand unit to select an adjustment function Each time the button is pressed the Function changes in the following sequence 2 Press the VIDEO button to select a specific Adjustment Item The I...

Страница 19: ...the Convergence Mode is activated the display at the right appears on a Green Crosshatch B Selecting the HD or SD Mode 1 Select the Signal Source before entering the Convergence Mode either an NTSC or HD source 2 Enter the Convergence Mode MENU 0 3 5 9 If the signal source is NTSC the SD mode is activated If the signal source is HD 1080i the HD mode is activated 3 Activating the HD mode when no HD...

Страница 20: ...ntrolling the Dynamic Beam Focus circuit drive signal 1 Use AUDIO button to select a Sub Function 2 Use the VIDEO button to select an Adjustment Item 3 Use the ADJUST buttons to change data F FINE CONV Press 4 Sub Functions This mode is used to perform Fine Raster Correction and Fine Red and Blue Convergence Adjustments There are three Sub Adjustment Functions selected with the AUDIO button FINE G...

Страница 21: ...u 0 3 5 7 Item Abbrev Description Range 480i 480p 1080i Adjustment 1 SCT Picture Gain control 0 63 31 31 31 Sub Contrast 2 SBRT Sub Brightness 0 63 31 31 31 Black Level 3 SCON Sub Contrast 0 15 0 0 0 Preset 4 RDRH R Drive H temp 0 63 31 31 31 White Balance 5 GDRH G Drive H temp 0 63 41 41 41 Preset 6 BDRH B Drive H temp 0 63 31 31 31 White Balance 7 CTRH R Cutoff H temp 0 63 31 31 31 8 CTGH G Cuto...

Страница 22: ...External DAC selection 0 1 1 1 17 EPWP EEPROM write protection 0 1 0 0 Data Deflection Jungle Menu 0 3 5 7 Item Abbrev Description Range HD Others 1 HWID Width 0 63 13 17 2 HKEY Horiz Keystone 0 63 9 3 7 VHGT Height 0 63 18 36 8 VLIN Vert Linearity 0 15 8 6 9 VSCN Vert S Corr 0 15 0 0 18 VPOS Vert Position 0 63 31 31 36 PINA Horiz PC Corr 0 63 31 31 MAIN MATRIX MENU 0 3 5 7 Item Abbrev Description...

Страница 23: ...Position 0 0 3 SKEW Skew Y axis 0 0 4 TILT Tilt X axis 0 0 5 HLIN Horiz Linearity 300 250 6 HWID Width 20 0 7 VKEY Vert Keystone 155 190 8 VWID Height 0 0 9 VLIN Vert Linearity 0 0 10 TBPC Top Bottom PC 70 100 11 SDBW Side Bow 30 30 COARSE CONV BLUE MENU 0 3 5 9 5 Abbrev Description SD HD 1 HSTA Horiz Position 50 50 2 VSTA Vert Position 0 0 3 SKEW Skew Y axis 0 0 4 TILT Tilt X axis 0 0 5 HLIN Hori...

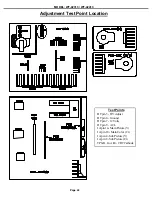
Страница 24: ...4 Adjustment Test Point Location Test Points DT pin 3 HV Adjust DT pin 6 Ground DT pin 7 12 Volts DT pin 8 ACL JA pin 14 Main Picture Y JA pin 18 Main Color Cr JA pin 4 Sub Picture Y JA pin 8 Sub Picture Cr TP6 R G or B CRT Cathode ...

Страница 25: ... activated HV Circuit 1 HV Regulation Oscilloscope JA Connector pin 14 JA Connector pin 4 Color Bars Video Input Video Circuit 2 Main Sub Y Level To set picture luminance Excess or insufficient brightness 1 Supply a color bar signal to a Video Input not an RF input 2 Select the color bar signal for both the main and sub pictures 3 Connect the oscilloscope to connector JA pin 14 Main Y 4 Activate t...

Страница 26: ...Main PR 3 Main Sub Color Level To set the cutoff point for all three CRTs Monochrome has a color tint or incorrect brightness CRT Circuit 4 CRT Cutoff Oscilloscope TP6R TP6G TP6B 50V Div 2msec Div None Video Input Note Use the Expand mode full screen 1 Select an External Input with no signal 2 Enter the Adjustment Mode Video Chroma Function 3 Press 1 automatically blanks the screen and sets COL to...

Страница 27: ...t Item 13 CTRL and 15 CTBL for optimum white 11 Set the data for Item 19 COL back to 31 To set the CRTs white level in the HD mode Monchrome pictures have a color tint CRT Circuit 6 White Balance HD HD White Raster DTV Inputs 1 Supply an HD Full White Raster signal to the DTV Inputs 2 Select the DTV Inputs Input button 3 Activate the Adjustment mode Video Chroma Function 4 Set Item 19 COL to 0 5 A...

Страница 28: ...ice Mode 40 30 20 10 50 0 0 0 60 70 80 90 GRADATION SCALE DC ma meter DT connector pins 7 8 Grayscale RF Input To set overall beam current to its optimum level Excess or insufficient contrast Note Activate the Expand mode full screen 1 Supply a Grayscale signal to a RF Input 2 Activate the Adjust Mode Video Chroma Function 3 Select Item 1 SCT signal level automatically reduces 4 Connect a 3ma DC m...

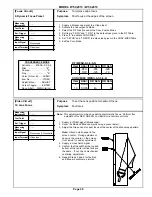
Страница 29: ...ic Focus Perform this adjustment for RED GREEN and BLUE monochrome pictures 1 Supply a VIDEO signal Monoscope 2 Cover the Red and Blue Lens producing a green raster 3 Adjust the Green Lens for best focus at the center of the Monoscope pattern Note Attach a white paper to the screen center During adjustment observe the picture on the screen from inside for easier adjustment 4 Supply a crosshatch si...

Страница 30: ...tton 3 Activate the Service Mode HR Function 4 Use the Adjust Right Left buttons to center the display horizontally A B 5 Save data and exit the Service Mode Monscope Crosshatch Video Input CRT Circuit 11 Electrostatic Focus To set electrostatic focus to the optimum point Poor focus Note This adjustment must be performed after the Sub Contrast adjustment Static Focus Adjustment 1 Supply a Monoscop...

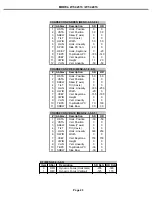
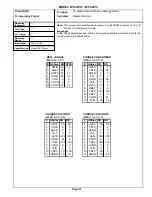
Страница 31: ...D DEFL JUNGLE MENU 0 3 5 7 Abbrev HD NTSC 1 HWID 13 17 2 HKEY 25 3 3 EWPT 31 31 7 VHGT 22 38 8 VLIN 3 6 9 VSCN 0 0 18 VPOS 31 31 COARSE CONV GREEN MENU 0 3 5 9 5 Abbrev SD HD 1 HSTA 0 0 2 VSTA 39 39 3 SKEW 0 0 4 TILT 0 0 5 HWID 50 50 6 HLIN 0 0 7 SPCC 20 0 8 HKEY 0 2 9 TBPC 180 140 10 VKEY 0 0 11 VWID 30 40 12 VLIN 50 50 COARSE CONV RED MENU 0 3 5 9 5 Abbrev SD HD 1 HSTA 50 50 2 VSTA 0 0 3 SKEW 0 ...

Страница 32: ...gnal source 3 Activate the Adjustment Mode JNGL Function 4 Select and adjust each of the following items 7 VHGT so the vertical marker sum 4 1 HWD so the horizontal marker sum 7 5 Save data and Exit the Service Mode HD Mode 1 Supply an HD Monoscope signal to the DTV HD Inputs 2 Select the DTV Inputs as the signal source Input button 3 Activate the Service Mode Defl Jungle Function 4 Select and adj...

Страница 33: ...sor is displayed on the crosshatch 5 Use the Cursor to adjust for straight crosshatch lines 6 Exit the Convergence Mode HD mode 1 Supply horizontal and vertical HD sync to the DTV Inputs and select the DTV Inputs as the source Note If an HD signal is not available use the Conv HD with No Signal Procedure 2 Enter the Convergence Mode Coarse Green 3 Repeat NTSC Steps 3 through 6 in the HD mode Conve...

Страница 34: ... use the Red Centering Magnet to converge red on the green at the center of screen Correct any red tilt with the Red Deflection Yoke 7 In the Coarse Blue mode repeat Step 6 using the Blue Centering magnet and the Blue Deflection Yoke 8 Exit the Convergence mode SD mode 1 Supply an NTSC Monoscope signal to a Video Input 2 Select the Monoscope as the signal source Input button 3 Enter the Convergenc...

Страница 35: ...Note If center convergence shifts use red and blue Items 1 HSTA and 2 VSTA to correct the shift 6 Exit the Convergence Mode HD mode 1 Supply horizontal and vertical HD sync to the DTV Inputs and select the DTV Inputs as the source Note If an HD signal is not available use the Conv HD with No Signal Procedure 2 Repeat SD Steps 2 through 5 in the HD mode 3 Exit the Convergence mode Convergence Circu...

Страница 36: ...t the Convergence mode HD Fine Adjustment 1 Supply an HD signal sync only to the DTV inputs and select DTV with the Audio button Note If an HD signal is not available use the Conv HD with No Signal Procedure 2 Repeat SD Fine Adjustment Steps 2 through 6 in the HD mode Convergence Circuit 18 Fine Convergence NTSC None HD HD sync Video DTV Inputs CONV HD WITH NO SIGNAL 1 MENU 0 3 7 0 2 Set DTV Port ...

Страница 37: ...ds to new chip parts 5 Avoid using a rubbing stroke when soldering 6 Take care not to scratch or damage the chip parts when soldering 7 Supplementary cementing is not required Chip Parts Removal Resistors Capacitors etc 1 Grasp the part with tweezers Melt the solder at both sides alternately and remove one side of the part with a twisting motion 2 Melt the solder at the other side and remove the p...

Страница 38: ...rance characteristics of electrical components REPLACEMENT PARTS MARK B C D F G J K Tolerance 0 1 0 25 0 5 1 2 5 10 MARK M N V X Z P Q Tolerance 20 30 10 40 20 80 20 100 0 30 10 MARK M N V X Z Tolerance pF 0 1 0 25 0 5 1 2 Replacement Part Notes When Replacing the RF Switch RF SW or the PCB SIGNAL 1 Remove the PLATE RF SW from the original component shown in the diagram at the right 2 Install the ...

Страница 39: ...V OUT 2SK2771 O1R T5A51 334P281010 TRANS FLYBACK 129P059050 VR FOCUS 330P288010 DEFL YOKE 453B036040 CAP ANODE 14 5 453B036050 CAP ANODE 22 453B036060 CAP ANODE 12 MISCELLANEOUS PART NO DESCRIPTION 251C219010 ASSY CRT RED 251C219020 ASSY CRT GREEN 252C219030 ASSY CRT BLUE CRT ASSEMBLIES MODEL MIRROR LENTICULAR SCREEN FRESNEL LENS DIAMOND SHIELD WT 42313 494D006010 491P136020 491P137020 760D628070 ...

Страница 40: ...C10 270P706020 IC MAX823REUK IC7D00 275P434010 IC C MOS TC74HC4066AFT IC7D01 275P560010 IC C MOS ADS931E IC7D02 275P560010 IC C MOS ADS931E IC7D03 275P560010 IC C MOS ADS931E IC7D10 275P769010 IC C MOS TC74AC157FT IC7D11 275P769010 IC C MOS TC74AC157FT IC7E00 275P434010 IC C MOS TC74HC4066AFT IC7E01 275P560010 IC C MOS ADS931E IC7E02 275P560010 IC C MOS ADS931E IC7E03 275P560010 IC C MOS ADS931E I...

Страница 41: ...ODE S5500D EM1Z ERB12 02RK D4B04 264P045080 DIODE 1S2076A 1S2471OM D5A01 264P045080 DIODE 1S2076A 1S2471OM D5A02 264D056020 DIODE S5500D EM1Z ERB12 02RK D5A03 264P045080 DIODE 1S2076A 1S2471OM D5A12 264P045080 DIODE 1S2076A 1S2471OM D5A13 264P045080 DIODE 1S2076A 1S2471OM D5A14 264P045080 DIODE 1S2076A 1S2471OM D5A33 264P669030 DIODE S3L20U D5A34 264P460060 DIODE EQA02 05C RD5 1EB1 D5A35 264P04508...

Страница 42: ...H K L2V19 325C461010 COIL PEAKING 6 8MH K L2V29 325C461030 COIL PEAKING 10MH K L2V55 325C461030 COIL PEAKING 10MH K L2V61 325C461010 COIL PEAKING 6 8MH K L2W02 409P923060 EMI F CHIP BLM21B272S L2W03 409P923060 EMI F CHIP BLM21B272S L2W04 409P923060 EMI F CHIP BLM21B272S L2W50 325C145090 COIL CHIP 4 7MH J L2W51 325C146030 COIL CHIP 10MH J L2W60 325C145090 COIL CHIP 4 7MH J L2W61 325C146030 COIL CHI...

Страница 43: ...0 321C141070 COIL RF 22MH K L9A50 411D009020 FERRITE CORE L9A52 411D009020 FERRITE CORE L9A53 321C141010 COIL RF 6 8MH M L9A54 411D009020 FERRITE CORE L9A55 321C142030 COIL RF 68MH K L9A56 411D009020 FERRITE CORE L9A57 321C141070 COIL RF 22MH K L9A62 321C141010 COIL RF 6 8MH M L9A65 321C141010 COIL RF 6 8MH M L9B01 351P226010 COIL CHOKE D1512C4 V 150UH L9B02 321C141070 COIL RF 22MH K L9B03 321C141...

Страница 44: ...491050 1 16W 390 F 103P504000 1 16W 18K J 103P502000 1 16W 390 J 103P504010 1 16W 22K J 103P502010 1 16W 470 J 103P504030 1 16W 33K J 103P491080 1 16W 510 F 103P504050 1 16W 47K J Part No Value Part No Value 103P502020 1 16W 560 J 103P504060 1 16W 56K J 103P492000 1 16W 620 F 103P496080 1 16W 62K F 103P492010 1 16W 680 F 103P496090 1 16W 68K F 103P502030 1 16W 680 J 103P504070 1 16W 68K J 103P4920...

Страница 45: ... 103P713070 R CARBON 1 4W 10K J R5A76 103P713070 R CARBON 1 4W 10K J R5A77 103P711090 R CARBON 1 4W 330 J R5A78 103P714010 R CARBON 1 4W 22K J R5A79 103P713030 R CARBON 1 4W 4 7K J R5A80 109P175010 R WIRE 2W 0 12 J R5A81 103P711030 R CARBON 1 4W 100 J R5A82 103P370090 R FUSE 1 4W 47 J R5A83 103P464070 R METAL 1 4W 8 2K F R5A84 103P464070 R METAL 1 4W 8 2K F R5A85 103P710070 R CARBON 1 4W 33 J R5A8...

Страница 46: ...0 R METAL 1 4W 100K F R6G22 103P467030 R METAL 1 4W 100K F R6G23 103P711030 R CARBON 1 4W 100 J R6G31 103P142060 R CARBON 1 2W 1 2K J R6R01 103P711030 R CARBON 1 4W 100 J R6R02 103P713090 R CARBON 1 4W 15K J R6R03 103P463050 R METAL 1 4W 2 7K F R6R04 103P462080 R METAL 1 4W 1 3K F R6R05 103P711070 R CARBON 1 4W 220 J R6R06 103P462030 R METAL 1 4W 820 F R6R07 103P711030 R CARBON 1 4W 100 J R6R08 10...

Страница 47: ...8 J R9C32 103C197080 R METAL 3W 0 68 J R9D00 109P173020 R CARBON 1 2W 4 7M J CAPACITORS CHIP Type Capacitors Listed by Value CHIP Type Capacitors Listed by Value Part No Value Part No Value 154P350050 CH50V 3P C 141P141030 B50V 2200P K 154P341010 CH50V 10P C 141P141070 B50V 4700P K 154P341050 CH50V 15P J 141P141090 B50V 6800P K 154P341090 CH50V 22P J 141P142000 B50V 8200P K 154P342030 CH50V 33P J ...

Страница 48: ...0V 0 1M M C2V05 181P359060 C ELEC CE50V 0 1M M C2V06 181P359060 C ELEC CE50V 0 1M M C2V08 181P359060 C ELEC CE50V 0 1M M C2V09 181P359060 C ELEC CE50V 0 1M M C2V10 181P359060 C ELEC CE50V 0 1M M C2V14 181P352040 C ELEC 16V 100M M C2V17 181P355040 C ELEC 50V 4 7M M C2V19 181P352040 C ELEC 16V 100M M C2V29 181P351070 C ELEC 10V 470M M C2V30 181P352030 C ELEC 16V 47M M C2V32 181P355000 C ELEC 50V 0 4...

Страница 49: ...142P023080 C CER BF50V 0 01M Z C5A68 181P123070 C ELEC NP 50V 0 47M M C5A69 142P024060 C CER BF50V 0 1M Z C5A70 172P264010 C M POLY 50V 2 2M J C5A71 172P262060 C M POLY 50V 0 12M J C5A72 181P355010 C ELEC 50V 1M M C5A73 172P264010 C M POLY 50V 2 2M J C5A80 181P355050 C ELEC 50V 10M M C5H01 181P184040 C ELEC 35V 330M M 105C C5H02 142P023080 C CER BF50V 0 01M Z C5H03 142P023080 C CER BF50V 0 01M Z C...

Страница 50: ... 181P352030 C ELEC 16V 47M M C9A05 189P185070 C CER AC250V E1000P M C9A06 189P185070 C CER AC250V E1000P M C9A07 189P153040 C M POLY 250VAC 0 1M M C9A08 189P185090 C CER AC250V E2200P M C9A09 189P185090 C CER AC250V E2200P M C9A10 189P185090 C CER AC250V E2200P M C9A11 189P185090 C CER AC250V E2200P M C9A13 189P152070 C M POLY 250VAC 0 01M M C9A14 189P152070 C M POLY 250VAC 0 01M M C9A15 172P26205...

Страница 51: ...A F9A03 283P043090 FUSE LF251 5A F9A04 283P044020 FUSE LF251 10A F9A05 283P043090 FUSE LF251 5A F9B01 283P043060 FUSE LF251 3A F9D00 283D131040 FUSE S10A 125A J2C01 452C383010 CONNECTOR DSUB J2D01 452C385010 CONNECTOR DVI K9A50 287P100010 RELAY PWR DG9D1 0 M II 0 25W PC9A21 268P058020 PHOTO COUPLER ON3131 R ON3161 R PC9A50 268P106010 PHOTO COUPLER CNZ3133 PJ2J00 440C407010 PIN JACK BOARD 6P PJ2J01...

Страница 52: ... 2 491P137020 LENS FRESNEL 3 596C569010 SCREEN BRACKET CORNER 4 598D298010 SCREEN BRACKET MASK 5 598D300010 SCREEN BRACKET SIDE 6 598D548010 SCREEN BRACKET BTM 7 598D549010 BRACKET SHIELD 8 641B942010 SCREEN HOLDER TOP 9 641B942020 SCREEN HOLDER T 10 641B943010 SCREEN HOLDER SIDES 11 750A434020 FRAME FRONT WT 42413 b 11 750A434030 FRAME FRONT WT 42313 a 12 760D628070 DIAMOND SHIELD ...

Страница 53: ...MODEL WT 42313 WT 42413 Page 53 POWER SUPPLY ...

Страница 54: ...MODEL WT 42313 WT 42413 Page 54 VIDEO COLOR ...

Страница 55: ...MODEL WT 42313 WT 42413 Page 55 SYNC SIGNAL PATH ...

Страница 56: ...MODEL WT 42313 WT 42413 Page 56 DEFLECTION HV ...

Страница 57: ...MODEL WT 42313 WT 42413 Page 57 HV REGULATION ...

Страница 58: ...MODEL WT 42313 WT 42413 Page 58 X RAY PROTECT ...

Страница 59: ...MODEL WT 42313 WT 42413 Page 59 SOUND SIGNAL PATH ...

Страница 60: ...MODEL WT 42313 WT 42413 Page 60 CONVERGENCE ...

Страница 61: ...MODEL WT 42313 WT 42413 Page 61 CONTROL CIRCUITRY ...

Страница 62: ...MODEL WT 42313 WT 42413 Page 62 ...

Отзывы: