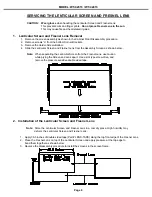


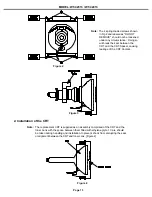
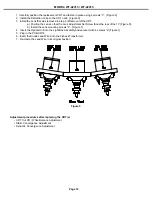


MODEL: WT-42313 / WT-42413
Page 19
D. Saving Adjustment Data
Press “ENTER” to save adjustment data in memory. The character display turns red for
approximately one second in this step.
Note:
If the circuit adjustment mode is terminated without pressing “ENTER”, changes
in adjustment data are not saved.
E. Terminating the Circuit Adjustment Mode
Press the “MENU” button on the remote hand unit twice to terminate the adjustment mode.
Note:
The circuit adjustment mode can also be terminated by turning power OFF.
F. Toggle Between Reception Modes
Pressing “3” when in the Adjustment Mode Video/Chroma Function toggles between 480i, 480p, and 1080i.
However data changes are not automatically saved.
Press “ENTER” to save data before pressing “3”
.
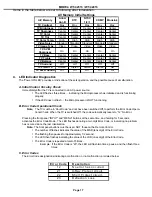
G. Service Mode Reset
To reset items in the service mode to their factory values:
1.
Press MENU-0-3-5-7 to enter the Service Mode.
2.
Press the “INPUT” or “DEVICE” button, on the front panel or the remote, and hold for 2 seconds
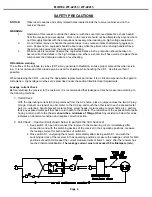
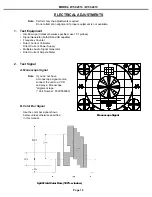
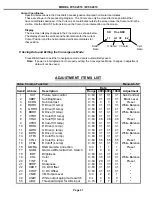
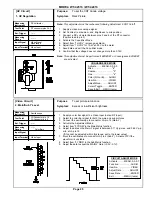
6. Convergence Adjustment Mode
The Convergence mode is used to perform raster geometry correction, and convergence adjustments as
specified in Adjustment Procedures 15 through 18.
A. Convergence Mode Activation
1.
Press MENU-0-3-5-9
2.
When the Convergence Mode is activated, the display at
the right appears on a Green Crosshatch.
B. Selecting the HD or SD Mode
1.
Select the Signal Source
before entering the Convergence Mode, either an NTSC or HD source.
2.
Enter the Convergence Mode
(MENU-0-3-5-9)
• If the signal source is NTSC, the SD mode is activated.
• If the signal source is HD 1080i, the HD mode is activated.
3.
Activating the HD mode when no HD signal is available.
• Activate the Factory Option Menu (MENU-0-3-7-0)
• Use the “Adjust” keys to select “DTV Port” and press “Enter” to change the setting to “1080i”.
Sequence = “Auto”-”480i”-480-p”-”1080i”.
Ignore any loss of sync while changing modes.
• Exit the Option Menu (Press “MENU” twice).
• Select the DTV Inputs as the signal source (INPUT button).
• Activate the Convergence Mode ... the Convergence mode will be in the HD mode and the internal
crosshatch is displayed.
4.
After adjusting Convergence, be sure to set the DTV Port back to AUTO.
• Select an analog input as the signal source (INPUT button).
• Activate the Option Menu (MENU-0-3-7-0).
• Use the “Adjust” keys to select “DTV Port and press “Enter” to change the setting from “1080i” to
“AUTO”.
• Exit the Option Menu (Press MENU twice).
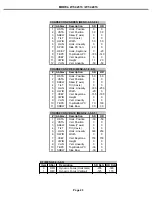
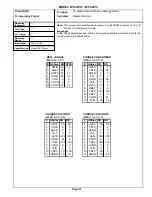
C. Convergence Mode Functions
In the Convergence Mode there are three main Functions (Categories).
• Pressing “6” activates CONV MISC
• Pressing “5” activates COARSE CONV
• Pressing “4” activates FINE CONV
SD
Coarse BLUE
1
HSTA
-50
Coarse Conv. Display
Содержание WT-42313
Страница 2: ......
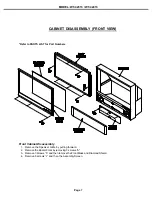
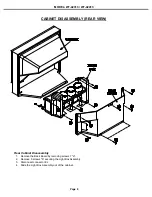
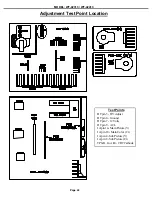
Страница 11: ...MODEL WT 42313 WT 42413 Page 11 PCB Locations Major Parts Locations ...
Страница 53: ...MODEL WT 42313 WT 42413 Page 53 POWER SUPPLY ...
Страница 54: ...MODEL WT 42313 WT 42413 Page 54 VIDEO COLOR ...
Страница 55: ...MODEL WT 42313 WT 42413 Page 55 SYNC SIGNAL PATH ...
Страница 56: ...MODEL WT 42313 WT 42413 Page 56 DEFLECTION HV ...
Страница 57: ...MODEL WT 42313 WT 42413 Page 57 HV REGULATION ...
Страница 58: ...MODEL WT 42313 WT 42413 Page 58 X RAY PROTECT ...
Страница 59: ...MODEL WT 42313 WT 42413 Page 59 SOUND SIGNAL PATH ...
Страница 60: ...MODEL WT 42313 WT 42413 Page 60 CONVERGENCE ...
Страница 61: ...MODEL WT 42313 WT 42413 Page 61 CONTROL CIRCUITRY ...
Страница 62: ...MODEL WT 42313 WT 42413 Page 62 ...