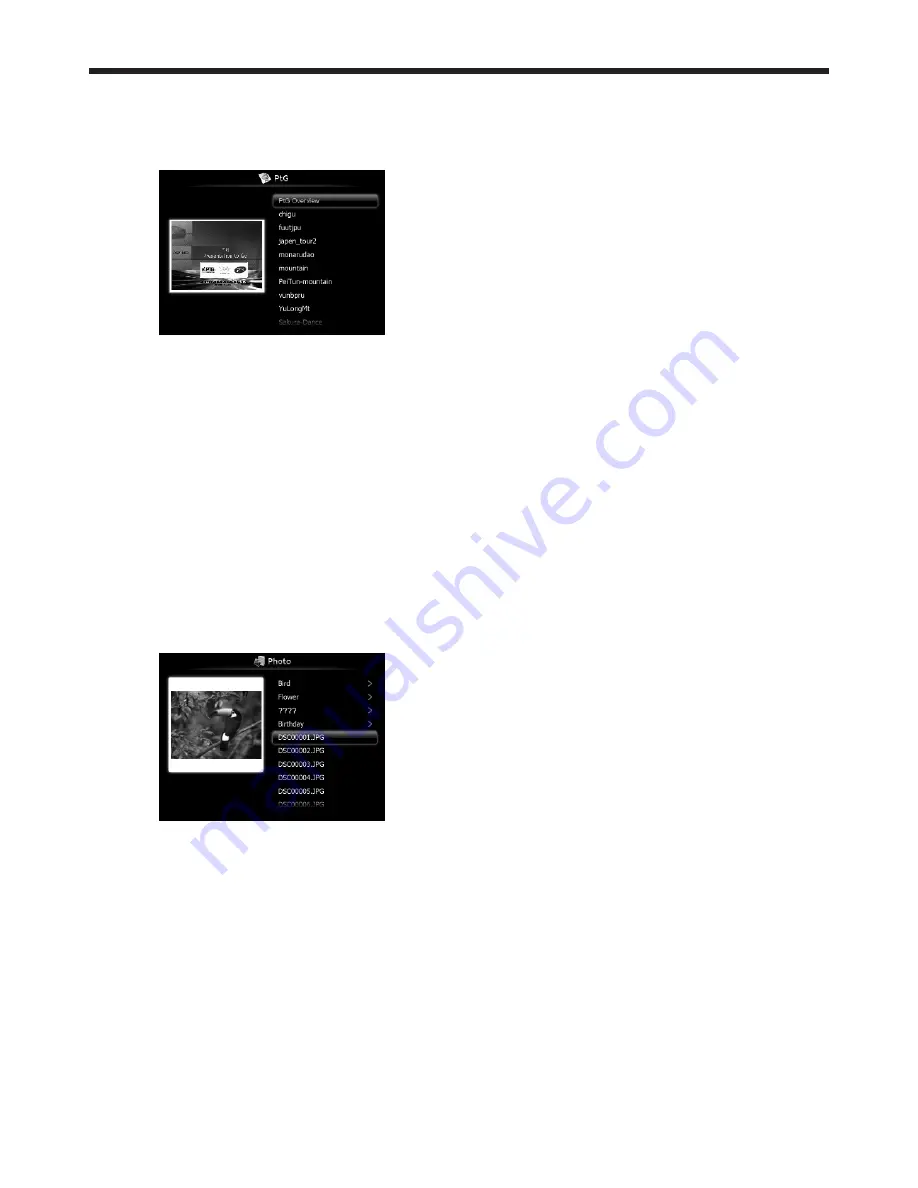
Mitsubishi Electric WD390U-EST Скачать руководство пользователя страница 51

EN-51

Displaying PtG file

5.  Press the 

 or 

 button on the remote control to 

select Presentation to Go and press the ENTER 
button

.

•  The file selection screen appears. 

6.  Press the 

 or 

 button to select a file or folder 

you want to display and press the ENTER button

.

•  If you select a folder, the underlying file names 

are displayed. Then, select a file. 

•  An image on page 1 is displayed on the screen.

7.  Change the page by pressing the 

 ,

 or 


button.
• 

 button: to previous page

• 

 button: to next page

• 

 button

to next pause

8.  Press the 

 button to quit the display.

•  The screen goes back to the file selection 

screen.

Displaying JPEG file

5.  Press the 

 or 

 button on the remote control to 

select Photo Viewer and press the ENTER button

.

•  The file selection screen appears. 

6.  Press the 

 or 

 button to select a file or folder 

you want to display and press the ENTER button

.

•  If you select a folder, the underlying file names 

are displayed. Then, select a file. 

•  The image of the selected file is displayed on 

the screen.

7.  Change the file by pressing the 

 ,

 or 

 button.

• 

 button: to previous file

• 

 button: to next file

• 

 button

to next file

8.  Press the 

 button to quit the display.

•  The screen goes back to the file selection 

screen.

Displaying with AutoRun function

5.  Create an “AUTORUN” folder in the root directory 

of the USB device using a computer or other.

6.  Save a PtG file or JPEG files in the AUTORUN 

folder.

  Important:

•  The AutoRun function supports single PtG file 

only. The PtG file located on the top by sorting 
is played if multiple PtG files exists in AUTORUN 
folder.

7.  Connect the USB device to the USB-A terminal.

•  The files specified by the AutoRun setting (PtG 

or Photo) are played back automatically.

8.  Press the ENTER button to start or pause the 

playback.

9.  Press the 

 ,

 or 

 button to change the file to be 

played back.
• 

 button: to previous page/previous file

• 

 button: to next page/next file

• 

 button

to next pause/next file

10. Press the 

 button to quit the AutoRun display.

•  The screen goes back to the file selection 

screen.

Displaying with slideshow function

5.  Press the 

 or 

 button on the remote control 

to select Presentation to Go or Photo Viewer and 
press the ENTER button

.

•  The file selection screen appears. 

6.  Press the 

 or 

 button to select a file or folder 

you want to display and press the ENTER button

.

•  If you select a folder, the underlying file names 

are displayed. Then, select a file. 

•  When a PtG file is selected, the file is displayed 

with the slideshow.

•  When a JPEG file is selected, all the files in 

the same folder as the JPEG file exists are 
displayed with the slideshow.

7.  Press the ENTER button to start or pause the 

playback.

8.  Press the 

 ,

 or 

 button to change the file to be 

played back.
• 

 button: to previous page/previous file

• 

 button: to next page/next file

• 

 button

to next pause/next file

9.  Press the 

 button to quit the slideshow.

•  The screen goes back to the file selection 

screen.

Ending the PC Less Presentation

Unplug the USB device from the projector. Before 
unplugging, be sure to press the UNPLUG button on 
the remote control and select [Yes] on the screen by 
pressing the 

 or 

 button and then ENTER button.

Advanced display utilities (continued)

Содержание WD390U-EST

Страница 1: ...WD390U EST This User Manual is important to you Please read it before using your projector DLP PROJECTOR MODEL WD390U EST User Manual ...

Страница 2: ... in the literature accompanying the appliance WARNING TO PREVENT FIRE OR SHOCK HAZARD DO NOT EXPOSE THIS APPLIANCE TO RAIN OR MOISTURE CAUTION TO PREVENT ELECTRIC SHOCK DO NOT USE THIS POLARIZED PLUG WITH AN EXTENSION CORD RECEPTACLE OR OTHER OUTLET UNLESS THE BLADES CAN BE FULLY INSERTED TO PREVENT BLADE EXPOSURE NOTE SINCE THIS PROJECTOR IS PLUGGABLE EQUIPMENT THE SOCKET OUTLET SHALL BE INSTALLE...

Страница 3: ...d States and or other countries Mac Mac OS OS X Finder and Apple Store are trademarks of Apple Inc Intel and Pentium are trademarks of Intel Corporation in the U S and or other countries PowerPC is a trademark of International Business Machines Corporation registered in many jurisdictions worldwide IOS is a trademark or registered trademark of Cisco in the U S and other countries and is used under...

Страница 4: ...you are not sure of the type of power please consult your appliance dealer or local power company 11 Power cord protection Power supply cords should be routed so that they are not likely to be walked on or pinched by items placed upon or against them Pay particular attention to cords at plugs convenience receptacles and points where they exit from the appliance Do not put the power cord under a ca...

Страница 5: ...rojector Flammable substances may ignite causing fire or breakdown because the temperature inside the projector rises very high while the lamp is illuminating Do not use the projector with condensation on it It can lead to breakdown or other failure Place of installation For safety s sake do not use the projector at any place subjected to high temperature and high humidity Please maintain an opera...

Страница 6: ...ITION button 7 COMPUTER button 8 button 9 VIDEO button AUDIO OUT AUDIO IN 3R VIDEO MONITOR OUT IN 2 USB B USB A LAN IN 1 COMPUTER COMPONENT VIDEO SERIAL S VIDEO AUDIO IN 3L AUDIO IN 2 AUDIO IN 1 7 5 13 8 2 14 10 12 16 15 4 6 1 9 11 3 1 Power jack 2 COMPUTER COMPONENT VIDEO IN terminals 1 2 mini D SUB 15 pin 3 MONITOR OUT terminal mini D SUB 15 pin 4 Remote control sensor rear 5 AUDIO IN 1 terminal...

Страница 7: ... 19 15 14 16 17 20 12 13 Remote control 1 ON button 2 MAGNIFY button 3 VOLUME UP DOWN buttons 4 KEYSTONE button 5 MENU button 6 ENTER button 7 AV Audio Video MUTE button 8 VIEWER button 9 UNPLUG button 10 USB DISP button 11 LAN DISP button 12 STANDBY button 13 ASPECT button 14 3D button 15 AUTO POSITION button 16 buttons 17 FREEZE button 18 VIDEO S VIDEO buttons 19 COMPUTER 1 2 buttons 20 HDMI but...

Страница 8: ...not used for a long time Do not combine a new battery with an old one If the solution of batteries comes in contact with your skin or clothes rinse with water If the solution comes in contact with your eyes rinse them with water and then consult your doctor Do not carry or store the batteries together with metallic ballpoint pens necklaces coins or hairpins Otherwise they may short out causing exp...

Страница 9: ...ght H Black space B inch cm inch cm inch cm inch cm inch cm inch cm inch cm inch m inch cm 70 178 56 142 42 107 66 168 56 142 35 89 3 5 9 20 0 52 4 4 11 80 203 64 163 48 122 75 192 64 163 40 102 4 0 10 24 0 60 5 0 13 100 254 80 203 60 152 94 240 80 203 50 127 5 0 13 30 0 77 6 3 16 120 305 96 244 72 183 113 288 96 244 60 152 6 0 15 37 0 93 7 5 19 150 381 120 305 90 229 142 359 120 305 75 191 7 5 19...

Страница 10: ...least 55 kgf When using a metal wire secure one end to a screw hole marked with an arrow on the rear terminal panel and the other end to the mount kit Don t use screw holes without arrow marks In this case make sure that the screw is inserted in the projector at least 5 mm The length of the screw should be 20 mm or shorter Also make sure that no electrical current is flowing in the mount kit due t...

Страница 11: ...ut R To video output To S Video output Important Match the colors of the video and audio plugs on the Audio cable with those of the terminals Speaker output is mono Projector DVD player or HDTV decoder Some DVD players have an output connector for 3 line fitting Y CB CR When connecting such DVD player with this projector use the COMPUTER COMPONENT VIDEO IN terminal AUDIO OUT AUDIO IN 3R VIDEO MONI...

Страница 12: ...ot be connected correctly depending on the size and shape of their connectors When you connect this projector and a Digital device such as a DVD player via the HDMI terminal black color may appear dark and deep depending on the type of the connected device This depends on the black level setting of the connected device There are two kinds of methods to digitally transfer image data in which differ...

Страница 13: ...nger computer cable instead of the provided cable the image may not be projected correctly Some computers require additional connectors or analog RGB output adapters to be connected with this projector Contact your dealer for further information This projector uses stereo mini jack for its audio input Check the type of the audio output terminal of the connected computer and prepare a proper cable ...

Страница 14: ...or metallic substance is on or around the pins of the power plug unplug the power cord and clean it using a dry cloth If you continue to use the projector without cleaning it may result in fire or electric shock Clean the power plug periodically at least once a year Be sure to unplug the power cord from the wall outlet if the projector will not be used for a long period of time Otherwise it may ca...

Страница 15: ...ses set the keystone adjustment values in the range where the image is displayed without noise When the keystone adjustment is carried out the image may not be displayed correctly because of the type of input signal When entire projected image isn t displayed within the screen E Zoom Shift To adjust the projected image size and position use E Zoom Shift in the Installation menu See page 21 for men...

Страница 16: ...starts warming up when the POWER button is pressed During the warm up process images may appear dark and no commands are accepted By blinking red the STATUS indicator indicates that the lamp should be replaced soon Replace the lamp when the STATUS indicator blinks red See page 60 and 65 Images may not be projected with good quality in an extremely hot or cold environment This is not a product malf...

Страница 17: ... projector while the STATUS indicator is blinking after the lamp lights up because the lamp s life may be shortened Don t turn the projector back on right after shutting it down because the lamp s life may be shortened Wait about 10 minutes before turning the projector back on Before shutting down the projector be sure to close the menu screen If you shut down the projector without closing the men...

Страница 18: ...you need to have the following items Field sequential 3D video contents DLP Link active 3D glasses Field sequential The system which displays alternately the image for the left eye and the right eye R L R R L R L L R L R L R L R L R L R R L R L L R L R L R L R L R L R R L R L L R L R L R L R L R L R L L L R R R L R L 3D image Format Page flipping Field sequential Top bottom Checkerboard Side by si...

Страница 19: ...n interactive devices such as 3D games or computers take an appropriate break every 30 60 minutes Prolonged use may cause eyesight fatigue When you feel uncomfortable stop viewing 3D images and playing 3D games until you are restored If necessary consult a doctor Also stop driving a car until you are restored for about 2 hours The period to restore varies with the individual As a guide 3D glasses ...

Страница 20: ...uration Hue User Red Green 3D Off On 3D Sync Invert Off On 1 1 1 Audio Audio Input Volume 0 21 1 2 2 2 1 2 IP Address DHCP Default Gateway DHCP Function Off On xx xx xx xx xx xx MAC Address End IP Address Start IP Address IP Config Setup Subnet Mask 2 2 2 Cyan Magenta 10 Off On xxxx Normal Aspect Ratio Full Color Temp Auto Normal Enhanced Input Level Color Management Standard Low Lamp Mode Blue Ye...

Страница 21: ...o select an item to adjust Installation Adjust MENU Exit Select Menu Position Image Reverse Auto Power On Auto Power Off Auto Keystone Reset All Upper Left Off Off English Off 5Min Standby Mode Low Lamp Mode Standard E Zoom Shift OK OK Language 5 Set the selected item by pressing the or button Installation Adjust MENU Exit Select Menu Position Image Reverse Auto Power On Auto Power Off Auto Keysto...

Страница 22: ...brightness of projected images See page 30 Contrast 30 Adjusts the contrast of projected images See page 30 Color Temp 4 options Adjusts the color temperature See page 30 Color Management Red Green Blue Cyan Yellow Magenta You can change to any desired color by adjusting each of Gain Saturation and Hue of six different colors See page 31 Aspect Ratio Normal Automatically sets the aspect ratio in r...

Страница 23: ...mputer1 Computer2 or HDMI is selected as the input source Sharpness 5 Adjusts the sharpness of projected images See page 30 Tint 10 Adjusts the color tint of projected images See page 30 You can select this setting only when NTSC is selected as the input signal You cannot adjust Tint when the TV50 PAL SECAM signal is inputted When Computer1 Computer2 or HDMI is selected Tint does not work Menu ope...

Страница 24: ...The Signal User menu is displayed for the following adjustments Clamp Position 1 255 Use this setting to correct solid white or solid black that appears in projected images Clamp Width 1 63 Use this setting to correct solid black that appears in projected images LPF On Off Select this setting to enable or disable LPF Shutter U 0 20 Use this setting to adjust projected images when noise appears in ...

Страница 25: ...put source is Video S Video and selects HDMI when the input source is HDMI Audio 1 Audio 2 Audio 3 Selects audio input Mix Selects mix signal of Audio 1 and Audio 2 You can change the balance of Audio 1 Audio 2 using Mix Volume 0 21 Adjusts the volume of the audio from the speaker In Audio Input HDMI audio is selected when the input source is HDMI input The audio of Audio 1 Audio 2 Audio 3 and Mix...

Страница 26: ... when you want to view images from the front with the projector set at the ceiling Auto Power On Off On When this mode is set to On the lamp is automatically lit when the power cord is plugged in the wall outlet Select On when you set the projector at the ceiling When the lamp is off the projector is in standby Use the remote control to turn on the lamp Auto Power Off Off 5 60 Min Selects a desire...

Страница 27: ...tup cancel function for the U S Image Capture OK Use to capture the screen for the splash screen See page 54 Splash Screen Original Displays the original image for the splash screen when the projector is powered on User Displays the image captured for the splash screen when the projector is powered on Off Displays no splash screen when the projector is powered on Back Color Blue Black Displays blu...

Страница 28: ...tting for IP Configuration See page 34 DHCP On Off Use this setting when you obtain IP Config automatically by DHCP server IP Address xxx xxx xxx xxx Displays IP Address Subnet Mask xxx xxx xxx xxx Displays Subnet Mask Default Gateway xxx xxx xxx xxx Displays Default Gateway MAC Address xx xx xx xx xx xx Displays MAC Address DHCP Function On Off Use this setting when using the projector as a DHCP ...

Страница 29: ...time than the actual time See page 59 for the interval of lamp replacement Input Indicates the name of the terminal to which the currently projected video signal is being inputted Resolution Indicates the resolution of the currently projected video signal H Frequency Indicates the horizontal frequency of the currently projected video signal V Frequency Indicates the vertical frequency of the curre...

Страница 30: ...st in the Picture menu Image adjustment To adjust the brightness Contrast and Brightness You can make adjustments for the brightness of the projected image using the menu See page 21 for menu setting 1 Display the Picture menu 2 Select Contrast or Brightness by pressing the or button 3 Adjust the selected item by pressing the or button To cancel the menu 4 Press the MENU button Contrast Select to ...

Страница 31: ... low such as movies and music video clips BrilliantColor Use this setting to make colors with medium brightness such as yellow and the skin tone appear natural Press the button to decrease the value to lessen the effect Press the button to increase the value to heighten the effect BrilliantColor has no effect at value 0 6 Select a value by pressing the or button For more enhanced color reproductio...

Страница 32: ...r using the menu Perform the following procedures when the following conditions occur When wide strips appear Adjust Tracking in the Signal menu When the projected image flickers When the projected image is blurred Adjust Fine sync in the Signal menu When the projected image is displaced horizontally Adjust H Position in the Signal menu Every time the button is pressed the image moves to the right...

Страница 33: ...etting without storing The display returns to the Network Config menu after selecting OK or CANCEL It may take some time to reflect the setting Enabling or disabling the network certification You can select whether or not to certify the network communication using the network password See page 21 for menu setting 1 Display the Network Config menu 2 Press the or button to select Network Certificati...

Страница 34: ...ess the or button to select IP Config IP Config OK 3 Press the ENTER button The IP Config menu appears MENU IP Config Adjust Exit Select DHCP IP Address Subnet Mask Default Gateway MAC Address DHCP Function Start IP Address End IP Address IP Config Setup Off OK xx xx xx xx xx xx On 192 255 192 168 255 168 1 255 1 10 0 192 192 168 168 1 1 11 254 10 The default setting of each item is as follows DHC...

Страница 35: ...o set these settings set DHCP Function to On and perform the IP settings as follows Start IP Address setting 1 Display the IP Config menu 2 Press the or button to select Start IP Address Start IP Address 169 254 0 221 3 Press the ENTER button The first octet is selected Start IP Address 169 254 0 221 4 Press the or button to select the numeric value 5 Press the or button to select the octet The se...

Страница 36: ...the setting without storing The display returns to the Wireless Setting menu after selecting CANCEL Network settings continued Channel setting 1 Display the Wireless Setting menu 2 Press the or button to select Channel Channel Auto 3 Press the or button to select Auto or 1 to 11 To cancel the setting press the MENU button Encryption setting 1 Display the Wireless Setting menu 2 Press the or button...

Страница 37: ...ion dialog appears 4 If the ENTER button is pressed again the network settings will be initialized It may take some time to initialize the settings Restart of network function See page 21 for menu setting 1 Display the Network Config menu 2 Press the or button to select Network Restart Network Restart OK 3 Press the ENTER button Network Restart dialog appears 4 If the ENTER button is pressed again...

Страница 38: ...r Preparation for using Remote Desktop The thin client function utilizes the standard Microsoft Remote Desktop function To use the Remote Desktop function perform the following preparations on the computer Important For the following preparations log on to the computer using the administrator account 1 Creating a user account Important You must configure a password for the user account Do not use ...

Страница 39: ...yed 6 Perform steps 7 10 in the section In Windows Vista Windows 7 Windows Server 2008 R2 or Windows MultiPoint Server 3 Configuration of Windows Firewall Configure Windows Firewall as follows In Windows 7 Windows Server 2008 R2 or Windows MultiPoint Server 1 Select Start Control Panel 2 Select System and Security 3 Select Allow a program through Windows Firewall The Allowed Programs window is dis...

Страница 40: ...ally available LAN cable Connect a USB mouse and USB keyboard to the USB A terminal on the projector AUDIO OUT AUDIO IN 3R VIDEO MONITOR OUT IN 2 USB B USB A LAN IN 1 COMPUTER COMPONENT VIDEO SERIAL S VIDEO AUDIO IN 3L AUDIO IN 2 AUDIO IN 1 Wireless keyboard and mouse LAN cable option Computer To LAN terminal To USB A terminal Important On Thin Client use both a keyboard and mouse We recommend a c...

Страница 41: ...er a wrong User name or Password The projector could not log on Make sure your User name and Password are correct will be displayed If you connect to a computer installed with Windows XP Windows Vista or Windows 7 that any other user has already logged on Another user is currently logged on to this computer will be displayed If you connect to a computer with Windows Server 2008 R2 or Windows Multi...

Страница 42: ...ple sites is smaller than that of the thin client computers or projectors E g when two users operate four devices In the example above the following licenses are necessary Windows Server CAL User CAL x 2 Windows RDS CAL x 2 Device CAL With Device CAL you purchase CALs according to the number of devices accessing to the host regardless of the number of users who access the host via thin client comp...

Страница 43: ...ter To USB B terminal USB 4 pin type B To USB port USB cable option USB 4 pin type A Important The USB B terminal on this projector is compatible with USB 2 0 Do not use a USB hub between the projector and the computer Installation of driver When using Mac OS X install the driver after connecting the projector and the computer using a USB cable for the first time Once you have installed the driver...

Страница 44: ...tion 4 to 1 split screen projection Images from up to 4 computers can be projected split on 1 projector screen Remote desktop Connecting an input device such as a mouse or keyboard to the USB A terminal on the projector enables the following computer operations from the projector Showing local files of the computer Operating the application software Showing server files on the network Browsing of ...

Страница 45: ...O MONITOR OUT IN 2 USB B USB A LAN IN 1 COMPUTER COMPONENT VIDEO SERIAL S VIDEO AUDIO IN 3L AUDIO IN 2 AUDIO IN 1 LAN cable option Computer Computer USB wireless LAN adapter option To LAN terminal To USB A terminal Important For wired LAN connection use a category 5 LAN cable Both straight through and crossover cables can be used The USB A terminal on this projector is compatible with USB 2 0 When...

Страница 46: ...te the projection Exit button Play button Split 1 button Split 3 button Split 2 button Split 4 button Menu button Freeze button Stop button Play button Projects the image in full screen Split 1 4 buttons Click either of the buttons to project the image on relevant split screen Stop button Stops the projection Freeze button Freezes the projected image Menu button Displays the menu window See the ne...

Страница 47: ...nded screen install the Virtual display driver as follows 1 Double click Virtual display driver exe contained in C Program Files LAN Display System and start up the installer of the Virtual display driver 2 The Setup window is displayed Click Next and operate according to the instructions on the window 3 When the installation has been completed restart the computer Using remote desktop Connect an ...

Страница 48: ...AUDIO IN 3L AUDIO IN 2 AUDIO IN 1 Tablet computer Computer To USB A terminal USB wireless LAN adapter option Important Do not use a USB hub for connection Some USB wireless LAN adapters cannot be used depending on the specifications Starting SidePad 1 On the tablet computer tap the MirrorOp Receiver icon to turn on MirrorOp Receiver The MirrorOp Receiver startup screen is displayed 2 On the comput...

Страница 49: ...ained in the PPT files are also converted Features Converting up to 20 pages of PPT Converting into 800 x 600 1024 x 768 1280 x 800 16bpp PtG System requirement CPU Intel Pentium M processor 1 5 GHz or above Memory 256 MB or more recommended OS Windows XP Windows Vista and Windows 7 Microsoft Office Microsoft Office 2003 Microsoft Office 2007 and Microsoft Office 2010 Installing PtG Converter Lite...

Страница 50: ...ot use a USB hub for the connection Performing the PC Less Presentation Selecting a PC Less Presentation input 1 Press the VIEWER button on the remote control or the COMPUTER button on the projector Each time you press the COMPUTER button the input source is switched between Computer1 Computer2 HDMI LAN Display USB Display and PC Less Presentation When the PC Less Presentation input is selected th...

Страница 51: ...top by sorting is played if multiple PtG files exists in AUTORUN folder 7 Connect the USB device to the USB A terminal The files specified by the AutoRun setting PtG or Photo are played back automatically 8 Press the ENTER button to start or pause the playback 9 Press the or button to change the file to be played back button to previous page previous file button to next page next file button to ne...

Страница 52: ...TER COMPONENT VIDEO SERIAL S VIDEO AUDIO IN 3L AUDIO IN 2 AUDIO IN 1 Tablet computer USB wireless LAN adapter option To USB A terminal Important Do not use a USB hub for connection Some USB wireless LAN adapters cannot be used depending on the specifications Wireless network setting on the tablet computer 1 Turn on the tablet computer and tap the Settings icon Advanced display utilities continued ...

Страница 53: ...yed 3 Select a projector for projection by tapping its SSID 4 Select a file to be projected by tapping its name The image of the selected file is displayed 5 Operate the image by touching the tablet screen Flick the screen to move to the previous or next page Pinch the screen for zooming in or out Tap the screen to display the status bar and the thumbnails of the pages See below Thumbnails Status ...

Страница 54: ...und that is displayed while the video is muted or no signal is inputted Important You can capture the computer images from the Computer1 Computer2 HDMI LAN Display USB Display and PC Less Presentation input sources Procedure See page 21 for menu setting 1 Select the input source Computer1 Computer2 or HDMI 2 Display your desired image 3 Display the Option menu 4 Select Image Capture by pressing th...

Страница 55: ...ering a new password appears Password Adjust Confirm Select Password New Password Off When the password has already been set the screen for entering the old password appears instead In such a case enter the old password using the same operation as in next step and press the ENTER button Then the screen for entering a new password appears 6 Enter a 4 digit password using the and buttons 1 2 3 4 To ...

Страница 56: ... You can supervise and control the projector s operation using a personal computer via a LAN network Major functions ProjectorView Global Batch projector controlling supervising application software Batch operation of stand alone projector multiple projectors Scheduling function to turn ON OFF for each day of the week Checking each condition of the projector and detecting a theft Setting of the pr...

Страница 57: ... 31 HDMI 41 PC Less Presentation 42 USB Display 51 LAN Display INPT Inquiry about input switching AVMT Mute control 30 Video and audio mute disable 31 Video and audio mute enable AVMT Inquiry about the mute state ERST Inquiry about the error state 1st byte Fan error 0 or 2 2nd byte Lamp error 0 to 2 3rd byte Temperature error 0 or 2 4th byte Cover open error 0 or 2 5th byte Always 0 6th byte Other...

Страница 58: ...agments from scattering Be sure to use the lamp dedicated to this projector VLT XD560LP for WD390U EST Use of other lamps may cause a failure of the projector A When the projector is placed on the table Make sure that the projector is securely held in place 1 Remove the cover a of the screw fixing the lamp cover with a fingernail If it is difficult to remove it with a fingernail use a finetipped t...

Страница 59: ...tion time unless you replace the lamp Caution The lamp is fragile If it is broken be careful not to cut yourself with glass fragments Contact your dealer for a new lamp Interval of lamp replacement The recommended interval of lamp replacement is about 6000 hours 1 2 of consecutive use Such interval differs depending on the operating environment and may be shorter than 6000 hours 1 2 Decrease in lu...

Страница 60: ...ntact your dealer No image appears on the screen Cancel the AV mute by pressing the AV MUTE button Check that the lens cap is removed It may take about 1 minute for the lamp to light up The lamp fails to light up on rare occasions In such a case wait for a few minutes and then try again If the projector was turned off before the lamp was cooled down sufficiently last time the fan may start rotatin...

Страница 61: ...lar to each other See page 9 Projected images are dark Adjust Brightness and Contrast in the Picture menu See page 30 Replace the lamp See page 58 Projected images are blurred Adjust the focus See page 16 Clean the lens Press the or button on the remote control to eliminate flicker Adjust Tracking and Fine sync in the Signal menu See page 24 Adjust Brightness and Contrast in the Picture menu See p...

Страница 62: ... setting has changed images may be flickering until the lamp lights stably This is an expected behavior When selecting the input signal Auto Position and Image the projected image may be flickering temporarily This is not a product malfunction Projector images are twitching Projector may be vibrating Set Auto Keystone to Off or lower the VOLUME button of the Remote control Others Problem Solution ...

Страница 63: ... 3D glasses turned off Turn on the 3D glasses Is the 3D format of the displayed image supported by the projector The projector supports only 3D images of the page flipping format field sequential format that displays the left eye images and the right eye images sequentially Use 3D images of these formats The signals listed in the table on page 68 can be displayed in 3D format You cannot view other...

Страница 64: ...ned with diluted mild detergent and then wipe them with a dry cloth To protect the surface of the projector from fading or deteriorating Do not spray insecticide on or inside the projector Do not use benzin or thinner to clean it Do not let rubber or plastic materials contact with projector Cleaning of the lens Remove dust or dirt using the commercially available lens care products such as cleanin...

Страница 65: ...e clogged with dust or dirt The room temperature is high Clean the vents Relocate the projector to a cooler place Steady red Blinking green The protection circuit is working or the lamp is in an abnormal condition Wait until the STATUS indicator goes out then press the POWER button If the above solution is not effective replace the lamp Steady green Blinking green red The lamp operation time excee...

Страница 66: ...p 1080i 720p 1080p Speaker 10 W mono x 1 S video input Luminance signal 1 0 Vp p 75 Ω negative sync Chroma signal 0 286 Vp p 75 Ω burst signal Video input 1 0 Vp p 75 Ω negative sync Audio input 350 mVrms 10 kΩ or more Analog RGB input RGB 0 7 Vp p 75 Ω negative sync YPBPR YCBCR Y 1 0 Vp p negative sync PBPR CBCR 0 7 Vp p HD CS TTL level positive or negative VD TTL level positive or negative HDMI ...

Страница 67: ... Data 0 8 TMDS Data 0 Shield 9 TMDS Data 0 10 TMDS Clock 11 TMDS Clock Shield 12 TMDS Clock 13 CEC 14 15 SCL 16 SDA 17 DDC Ground 18 5 V Power 19 Hot Plug Detect Pin No Name I O 1 2 TXD IN 3 RXD OUT 4 5 GND 6 7 8 9 Dimension drawings unit mm 258 113 325 What s included in the box AC power cord for the U S 02552 0312 00 for Europe 02552 0310 00 for the U K 02552 0311 00 for Australia 02552 0309 00 ...

Страница 68: ...800 SXGA60 1280 x 1024 63 98 60 02 1000 x 800 SXGA75 1280 x 1024 79 98 75 02 1000 x 800 SXGA85 1280 x 1024 91 15 85 02 1000 x 800 SUN66a 1152 x 900 61 85 66 00 1024 x 800 SUN76a 1152 x 900 71 81 76 64 1024 x 800 SUN66 1280 x 1024 71 68 66 68 1000 x 800 SUN76 1280 x 1024 81 13 76 11 1000 x 800 SGI72 1280 x 1024 76 92 72 30 1000 x 800 SGI76 1280 x 1024 82 01 76 00 1000 x 800 WXGA 60 1440 x 900 55 94...

Страница 69: ...1 Zusho Baba Nagaokakyo City Kyoto Japan Ver 1 0 ...

Отзывы: