background image

90

op

0.5

o

øA

R0.4~R0.8

45

op

 2

o

6

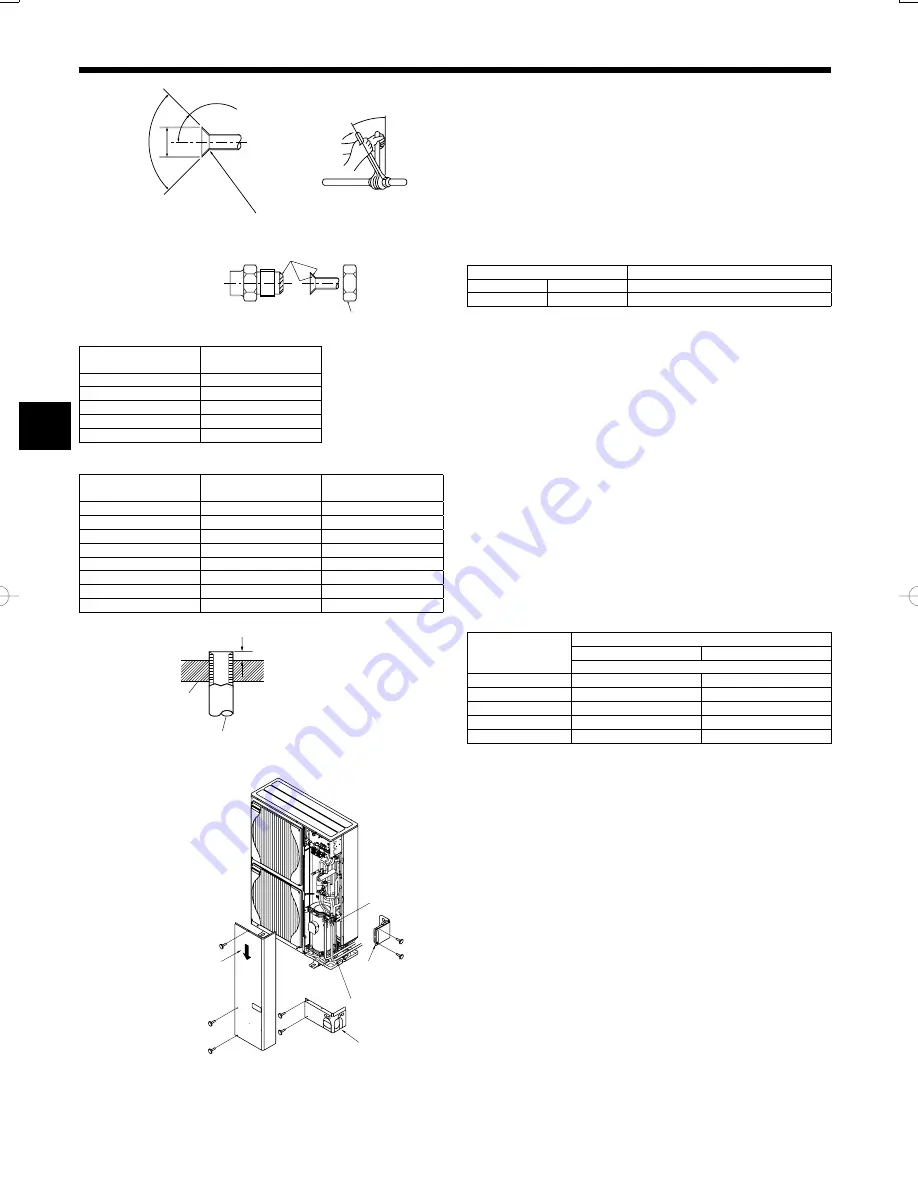
4.2. Connecting pipes (Fig. 4-1)

•  

When commercially available copper pipes are used, wrap liquid and gas pipes 
with commercially available insulation materials (heat-resistant to 100 °C or 
more, thickness of 12 mm or more).

•  

The indoor parts of the drain pipe should be wrapped with polyethylene foam 
insulation materials (specifi c gravity of 0.03, thickness of 9 mm or more).

•  

Apply thin layer of refrigerant oil to pipe and joint seating surface before tighten-
ing fl are nut. 

A

•  

Use two wrenches to tighten piping connections. 

B

•  

Use leak detector or soapy water to check for gas leaks after connections are 
completed.

•  

Apply refrigerating machine oil over the entire fl are seat surface. 

C

•  

Use the fl are nuts for the following pipe size. 

D

HRP71,100,125

Gas side

Pipe size (mm)

ø15.88

Liquid side

Pipe size (mm)

ø9.52

•  

When bending the pipes, be careful not to break them. Bend radii of 100 mm to 
150 mm are suffi cient.

•  

Make sure the pipes do not contact the compressor. Abnormal noise or vibration 
may result.

1

 Pipes must be connected starting from the indoor unit.


Flare nuts must be tightened with a torque wrench.

2

  Flare the liquid pipes and gas pipes and apply a thin layer of refrigeration oil (Ap-

plied on site).

•  

When usual pipe sealing is used, refer to Table 1 for fl aring of R410A refrigerant 
pipes.


The size adjustment gauge can be used to confi rm A measurements.

A

 (Fig. 4-1)

Copper pipe O.D.

(mm)

Flare dimensions

øA dimensions (mm)

ø6.35

8.7 - 9.1

ø9.52

12.8 - 13.2

ø12.7

16.2 - 16.6

ø15.88

19.3 - 19.7

ø19.05

23.6 - 24.0

B

 (Fig. 4-1)

Copper pipe O.D. 

(mm)

Flare nut O.D. 

(mm)

Tightening torque 

(N·m)

ø6.35

17

14 - 18

ø6.35

22

34 - 42

ø9.52

22

34 - 42

ø12.7

26

49 - 61

ø12.7

29

68 - 82

ø15.88

29

68 - 82

ø15.88

36

100 - 120

ø19.05

36

100 - 120

A

  Flare cutting dimensions

B

  Flare nut tightening torque

A

B

C

D

A

 Die

B

 Copper pipe

A

B

Fig. 4-1

Fig. 4-2

A

Table 1 (Fig. 4-2)

Copper pipe O.D. 

(mm)

A (mm)

Flare tool for R410A

Flare tool for R22·R407C

Clutch type

ø6.35 (1/4")

0 - 0.5

1.0 - 1.5

ø9.52 (3/8")

0 - 0.5

1.0 - 1.5

ø12.7 (1/2")

0 - 0.5

1.0 - 1.5

ø15.88 (5/8")

0 - 0.5

1.0 - 1.5

ø19.05 (3/4")

0 - 0.5

1.0 - 1.5

4. Installing the refrigerant piping

Fig. 4-3

A

Front piping cover

B

Piping cover

C

Stop valve

D

Service panel

E

Bend radius : 100mm -150mm

4.3. Refrigerant piping (Fig. 4-3)

Remove the service panel 

D

 (three screws) and the front piping cover 

A

 (two 

screws) and rear piping cover 

B

 (two screws).

1

  Perform refrigerant piping connections for the indoor/outdoor unit when the out-

door unit’s stop valve is completely closed.

2

  Vacuum-purge air from the indoor unit and the connection piping.

3

  After connecting the refrigerant pipes, check the connected pipes and the indoor 

unit for gas leaks. (Refer to 4.4 Refrigerant pipe airtight testing method)

4

  A high-performance vacuum pump is used at the stop valve service port to main-

tain a vacuum for an adequate time (at least one hour after reaching –101 kPa 
(5 Torr)) in order to vacuum dry the inside of the pipes. Always check the degree 
of vacuum at the gauge manifold. If there is any moisture left in the pipe, the de-
gree of vacuum is sometimes not reached with short-time vacuum application. 


 After vacuum drying, completely open the stop valves (both liquid and gas) for 
the outdoor unit. This completely links the indoor and outdoor refrigerant circuits.

 •  

If the vacuum drying is inadequate, air and water vapor remain in the refriger-
ant circuits and can cause abnormal rise of high pressure, abnormal drop of 
low pressure, deterioration of the refrigerating machine oil due to moisture, 
etc.

 •  

If the stop valves are left closed and the unit is operated, the compressor and 
control valves will be damaged.

 •  

Use a leak detector or soapy water to check for gas leaks at the pipe connec-
tion sections of the outdoor unit.

 •  

Do not use the refrigerant from the unit to purge air from the refrigerant lines.

 •  

After the valve work is completed, tighten the valve caps to the correct torque: 
20 to 25 N·m (200 to 250 kgf·cm).


 Failure to replace and tighten the caps may result in refrigerant leakage. In 
addition, do not damage the insides of the valve caps as they act as a seal to 
prevent refrigerant leakage.

5

  Use sealant to seal the ends of the thermal insulation around the pipe connec-

tion sections to prevent water from entering the thermal insulation.

Содержание PUHZ-HA2

Страница 1: ...n de airconditioner begint MANUAL DE INSTALACIÓN Para un uso correcto y seguro lea detalladamente este manual y el manual de instalación de la unidad interior antes de instalar la unidad de aire acondicionado MANUALE DI INSTALLAZIONE Per un uso sicuro e corretto leggere attentamente il presente manuale ed il manuale d installazione dell unità interna prima di installare il condizionatore d aria EΓ...

Страница 2: ... air conditioner use only the specified refrig erant R410A to charge the refrigerant lines Do not mix it with any other refrigerant and do not allow air to remain in the lines Air enclosed in the lines can cause pressure peaks resulting in a rupture and other hazards Use only accessories authorized by Mitsubishi Electric and ask a dealer or an authorized technician to install them If accessories a...

Страница 3: ...eration The refrigerant pipes are hot or cold depending on the condition of the flowing refrigerant If you touch the pipes burns or frostbite may result After stopping operation be sure to wait at least five minutes before turn ing off the main power switch Otherwise water leakage or breakdown may result 1 5 Using R410A refrigerant air conditioners Caution Do not use refrigerant other than R410A r...

Страница 4: ...de by side In addition leave space as shown Do not install the optional air outlet guides for upward airflow 3 Obstacles at front only Fig 2 14 When using an optional air outlet guide the clearance for HRP71 100 125 models is 1000 mm or more 4 Obstacles at front and rear only Fig 2 15 When using an optional air outlet guide the clearance for HRP71 100 125 models is 1000 mm or more 5 Single paralle...

Страница 5: ...hoons or strong winds An incorrectly installed unit may fall down and cause damage or injuries mm M10 3 8 bolt Base As long as possible Vent Max 30 Set deep in the ground 600 600 Min 360 175 175 Min 10 950 25 330 370 4 Installing the refrigerant piping 4 1 Precautions for devices that use R410A refrigerant Refer to page 3 for precautions not included below on using air conditioners with R410A refr...

Страница 6: ...88 5 8 0 0 5 1 0 1 5 ø19 05 3 4 0 0 5 1 0 1 5 4 Installing the refrigerant piping Fig 4 3 AFront piping cover BPiping cover CStop valve DService panel EBend radius 100mm 150mm 4 3 Refrigerant piping Fig 4 3 Remove the service panel D three screws and the front piping cover A two screws and rear piping cover B two screws 1 Perform refrigerant piping connections for the indoor outdoor unit when the ...

Страница 7: ...ockout in the pipe cover following the groove and wrap the pipes Pipe inlet gap Use putty or sealant to seal the pipe inlet around the pipes so that no gaps re main If the gaps are not closed noise may be emitted or water and dust will enter the unit and breakdown may result 4 6 Addition of refrigerant Additional charging is not necessary if the pipe length does not exceed 30 m If the pipe length ...

Страница 8: ...s to confirm if the pipes can be used If the diameter of the existing gas side pipe is bigger than the specified diameter turn SW8 1 on Measure the existing pipe thickness and check for damage The existing pipe thickness meets specifica tions and the pipes are not damaged Check if the existing air conditioner can operate After operating the cooling system for about 30 minutes do a pump down work D...

Страница 9: ...rminals are NOT electrically insulataed by the transformer or other device Notes 1 Wiring size must comply with the applicable local and national code 2 Power supply cords and Indoor Outdoor unit connecting cords shall not be lighter than polychloroprene sheathed flexible cord Design 60245 IEC 57 3 Use an earth wire which is longer than the other cords so that it will not become disconnected when ...

Страница 10: ...l on the control board of the outdoor unit Remove the protective sheet to operate the DIP switches easily 7 3 Test run 7 3 1 Using SW4 in outdoor unit SW4 1 ON Cooling operation SW4 2 OFF SW4 1 ON Heating operation SW4 2 ON After performing the test run set SW4 1 to OFF After power is supplied a small clicking noise may be heard from the inside of the outdoor unit The electronic expansion valve is...

Страница 11: ...win Refrigerant address 01 G Simultaneous triple Refrigerant address 02 E SW 1 3 6 F SW 1 3 6 G SW 1 3 6 Red A B C D E SW1 CNDM 3 1 Fig 9 1 3 Because the unit automatically stops in about two to three minutes after the refrigerant collecting operation LED1 and LED2 are lit be sure to quickly close the gas stop valve When LED1 and LED2 are lit and the outdoor unit is stopped open the liquid stop va...

Страница 12: ......

Страница 13: ...ig 2 14 Fig 2 15 Fig 2 16 Fig 2 17 Fig 2 18 Fig 2 10 Fig 2 9 Fig 2 8 Fig 2 6 150 300 1000 Max 500 200 300 200 1000 150 1000 250 250 1500 500 Max 500 300 1500 500 1500 Max 300 1500 1500 500 1000 600 2000 150 1500 600 3000 500 1500 800 150 ...

Страница 14: ...RMAN HOUSE 1 GEORGE STREET UXBRIDGE MIDDLESEX UB8 1QQ U K RG79D355H03 Printed in Japan This product is designed and intended for use in the residential commercial and light industrial environment The product at hand is based on the following EU regulations Low Voltage Directive 73 23 EEC Electromagnetic Compatibility Directive 89 336 EEC ...

Отзывы: