- 7 -
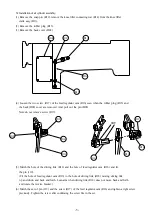
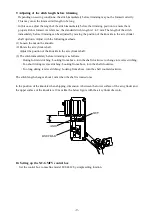
5.4 Installation of solenoid valve
(1) Connect the urethane tube (104) with elbow unions of air cylinder assembly (108).
(2) Install solenoid value assembly (121) on the place where urethane tube (104) and under the table
reach.
(3) Connect the upper part of elbow unions installed on the air cylinder assembly (108)
with A port of the solenoid valve assembly (121) by the urethane tube (104).
Similarly, connect the lower side of elbow unions and B port of the solenoid
valve assembly (121) by the urethane tube (104).
(4) Connect the connector of solenoid value assembly (121) with option B of the control board.
(5) Connect the air supply source to the P port of the solenoid value.
(6) Use the regulator and the branch device which you prepared.
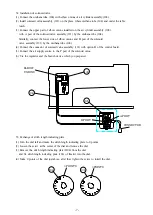
5.5 Exchange of stitch length indicating plate.
(1) Turn the dial left and make the stitch length indicating plate to 0 points.
(2) Loosen the screw at the center of the dial and remove the dial.
(3) Remove the stitch length indicating plate (D04) from the dial
and fix stitch length indicating plate (106) of this kit into the dial.
(4) Make 0 points of the dial just above. after that, tighten the screw to install the dial.
B-PORT
ELBOW
UNIONS
108
121
A-PORT
CONNECTOR
104
0 POINTS
106
D04
0 POINTS
Содержание LU-ST KIT
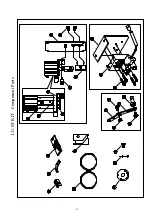
Страница 4: ...LU ST KIT Component Parts 3 ...
Страница 11: ...MEMO ...
Страница 12: ...PrintedinJapan ...

