31
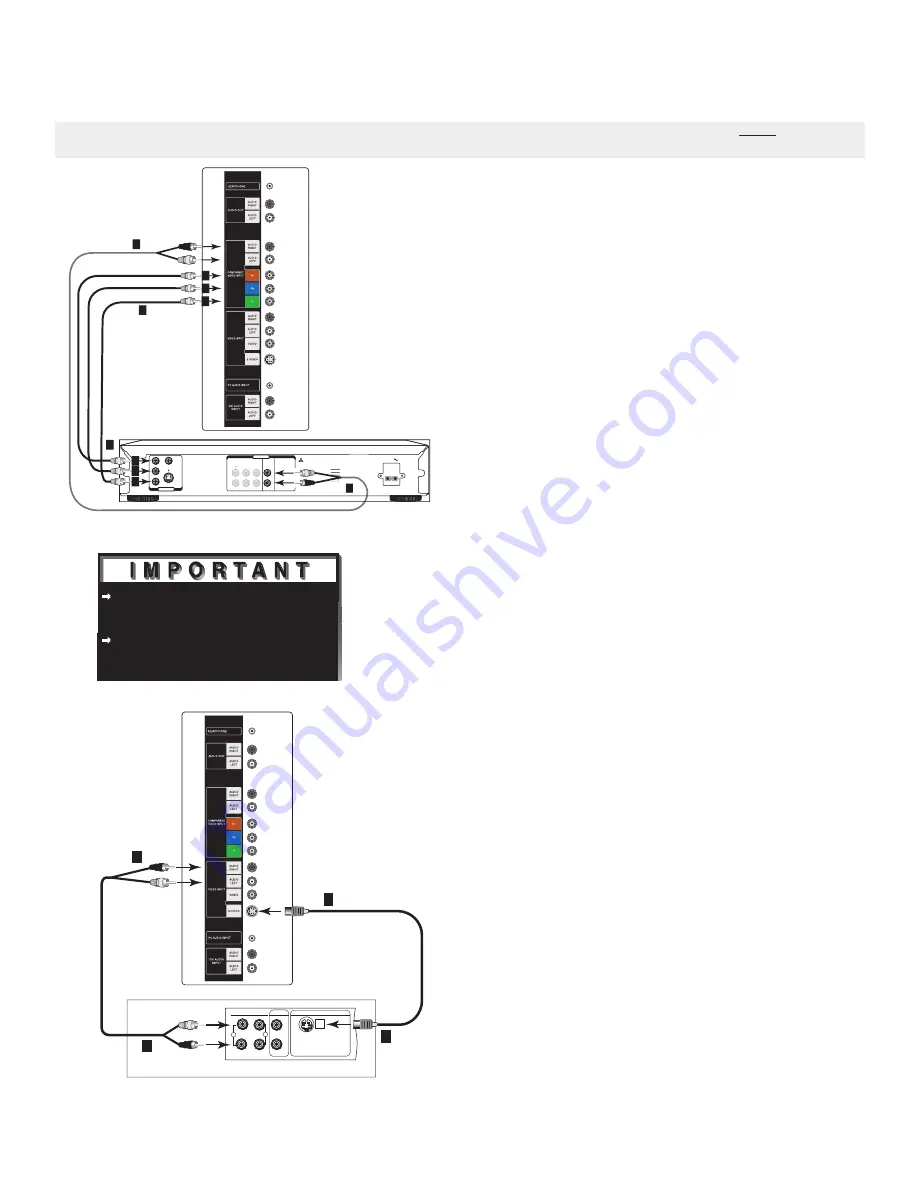
DVD Player/Video Game with
Component Video
(Figure 4)
1. Connect the Component Video cables from
(YCb Cr or Y Pb Pr) VIDEO OUT on the back
of the DVD player to COMPONENT VIDEO
INPUT on the LCD Display side panel. The correct
connections are:
A.
Y to Y
B.
Cb or Pb to Pb
C.
Cr or Pr to Pr
2. Connect a set of audio cables from AUDIO OUT
on the back of the DVD player to COMPONENT
VIDEO Input/AUDIO RIGHT & AUDIO LEFT
on the LCD Display side panel.
• The red cable connects to the R (right)channel
• The white cable connects to the L (left) channel
NOTE:
Some video game systems support component
connections. Please refer to your video game
console Owner’s Guide.
NOTE:
If your DVD player supports progressive
scan playback, be sure to set your player
accordingly. Please refer to your DVD player’s
Owner’s Guide.
Other S-Video Device
(Figure 5)
1. Connect a S-Video cable from VIDEO OUT on the
device back panel to VIDEO INPUT on the LCD
Display side panel.
2. Connect a set of audio cables from AUDIO OUT
on the device back panel to VIDEO INPUT/
AUDIO RIGHT & AUDIO LEFT on the LCD
Display side panel.
• The red cable connects to the R (right) channel
• The white cable connects to the L (left) channel
See Appendix A, page 61, for component video
signal compatibility information.
For digital audio connections, see your DVD
and A/V receiver Owner’s Guides.
Figure 4. Connecting a DVD Player with Component Video.
Figure 5. Connecting an S-Video Device.
Connecting a DVD Player or Other S-Video Device Directly to
LCD Side Panel
NOTE: The LCD Display side panel connections shown below can only be used when the HD-6000 is not connected to
the LCD Display.
�����
�
�
��
��
���������
�������������
���������������
���
�
�
������
��������� ��������
�����
������� �������
���������
�����
����������
����������
�����
�������
�����������������������������������
���������������������������������
������������������������������
��������������
������������������
����������������
�������������
�������������
����������
������������
�
���
��������������
�����������
����������
�
�
�
�
�
�
�����
�
�
�
���
�����
�����
�
�
�
�
�
�
���������
���������
��������
������������������
�����
���
�����
���
����������������������
�
�
�
�
Содержание L423FR
Страница 19: ...18 Set Back Configuration Setup continued 7 Secure the HD 6000 to the stand using the two M3 Bolts ...
Страница 36: ...35 This page intentionally left blank ...
Страница 44: ...43 This page intentionally left blank ...
Страница 56: ...55 This page intentionally left blank ...
Страница 65: ...64 ...
Страница 66: ...65 ...
Страница 67: ...66 Cable Management ...
Страница 71: ...70 NOTES ...
Страница 72: ...71 NOTES ...
Страница 73: ...72 NOTES ...


