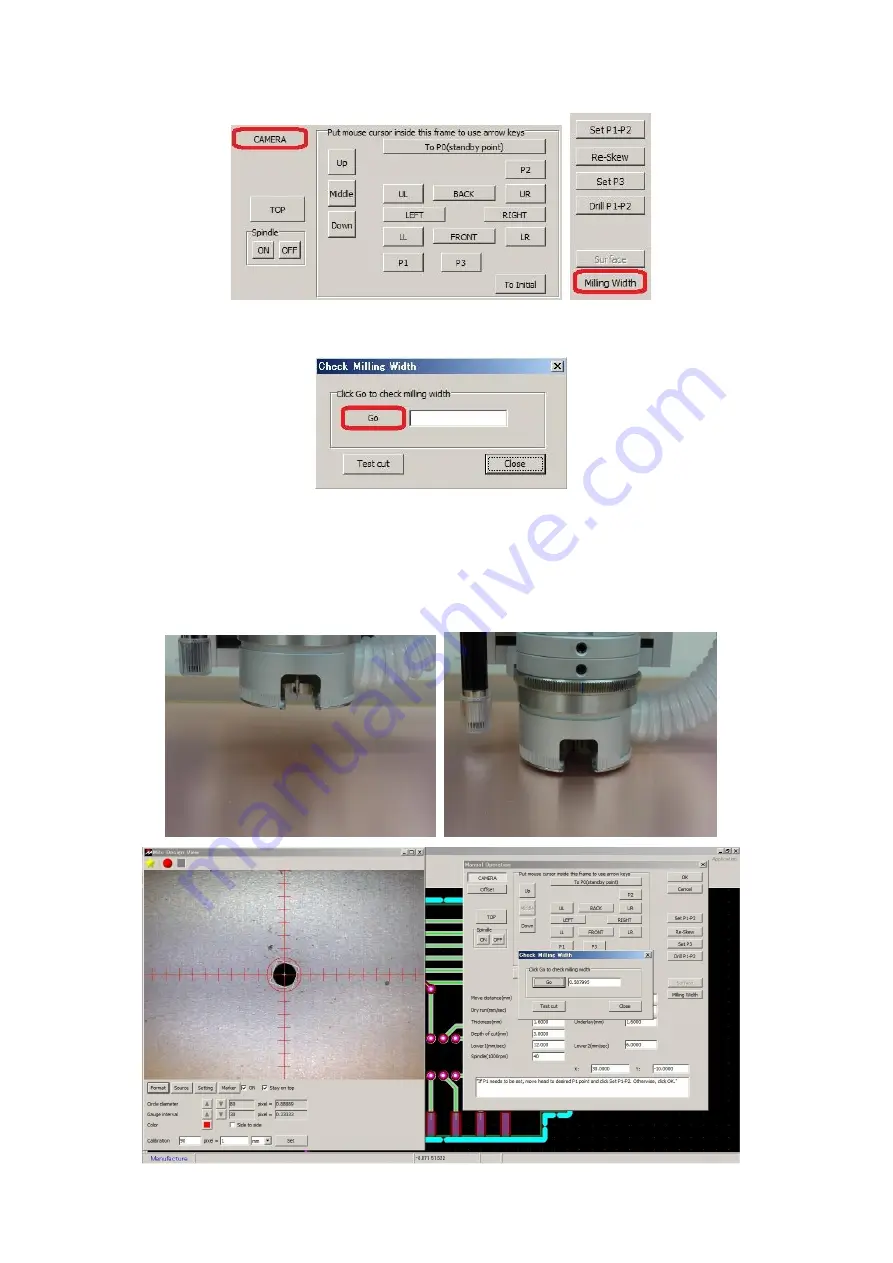
MITS Design Pro CAM-T Скачать руководство пользователя страница 28


27 

22.


Click

 CAMERA

 button and click 

Milling Width


23.


Check Milling Width window will appear. Click 

Go


24.


The machine will automatically mill and measure the milling width. The


result will be shown. Use the depth adjustment screw to set it to 0.3mm. 


Rotate the depth adjustment screw clock wise to widen the milling width 


and counter clockwise to thin it. 


Содержание Design Pro CAM-T

Страница 1: ...M MI IT TS S D De es si ig gn n P Pr ro o C CA AM M T T f fo or r F FP P 2 21 1T T...

Страница 2: ...sure to process within the working area of Auto Lab Dry Run and Milling Speed Below is the optimal speed for Auto Lab Dry Run 20 30mm sec Milling Speed 12 18mm sec Routing Speed 1 2mm sec If the proc...

Страница 3: ...transportation Do not apply any force to the shaft lead screw spindle head while transportation It could result to have the accuracy to drop Spindle Motor Cleaning Note that spindle motor and collet a...

Страница 4: ...7 Setup Operation Check P 8 Procedures P 10 Preparation P 11 Set Milling Sequences P 14 Adjust P 17 Process Top Layer P 30 Adjust Align Bottom Layer P 34 Process Bottom Layer P 39 After Completed P 4...

Страница 5: ...t file is used which is automatically saved on to your computer when the software is installed Below are the board and the tools used in this tutorial guide Board Double Sided Copper Cladded Thickness...

Страница 6: ...5 Prototyping Machine Part Name 1 Power Switch 2 Spindle Head 3 Working Table 4 Pressure Foot 5 Depth Adjustment Screw 6 USB Camera 7 Tool Change Lever 8 Vacuum Nozzle...

Страница 7: ...6 9 Fuse Holder 10 AC IN Power Plug 11 AC OUT Vacuum Outlet 12 RS 232C Port 13 USB Port...

Страница 8: ...Lab Screen Command Icons CAD Origin Application Basic Operation Mouse Scroll Move Up Down Shift Scroll Move Right Left Ctrl Scroll Zoom In Out Keyboard Esc Pause Milling Backspace Undo Shift Backspace...

Страница 9: ...on Check 1 Connect the power cable to the AC In Power Plug 2 Attach and hold the vacuum hose by fixing the plastic vacuum holder on the backside of the machine with the screw 3 Attach vacuum hose into...

Страница 10: ...leaner to the Prototyping Machine with power cable Be sure to turn the Vacuum Cleaner power On at all time 6 Turn the power switch On The spindle head will move to the back left corner Warning Please...

Страница 11: ...prototype PCB Preparation Open mdemo mit file Setup underlay and PCB Set Milling Sequence Adjust Set P1P2 Camera Offset Adjust Milling Width Drill Fiducial Holes Process Top Layer Drill Top Mill Top A...

Страница 12: ...11 Preparation First you will begin with the below steps 1 Open mdemo mit file 1 2 2 Set underlay and PCB on working table 3 4 mdemo mit file below After setup below...

Страница 13: ...files are saved as below for each OS Windows 7 Document Public Document Mits Software MT Path Data mdemo mit Windows Vista Public Documents Mits Software MT Path Data mdemo mit Windows XP Local Disc C...

Страница 14: ...able Clear the working table and place the underlay Use the masking tape to hold the underlay Clear the underlay and place the PCB Use the masking tape to hold the PCB You ve completed the underlay an...

Страница 15: ...14 Set Milling Sequences Now you will set Milling Sequence The sequence is as below Drill Top Mill Top Mill Btm Routing Btm...

Страница 16: ...Y Milling Sequence Settings window will appear Check and see X quantity and Y quantity is set to 1 Next you will move the jobs from Milling Job List to Milling Sequence List Double click on Drill Top...

Страница 17: ...16 Repeat the above and move the below jobs to the Milling Sequence List Mill Top Mill Btm Routing Btm Click OK and the machine will move Now Milling Sequence setting is completed...

Страница 18: ...al Holes 18 25 P1 P2 P1 P2 are the points used to determine the actual working area during the prototyping As shown in the picture below P1 is the intersected point which is 2mm to the left and down f...

Страница 19: ...will appear Now you will set P1 and P2 Move the machine to the front left corner by using the Movement Icon FRONT BACK LEFT RIGHT and entering distance to move per click in Move Distance After moving...

Страница 20: ...ead stays inside the PCB WARNING Do not set P1 all the way at the left corner Camera will not be able to use to read the fiducial hole when the board is flipped over P1 P2 P1 P2 setting is completed N...

Страница 21: ...Lever to the right and open the collet chuck Remove the dummy tool by pulling it downwards Insert the Milling Bit inside the collet chuck Make sure to insert the Milling Bit all the way inside and tu...

Страница 22: ...foot The tool will move down when the depth adjustment is rotated clock wise and up when rotated counter clock wise IMPORTANT The tool will move 3 m with 1 click on depth adjustment 1 revolution will...

Страница 23: ...f the surface of the board has been milled Repeat 8 10 until the board is milled When the surface of the board is milled clicked CAMERA The head will move to camera position Launch Design View If the...

Страница 24: ...you will set the camera Click Marker button and click on the checkbox for ON and Stay on top Marker will be displayed on the window and Marker setting will be shown below Click on the Black colored bo...

Страница 25: ...the center to P1 Click on Format and select 640 x 480 x 16b and click OK For calibration set as 90 pixel 1 mm and click Set Design View will stay on top of other application Move the Design Pro Manua...

Страница 26: ...illed circle is on Design View screen Click Snap to circle The machine will automatically move and align to the center of the circle Click OK If the milled circle is not on the Design View screen ente...

Страница 27: ...to the milled circle enter distance to move in XY move and use Circle diameter on Design Viewon Design View to align Click CAMERA button and end camera mode Camera offset is not completed Now you will...

Страница 28: ...dow will appear Click Go The machine will automatically mill and measure the milling width The result will be shown Use the depth adjustment screw to set it to 0 3mm Rotate the depth adjustment screw...

Страница 29: ...o again The machine will automatically move 1mm back and mill Repeat 23 25 until the result becomes 0 3mm After it becomes 0 3mm click Close Click CAMERA and end camera mode Milling width setting is n...

Страница 30: ...indow will appear Click Yes Y The machine will automatically move to P1P2 and drill holes Click CAMERA button to double check the offset If the P1 and the center of the Design view is not aligned repe...

Страница 31: ...30 Process Top Layer Next you will process Top layer of the PCB 1 Drill Top 1 3 2 Mill Top 4 5 Drill Top Below Mill Top Below Top Layer Completed Below...

Страница 32: ...rill Top and click Continue Tool Change Window will appear Check to see if the Milling Job is Drill Top and the diameter is 0 8000 Click Continue Drilling will begin Data which will be drilled will sh...

Страница 33: ...ling Job is set as Mill Top and click Continue Tool Change Window will appear Change the tool to 90 Milling Bit Check to see if the Milling Job is Mill Top and the diameter is 0 3000 Click Continue Mi...

Страница 34: ...33 After milling the spindle head will move backwards Top layer prototype is now completed Next you will flip the board over and align the fiducial points P1 P2 points...

Страница 35: ...34 Adjust Align Bottom Layer Next you will flip the board over and adjust align to the fiducial points P1 P2 points 1 Flip the board over 1 3 2 P1 P2 Adjust Align Bottom 4 11...

Страница 36: ...ape on the PCB Do not throw it away it will be reused Flip the board over Bring the left side of the board to the right side when it is flipped over Move the PCB to the left side and reused the tape t...

Страница 37: ...Top Bottom Change window is shown Click Adjust Manual Operation window will show up Click on P1 Open Design View and click CAMERA button in Manual Operation window Use the movement button FRONT BACK R...

Страница 38: ...Design View window click Snap to circle The machine will automatically move and align to the center of the circle Click OK Check if the center of the P1 and camera is aligned and click Set P1 P2 Conf...

Страница 39: ...The machine will move to P2 Repeat 7 9 to use Snap to circle and align center of the P2 to the camera and click Set P1 P2 Click OK on the Manual Operation window Bottom layer adjust align is complete...

Страница 40: ...39 Process Bottom Layer Lastly it is the prototyping of the bottom layer 1 Mill Btm 1 3 2 Routing Btm 4 6 Milling Bottom Below Routing Bottom Below Bottom Layer Completed Below...

Страница 41: ...Mill Btm and click Continue Tool Change Window will appear Check to see if the Milling Job is Drill Top and the diameter is 0 8000 Click Continue Milling will being Data which will be milled will sho...

Страница 42: ...Job is set as Routing Btm and click Continue Tool Change Window will appear Change the tool to Router Bit 1 0mm Check to see if the Milling Job is Routing Btm and the diameter is 1 0000 Click Continu...

Страница 43: ...42 Closing Confirmation window will appear Click Close Prototyping is completed Top Layer Bottom Layer...

Страница 44: ...cutter knife or nipper to separate the finished PCB from the blank PCB Change from Router Bit to Dummy Tool WARNING Make sure to change back to Dummy Tool The spindle motor needs to hold on to a tool...

Страница 45: ...driver go to CAM Prefs Board Maker in Design Pro Set the RS232C port to USB Click OK on the Board Maker Setting window and close Design Pro The setting changed will be applied after the software is cl...

Страница 46: ...mark in the box for Allow the computer to turn off this device to save power Repeat the above for all of the USB Root Hub in Device Manager After setting has been changed restart your computer If the...

Страница 47: ...s shown and stays enter SHIFT ESC on the keyboard After doing so turn the power switch off and back on Step Out When step out occurs the software coordinates and the actual coordinates will be misalig...

Отзывы: