background image

IMPORTANT SAFEGUARDS


When  using  electrical  appliances,  basic  safety  precautions  should  always  be  followed 

including the following: 

1.  Read all instructions carefully before using. 

2.  Check if the voltage indicated on the appliance corresponds to the local main voltage before you 

connect the appliance. 

3.  To protect against electrical shock, do not immerse cord, plugs, or the unit in water or other liquid. 

4.  Close supervision is necessary when any unit is used by or near children. 

5.  Unplug when not in use and before clearing. Allow to cool before putting on or taking off parts. 

6.  It  is  recommended  to  fill  the  water  tank  up  to  the  maximum  gradation  with  distilled  water.  Make 

sure the water tank is properly inserted in place before operating to avoid a lack of water in the 

oven when it works. 

7.  Avoid opening the oven door frequently during the cooking process to avoid loss of steam.   

8.  If  it  is  necessary  to  open  the  oven  door  during  the  cooking  process,  please  keep  a  reasonable 

distance from the oven door to avoid close contact with high-temperature steam.   

9.  Insulated gloves should be worn when retrieving food or containers from the oven to avoid being 

hurt by high temperatures. 

10. After the reheating of milk or baby food, please mix the food well and check the temperature before 

feeding to avoid burn injuries. 

11. Do not operate any appliance with a damaged cord or plug or after the appliance malfunctions or 

has been damaged in any manner. Return appliance to the nearest authorized service facility for 

examination, repair, or adjustment. 

12. The use of accessory attachments not recommended by the manufacturer may cause injuries. 

13. Do not let cord hang over edge of table or counter, or touch hot surface. 

14. Do  not  let  the  appliance  operate  unattended.  Extreme  caution  must  be  used  when  moving  an


appliance containing hot oil or other hot liquids. 

15. The  back  steam  exhaust  port  will  discharge  high-temperature  steam  during  operation.  Do  not 

approach the back exhaust port to avoid scald. 

16. Never  connect  this  appliance  to  an  external  timer  switch  or  separate  remote-control  system  in 

order to avoid a hazardous situation. To disconnect, turn off the appliance, then remove the plug 

from the wall outlet. 

17. Do not place the appliance on or near combustible materials such as a tablecloth or curtain. The 

accessible surfaces may become hot during use.   

18. Never  put the appliance against the wall or  other appliances. There should be at least  10 cm of 

free  space  for  the  back  side.  Left/right  sides  and  the  upper  side  of  the  appliance.  Do  not  place 

anything on top of appliance. 

19. Hot air is released through the air outlet in the boiler. Please keep your hands and face at a safe 

distance from the air outlet in the basket, so as to avoid scalding caused by the hot air released 

from the air outlet in the basket. 

20. Ensure the appliance in placed on a horizontal, even and stable surface. 

21. The appliance needs approximately 30 minutes to cool down for handle or cleaning safely. 

22. This  appliance  is  not  intended  for  use  by  persons  (including  children)  with  reduced  physical, 

sensory or mental capabilities, or lack of experience and knowledge, unless they have been given 

supervision or instruction concerning use of the appliance by a person responsible for their safety. 

23. Do not use appliance for other than intended use. 

24. Immediately unplug the appliance if you see dark smoke coming out of the appliance. Wait for the 

smoke emission to stop before remove the pan from the appliance. 

Содержание MK-319

Страница 1: ... device functions according to this instruction manual prior to each use and only use this device if it is in proper working condition Vui lòng đọc và làm theo tất cả các hướng dẫn được thể hiện trong sách hướng dẫn này trước khi sử dụng sản phẩm Giữ lại sách hướng dẫn để tham khảo khi cần thiết Hãy kiểm tra các chức năng của thiết bị theo sách hướng dẫn này trước mỗi lần sử dụng và chỉ sử dụng kh...

Страница 2: ... not let cord hang over edge of table or counter or touch hot surface 14 Do not let the appliance operate unattended Extreme caution must be used when moving an appliance containing hot oil or other hot liquids 15 The back steam exhaust port will discharge high temperature steam during operation Do not approach the back exhaust port to avoid scald 16 Never connect this appliance to an external tim...

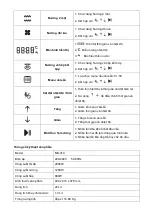
Страница 3: ...st vent 7 Bake tray 11 Heating tube 4 Control panel 8 Steam tray Control panel and display Icon Name Function introduce Power Switch 1 Turn on or turn off the power 2 Cancel current setting Steam 1 Select steam function 2 Use with Up Grill 1 Select Up Grill function 2 Use with Down Grill 1 Select Down Grill function 2 Use with ...

Страница 4: ...just time and temp Up 1 Increase Menu 2 Increase time and temperature Down 1 Decrease Menu 2 Decrease time and temperature Start Pause 1 Press once to start cooking 2 Press another time to pause ongoing procedure 3 Press twice in a row to cancel ongoing working Product technical data Model MK 319 Voltage and frequency 220 240V 50 60Hz Input power Max 2000W Grilling power 1200W Steaming power 800W ...

Страница 5: ...light on Select the functions Steam Up grill Down grill Grill Convection Steam grill on the control panel the icon function you have chosen will flash Then press Start Pause button icon to start working under default temperature and time 2 Method 2 Hold the power switch the display screen and all function icons are light on Select the functions Steam Up grill Down grill Grill Convection Steam gril...

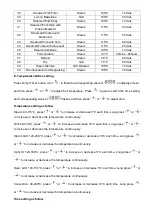
Страница 6: ...Steamed Grilled Pork Belly Grill Steam 230 C 18mins 16 Steamed Pork Ribs Steam 115 C 20mins 17 Steamed Tofu with Minced pork Steam 100 C 15mins 18 White Fungus Soup with Lotus Seeds Steam 100 C 60mins 19 Steamed Pork with Rice flour Steam 100 C 60mins 20 Steamed Egg Tofu with Shrimp Steam 100 C 12mins 21 Steamed Eggplant Steam 100 C 25mins 22 Steamed Snow Pear with Lily Bulb Steam 100 C 60mins 23 ...

Страница 7: ...h the time setting and corresponding value of flashes and then press or to adjust time Temperature setting as follow Steam 40 115 C press or to increase or decrease 5 C each time Long press or to increase or decrease the temperature continuously Grill 40 230 C press or to increase or decrease 10 C each time Long press or to increase or decrease the temperature continuously Steam Grill 120 230 C pr...

Страница 8: ...tion step Note During the cooking process the start pause icon will keep flashing indicating that the air fryer is in working condition When the door opened and then closed during the cooking process the air fryer pauses at this time and needs to be restarted by pressing the key G Lack of water If the icon lights up and the buzzer emits DE DE sound during cooking the air fryer will stop cooking to...

Страница 9: ...e appliance will not be used for long time please disconnect it from the power supply Keep the oven cavity water tank and drip tray clean and dry Put the appliance in a dry environment absent of corrosive gas 7 Disconnect the appliance from the power supply for lamp replacement Only use original parts purchased from the manufacturer 8 Do not use coarse objects or sharp metal tools to scrape the gl...

Страница 10: ...r service Oven lamp fails to light Lamp is damaged Contact customer service Master PCB is damaged Fan fails to work Fan motor is damaged Contact customer service Master PCB is damaged Button fails to work Control panel is damaged Contact customer service Master PCB is damaged Steam emission is slow or unsmooth or contains white powdery residues Pipe clogged by water scale Clear the water scale No ...

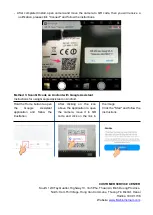
Страница 11: ... by Zalo Vietnam app Open Zalo Click and select Scan QR code Move the camera to QR code Click Yes to redirect to the warranty registration page Method 2 Scan QR code on iphone with iOS11 Activate scanning QR code by camera Go to Settings Camera Scan QR Code ...

Страница 12: ...old the Home button to open the Google Assistant application and follow the illustration After clicking on the icon above the application to open the camera move it to QR code and click on the link in the image Click the Start and follow the instructions CUSTOMER SERVICE CENTER South 12 9 Tay Quarter Highway 13 Vinh Phu Thuan An Binh Duong Province North Xam Thi Village Hong Van Commune Thuong Tin...

Страница 13: ... nguồn lên trên cạnh bàn hoặc các vật sắc nhọn hoặc đặt lên trên bề mặt nóng 14 Không để thiết bị hoạt động mà không có sự giám sát Phải hết sức thận trọng khi di chuyển nồi chiên có chứa dầu nóng hoặc các chất lỏng nóng khác 15 Cửa xả hơi phía sau của nồi chiên sẽ xả hơi ở nhiệt độ cao trong suốt quá trình hoạt động Không đưa tay hoặc mặt đến gần cửa xả hơi để tránh bị bỏng 16 Không được kết nối ...

Страница 14: ... Khay nướng 11 Ống dẫn nhiệt 4 Bảng điều khiển 8 Khay hấp Bảng điều khiển và màn hình Biểu tƣợng Chức năng Mô tả Nút nguồn 1 Bật tắt nguồn điện của bảng điều khiển 2 Hủy cài đặt hiện tại Hấp 1 Chức năng hấp 2 Kết hợp với Nƣớng mặt trên 1 Chức năng Nướng mặt trên 2 Kết hợp với Nƣớng mặt dƣới 1 Chức năng Nướng mặt dưới 2 Kết hợp với ...

Страница 15: ... và thời gian cài đặt hiện tại 2 Sử dụng để điều chỉnh thời gian và nhiệt độ Tăng 1 Giảm số menu cài sẵn 2 Giảm thời gian và nhiệt độ Giảm 1 Tăng số menu cài sẵn 2 Tăng thời gian và nhiệt độ Bắt đầu Tạm dừng 1 Nhấn lần đầu để nồi bắt đầu nấu 2 Nhấn lần hai để tạm dừng quá trình nấu 3 Nhấn hai lần liên tiếp để hủy chế độ nấu Thông số kỹ thuật sản phẩm Model MK 319 Điện áp 220 240V 50 60Hz Công suất...

Страница 16: ...t trên Nƣớng mặt dƣới Nƣớng 2 mặt Nƣớng đối lƣu Nƣớng và hấp kết hợp 1 Cách 1 Nhấn giữ nút nguồn màn hình và các biểu tượng trên bảng điều khiển sẽ sáng Lựa chọn chức năng Hấp Nướng mặt trên Nướng mặt dưới Nướng 2 mặt Nướng đối lưu Nướng và hấp kết hợp trên bảng điều khiển biểu tượng của chức năng bạn đã chọn sẽ nhấp nháy Sau đó nhấn nút Bắt đầu Tạm dừng để nồi bắt đầu hoạt động nhiệt độ và thời g...

Страница 17: ...ướng 200 C 45 phút 10 Pizza Nướng 180 C 20 phút 11 Bò bít tết Nướng 230 C 20 phút 12 Gà quay Nướng 230 C 40 phút 13 Xúc xích hấp nướng Nướng và Hấp kết hợp 180 C 12 phút 14 Chân gà hấp nướng Nướng và Hấp kết hợp 230 C 25 phút 15 Bụng heo hấp nướng Nướng và Hấp kết hợp 230 C 18 phút 16 Sườn heo hấp Hấp 115 C 20 phút 17 Đậu phụ hấp thịt heo băm Hấp 100 C 15 phút 18 Canh nấm trắng hạt sen Hấp 100 C 6...

Страница 18: ...sẽ hiển thị và nhấp nháy Nhấn các nút hoặc để điều chỉnh nhiệt độ Sau đó nhấn nút cài đặt Nhiệt độ thời gian một lần nữa để vào chế độ cài đặt thời gian màn hình cũng sẽ hiển thị và nhấp nháy Tiếp tục nhấn các nút hoặc để điều chỉnh thời gian Cài đặt nhiệt độ Chế độ Hấp 40 115 C nhấn các nút hoặc để tăng hoặc giảm 5 C mỗi lần nhấn Nhấn giữ các nút hoặc để tăng hoặc giảm nhiệt độ liên tục Nướng 2 m...

Страница 19: ... lần liên tiếp để hủy chế độ nấu hiện tại nồi chiên sẽ trở lại bước chọn chế độ nấu Lưu ý Trong suốt quá trình nấu biểu tượng Bắt đầu Tạm dừng sẽ nhấp nháy liên tục cho biết rằng nồi chiên đang trong tình trạng hoạt động Khi mở và đóng cửa kính trong suốt quá trình nấu nồi chiên sẽ tạm dừng hoạt động và bạn cần phải nhấn nút Bắt đầu Tạm dừng để nồi tiếp tục hoạt động G Báo thiếu nƣớc Nếu biểu tượn...

Страница 20: ... 15 phút để làm khô bên trong nồi chiên và khung cửa sau mỗi lần sử dụng 6 Nếu nồi chiên không được sử dụng trong một thời gian dài vui lòng ngắt kết nối nồi khỏi nguồn điện Giữ cho bên trong nồi khay chứa nước và khay hứng nước nhỏ giọt sạch sẽ và khô ráo Đặt nồi chiên trong môi trường khô ráo không có khí ăn mòn 7 Ngắt kết nối nồi chiên khỏi nguồn điện khi muốn thay thế đèn Chỉ sử dụng các bộ ph...

Страница 21: ...nh Đèn trong khoang không sáng Đèn bị hỏng Liên hệ trung tâm bảo hành Bo mạch chính bị hỏng Quạt không hoạt động Động cơ quạt bị hỏng Liên hệ trung tâm bảo hành Bo mạch chính bị hỏng Các nút nhấn không hoạt động Bảng điều khiển bị hỏng Liên hệ trung tâm bảo hành Bo mạch chính bị hỏng Hơi nước tỏa ra chậm hoặc ít hoặc có cặn bột màu trắng Đường ống bị tắc do cặn nước Vệ sinh cặn nước bám trong đườn...

Страница 22: ... vào dấu Click vào Quét mã QR Di chuyển vùng quét đến mã QR Click vào Có để chuyển hướng đến trang đăng ký bảo hành Cách 2 Quét mã QR trên Iphone với hệ điều hành iOS11 Hướng dẫn kích hoạt chức năng quét mã QR bằng camera Vào Settings cài đặt Camera máy ảnh Scan QR Code quét mã QR ...

Страница 23: ...u hành Android Bấm giữ nút Home để mở ứng dụng Google Assistant và làm theo hình minh hoạ Sau khi click vào biểu tượng ống kính bên trên ứng dụng mở trình camera di chuyển đến mã QR và click vào link theo hình Kích vào nút Bắt đầu và làm theo hướng dẫn TRUNG TÂM BẢO HÀNH VÀ CHĂM SÓC KHÁCH HÀNG Miền Nam 12 9 khu phố Tây Quốc lộ 13 Vĩnh Phú Thuận An tỉnh Bình Dương Miền Bắc Thôn Xâm Thị xã Hồng Vân ...

Отзывы: