the extension part faces downwards. The shell of the main
component extends 20 mm inside the connection rim and is
fastened with the enclosed screws (8). If the joint is located
above the roof, the slots of the connection rim should be
sealed (adhesive paste). The joints of fire pipes should have
a 6 cm overlap. The spread (larger) end of the flue pipe
comes downwards. The liner pipes should have a 50 mm
overlap. The end of the liner pipe that has a beading comes
upwards. The required number of extension parts should be
fastened following the same principle. Finally, the top end
that was on the main component and the roofing sheets are
put in place and fastened (Figure 3 and 4).
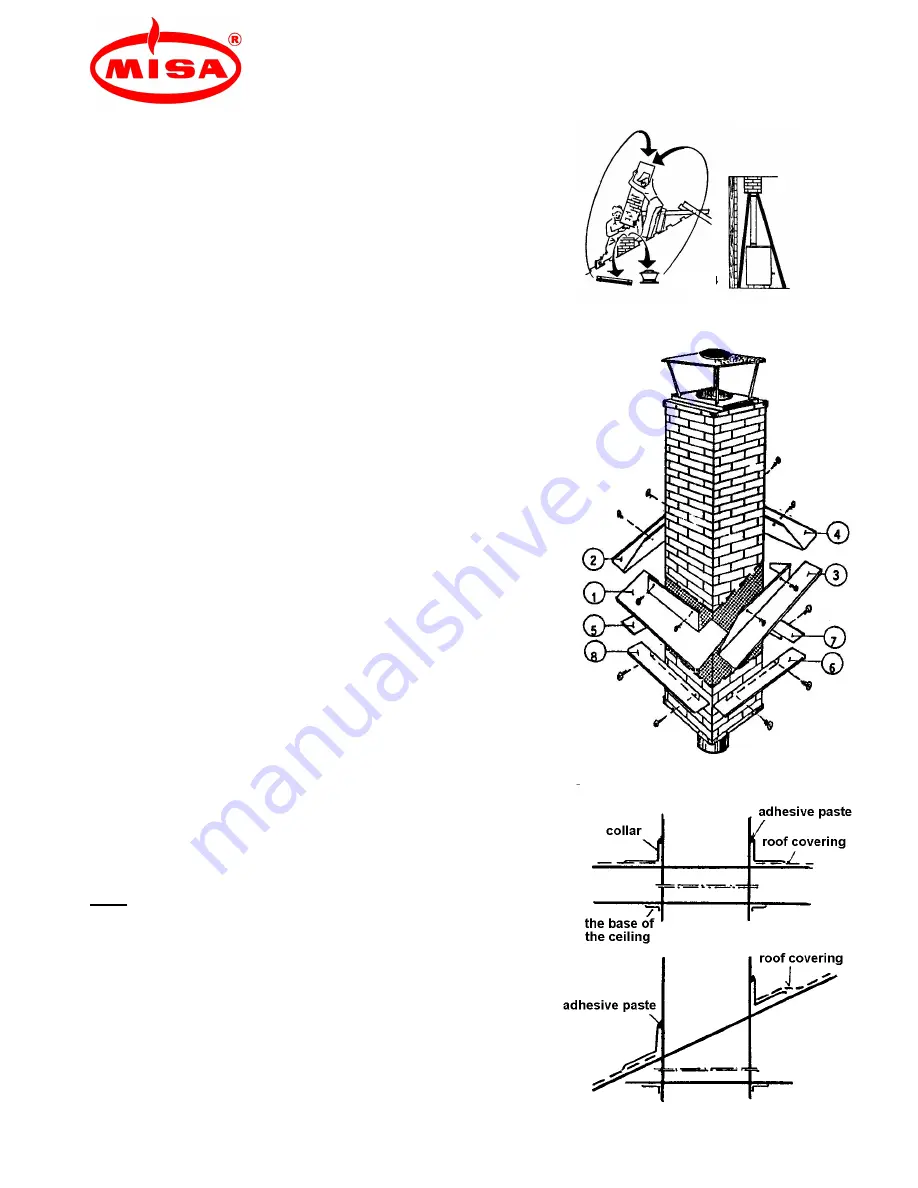
Installation of the roofing sheets
The sheeting for both the roof and the ceiling are found in the
same packaging as the main component 15125R.
The roof sheeting is suited for all roof inclinations. The initial
bends of the parts should be made ready before installation
using a table edge or similar as shown in Figure 4.
Installation sequence:
Roof sheeting
- part 1 of the collar is fastened
- the side sheets, parts 2 and 3, are fastened
- the top sheet part 4 is fastened
- the top sheet is placed beneath the roof covering
- the lower sheet and side sheet are placed above the roof
covering
- roof sheeting is fastened on the outer shell of the chimney
with screws, a Ø 2 mm drill or a small spike or similar can be
used to make the initial holes
- edges should be sealed with a suitable adhesive or
bitumen paste
Ceiling sheeting
- parts 5 and 6 are fastened
- parts 7 and 8 are fastened
- fastened by screws similar to roof sheeting
Note
The chimney should be protected against snow load. The
maximum height of the free-standing part on the roof is 1.3
m above the uppermost support. If condensation water is
formed in the chimney in your climate, the phenomenon can
be eliminated as follows: remove the top end of the chimney
and fill the edges of the chimney with rock wool (A1
incombustible) all the way to the insulation of the ceiling.
The outer surface of the chimney can be painted (use tin
roof paint).
Figure 3
Figure 4
Figure 5


