

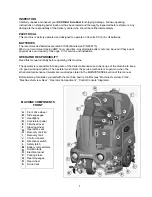
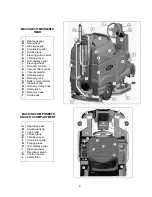
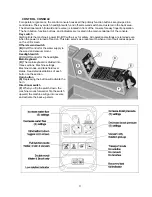
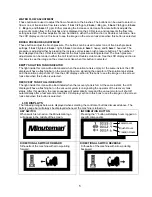
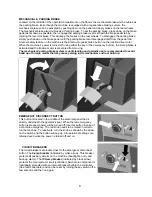
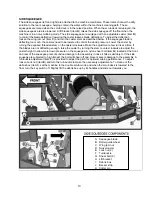


MAIN KEYBOARD
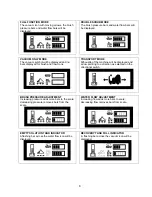
FULL FUNCTION MODE
When this mode is chosen, a green indicator light will illuminate within the full function icon. When the
machine is running in this mode, all machine functions will be on. When the operator sets the
directional
switch
to the
forward
position and steps the
accelerator pedal,
the solution pump will turn on, the brushes
will turn on and be lowered to the floor, and the rear and side squeegees will be lowered to the floor as the
vacuum motor turns on. While operating in this mode the solution will be dispersed into the brushes, which
will scrub the floor allowing the chemical in the solution to break down the dirt on the floor. As the machine
continues to move forward, the vacuum motor will pull the dirty solution water from the rear squeegee into
the recovery tank. If the operator stops moving forward and switches the directional switch into reverse,
the rear squeegee will rise up (protecting it from damage) and the vacuum motor will turn off after a few
seconds. If the operator stops moving in either direction, the machine will automatically raise and turn off
the brushes, shut-off the water and raise the rear and side squeegees. Some of the functions will take a
little while longer to turn off than others.
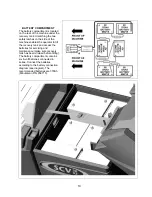
See the LCD display section in this book to see the image on the
screen looks like when this button is selected.
DOUBLE SCRUB MODE
When this mode is chosen, a green indicator light will illuminate within the double scrub icon. When the
machine is running in this mode, the machine will perform all operations except dirty solution recovery.
This mode can be used if the floor is heavily soiled and the chemical will need additional time to emulsify
grease and oils that are on the floor. When the operator sets the
directional switch
to either the
forward
or
reverse
position and steps the
accelerator pedal,
the solution pump will turn on, the brushes will turn on
and be lowered to the floor. While operating in this mode, the solution will be dispersed into the brushes,
which will scrub the floor allowing the chemical in the solution to break down the dirt on the floor. As the
machine continues to move forward or back, the rear squeegee and vacuum system are not on, which
allows the solution to stay on the floor emulsifying the grease and oil. If the operator stops moving in either
direction, the machine will automatically raise and turn off the brushes. After double scrubbing, the
operator should use
the vacuum only mode
to recover the dirty solution water from the floor.
See the LCD
display section in this book to see the image on the screen looks like when this button is selected.
VACUUM ONLY MODE
When this mode is chosen, a green indicator light will illuminate within the vacuum only icon. When the
machine is running in this mode, the machine will only lower the rear squeegee and turn on the vacuum
system to recover the dirty solution from the floor. This mode is usually chosen after double scrubbing to
recover the dirty solution but it can also be used to pick up spills. When the operator sets the
directional
switch
to
forward
, the rear squeegee will be lowered to the floor as the vacuum turns on, pulling the dirty
solution water from the rear squeegee into the recovery tank. If the operator stops moving forward and
sets the directional switch to
reverse,
the rear squeegee will retract (protecting it from damage) and the
vacuum motor will turn off after a few seconds. If the operator quits moving in either direction, the machine
will automatically raise the squeegee and turn off the vacuum motor after a few seconds.
See the LCD
display section in this book to see the image on the screen looks like when this button is selected.
TRANSPORT MODE
When this mode is chosen, a green indicator light will illuminate within the transport icon. When the
machine is set in this mode, none of the cleaning functions of the machine will operate. This mode is only
used to transport the machine from one location to another at a faster rate of speed.
See the LCD display
section in this book to see the image on the screen looks like when this button is selected.
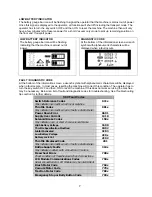
INFORMATION BUTTON
Depressing the “
i
” button will generate specific information such as the machine hour meter, brush motor
hours, and traction motor hours on the LCD display for a few seconds. Keeping this button depressed will
display these items of information for an indefinite amount of time until you release the button. This button
toggles the information on the screen being displayed from machine settings and hour meter information.
See the LCD display section in this book to see the image on the screen looks like when this button is
selected.
4
Содержание SCV28
Страница 1: ...SCV 28 32 RIDER SCRUBBER OPERATION SERVICE PARTS CARE ...
Страница 3: ...3 ...
Страница 31: ...EXPLODED VIEWS MAIN ASSEMBLY I 25 ...
Страница 32: ...26 ...
Страница 33: ...MAIN ASSEMBLY II 27 ...
Страница 34: ...28 ...
Страница 35: ...MAINFRAME ASSEMBLY I 29 ...
Страница 36: ...MAINFRAME ASSEMBLY II 30 ...
Страница 37: ...31 ...
Страница 38: ...FRONT DRIVE ASSEMBLY 32 ...
Страница 39: ...33 ...
Страница 40: ...STEERING ASSEMBLY 34 ...
Страница 41: ...35 ...
Страница 42: ...LCD HOUSING ASSEMBLY 36 ...
Страница 43: ...SOLUTION TANK ASSEMBLY 37 ...
Страница 44: ...38 ...
Страница 45: ...ELECTRICAL PANEL ASSEMBLY 39 ...
Страница 46: ...CONSOLE ASSEMBLY 40 ...
Страница 47: ...RECOVERY TANK ASSEMBLY I 41 ...
Страница 48: ...42 ...
Страница 49: ...RECOVERY TANK II 43 ...
Страница 50: ...DIVERTER ASSEMBLY 44 ...
Страница 51: ...BATTERY BOX ASSEMBLY 45 ...
Страница 52: ...PUMP ASSEMBLY 46 ...
Страница 53: ...47 ...
Страница 54: ...REAR AXLE ASSEMBLY 48 ...
Страница 55: ...SQUEEGEE MECHANISM ASSEMBLY 49 ...
Страница 56: ...REAR SQUEEGEE ASSEMBLY 28 50 ...
Страница 57: ...51 ...
Страница 58: ...REAR SQUEEGEE ASSEMBLY 32 52 ...
Страница 59: ...53 ...
Страница 60: ...28 CYLINDRICAL SCRUB DECK ASSEMBLY 54 ...
Страница 61: ...55 ...
Страница 62: ...28 DISC SCRUB DECK ASSEMBLY 56 ...
Страница 63: ...57 ...
Страница 64: ...32 CYLINDRICAL SCRUB DECK ASSEMBLY 58 ...
Страница 65: ...59 ...
Страница 66: ...32 DISC SCRUB DECK ASSEMBLY 60 ...
Страница 67: ...61 ...
Страница 68: ...CYLINDRICAL DECK AND SIDE SQUEEGEE MOUNTING 62 ...
Страница 69: ...63 ...
Страница 70: ...DISC SCRUBDECK AND SIDE SQUEEGEE MOUNTING 64 ...
Страница 71: ...65 ...
Страница 72: ...28 SIDE SQUEEGEE RIGHT SIDE 66 ...
Страница 73: ...28 SIDE SQUEEGEE LEFT SIDE 67 ...
Страница 74: ...32 SIDE SQUEEGEE RIGHT SIDE 68 ...
Страница 75: ...32 SIDE SQUEEGEE LEFT SIDE 69 ...
Страница 76: ...OFF AISLE WAND ASSEMBLY 70 ...
Страница 77: ...71 ...
Страница 78: ...PLUMBING DIAGRAM 72 ...
Страница 79: ...WIRING DIAGRAMS POWER WIRING 73 ...
Страница 80: ...INPUTS TO CONTROLLER 74 ...
Страница 81: ...OUTPUTS FROM CONTROLLER 75 ...
Страница 82: ...KEYBOARD WIRING 76 ...
Страница 83: ...MACHINE SCHEMATIC 77 ...
Страница 84: ...1 03 78 ...


