background image

F L A S H  S Y S T E M 

FLASH MODES 

: Autoflash 

: Autoflash with pre-flash 

: Flash cancel (in P mode) 

: Remote off-camera TTL flash (blinking alternately) 

The built-in flash operates in four different modes: single-burst, 
single-burst with pre-flash, flash cancel, and as a remote trigger for an 
off-camera flash. Autoflash is the camera's standard mode. In pre-flash 

mode, the flash will fire a small burst before the exposure in order to 
reduce red-eye in portraits. Flash cancel allows you to take pictures using 
only available light. Remote off-camera flash control is explained 
beginning on p.70. 

CAUTION 
The lens hood should not be used when taking picture with the camera's 

built-in flash since vignetting will result. 

When using AF ZOOM Xi 100-300mm f/4.5-5.6 with the camera's built-in 
flash, vignetting may occur; before taking flash pictures with this lens, 
please check with the nearest Minolta Servce Facility for specific 
limitations. For more Accessory Information, See p.90. 

62 

Содержание Dynax 7xi

Страница 1: ...MINOLTA INSTRUCTION MANUAL...

Страница 2: ...strap insert a battery etc Get used to holding the camera working the controls and seeing the displays Then begin where you must with anything new The Basics Read it well and you should then be ready...

Страница 3: ...on users of this camera that the attachment and or use of incompatible products with the 7xi may result in unsatisfactory performance or damage to the camera or its accessories To obtain optimum perfo...

Страница 4: ...erting 12 Battery condition indicators 13 Battery Performance 14 Cold weather operation 14 Film 15 Loading 15 Automatic manual film speed setting 18 Automatic manual rewind 20 Holding the Camera 22 Ta...

Страница 5: ...es 54 Exposure compensation 56 AEIock 58 Self timer 59 Bulb 60 Flash System 62 Flash modes 62 P mode flash 64 A S and M mode flash 65 Slow shutter sync flash 68 Remote off camera TTL flash 70 Film dri...

Страница 6: ...er release button Card on off button Body data panel Accessory shoe Program reset button Main switch Flash pop up button 13 14 15 16 17 18 19 20 21 22 23 24 25 Back cover release Lens release Focus mo...

Страница 7: ...ntacts 28 Card door 29 Remote control terminal 30 Battery cover release 31 Film leader index 32 Sprocket 33 Tripod socket 34 DX contacts 35 Self timer Drive mode button 36 Flash mode button 37 Rewind...

Страница 8: ...7 Film transport signals 8 Film cartridge mark 9 Aperture Exposure Adjustment Card setting displays 10 Card indicator 11 Exposure adjustment indicator 12 Metering mode indicators 13 Shutter speed fil...

Страница 9: ...area 8 Manual focus indicator 9 Depth index 10 Action index 11 Panorama indicator 12 Image control index Names of Parts Viewfinder Data Panel 1 Flash on indicator 2 Flash mode indicator 3 Camera shak...

Страница 10: ...NECKSTRAP A neckstrap is supplied with your camera Attach it as shown below a...

Страница 11: ...tuations in which you are not looking through the viewfinder when the shutter releases ie self timer photographs or bulb exposures An accessory shoe cap protects the contacts on the camera s accessory...

Страница 12: ...o the mount and turn the lens clockwise until it locks in place with a click If no lens is attached to the camera if the lens is not attached properly or if the AZ MZ switch on an xi Series lens is se...

Страница 13: ...he lens contacts and mirror Care of Glass Surfaces Never touch any lens surfaces including the eyepiece with your fingers If a lens becomes dirty first gently clean it with a lens brush Then if necess...

Страница 14: ...he battery cover 2 Insert the battery according to the marks on the inside of the chamber cover 3 Snap the cover closed Sometimes it helps to wipe the battery terminals with a clean dry cloth in order...

Страница 15: ...indicators at any time during use 4 Blinking low battery symbol and appears or no display appears at all and shutter locks Meaning Power is sufficient Power is sufficient but getting low Keep a fresh...

Страница 16: ...hat has been in prolonged storage battery performance may vary Cold Weather Operation Lithium batteries provide excellent performance in cold weather However if you plan to shoot many rolls of film ou...

Страница 17: ...film window and frame counter to verify the type of film in the camera and the number of frames remaining See p 20 for instructions on rewinding a partially exposed roll of film Before you load film f...

Страница 18: ...r edge are engaged by the sprocket teeth RIGHT WRONG RIGHT WRONG Make sure the film leader is shaped correctly otherwise the film may not wind properly Trim a torn or crimped film tip so that it looks...

Страница 19: ...rst frame and 1 will appear in the film counter If the film is loaded incorrectly 0 will blink in the frame counter and the shutter will remain locked Open the back cover and repeat steps 2 and 3 If y...

Страница 20: ...o the ISO of the previous roll initially this value is set to 100 1 Load the film and close the back cover 2 Open the card door and press the ISO button NEXT PAGE 18 If you use DX coded film between I...

Страница 21: ...ISO 6 and 6400 4 Press the ISO button again to enter your selection and return to operating mode or wait 4 sec and the setting will be entered automatically To check the film speed setting at any tim...

Страница 22: ...sec for a 24 exposure roll When the film has been completely rewound the motor will stop and the film cartridge symbol in the body data panel will blink to indicate that it is safe to open the camera...

Страница 23: ...section explains the simplest way to use your new camera with programmed autoexposure autofocus autoflash and single frame advance Details on each of the camera s functions begins on page 38 in the s...

Страница 24: ...elease button gently in a single steady motion never with a quick jab Always keep the camera strap around your neck or wound around one wrist When you pick up the camera make sure you touch the grip s...

Страница 25: ...the program reset button sets the camera to programmed autoexposure mode honeycomb pattern metering autofocus single frame film advance 0 0 exposure compensation wide autofocus area and auto switchov...

Страница 26: ...focus signal will light in the viewfinder data panel when your subject is in focus See p 27 for a list of focus signals If you do not touch the grip sensor you must activate AF and AE by pressing the...

Страница 27: ...the viewfinder data panel The built in flash will pop up automatically if it is required when you press the shutter release button partway down and will fire when you take the picture You should also...

Страница 28: ...ensors is detecting your main subject The camera s ultra wide AF area has four sensors two vertical and two horizontal When you hold the camera horizontally all four sensors are active when you hold t...

Страница 29: ...de In this mode the autofocus system will repeatedly check and update focus until you press the shutter release button all the way down At that time the camera will predict where the subject will be w...

Страница 30: ...rea use focus lock to lock focus on it then recompose the scene as desired 1 Place your subject in the center of the AF area and press the shutter button partway down 2 Hold the shutter button in this...

Страница 31: ...ordingly It is able to recognize many different photographic situations from landscapes to close ups portraits to action shots and will optimize the exposure settings based on the particular requireme...

Страница 32: ...panels then the required exposure settings are beyond the coupling range of the camera and lens If the metering indicators lighting is beyond the range of available aperture and shutter speeds In brig...

Страница 33: ...perture the dual dial control system makes it quick and easy for you to make the desired changes Furthermore as you change the aperture or shutter speed the image control index in the bottom of the vi...

Страница 34: ...the camera will maintain a correct exposure At the same time the indicator in the depth index will move to show you approximately how your changes will effect your photo If you do not touch any of the...

Страница 35: ...NEXT PAGE 33...

Страница 36: ...e depth index off press and hold the program re set button down and move the main switch back to ON Repeat to turn the index on again Most lenses will not use all the positions on the index The approx...

Страница 37: ...er speeds To return to P mode press the program re set button or to return to P mode and keep any changes you have made to the camera s operation press the flash pop up button If you do not touch any...

Страница 38: ...NEXT PAGE 36...

Страница 39: ...If you move the rear dial the camera will enter PA See previous section for more information For more information on subject motion and shutter speed see p 87 The action index should only be used with...

Страница 40: ...OPERATIONS IN DETAIL 38...

Страница 41: ...ctivates autofocus autoexposure and if you are using an xi Series Autozoom lens auto stand by zoom when it detects an object near the viewfinder By the time you frame your subject therefore the camera...

Страница 42: ...ojects a pattern of lines onto your subject which the AF sensors can then detect Be careful not to obstruct the AF illuminator while you are holding the camera The AF illuminator will not work if the...

Страница 43: ...ection If you want to use a specific AF sensor you can manually override the selection sequence and use only one of the four sensors 1 Press the dial function selector twice will appear in the viewfin...

Страница 44: ...finder or the body data panel 3 Press the shutter release button partway down to enter the area you have chosen and return to normal operating mode or wait 4 sec and your choice will be entered automa...

Страница 45: ...the camera to autofocus properly manual focusing may be necessary If two subjects at different distances overlap within the focusing frame If a subject composed of alternating light and dark lines com...

Страница 46: ...he viewfinder 2 If you are using an AF lens turn the focusing ring until the subject appears sharp With an xi Series lens pull and turn the zoom ring For more information refer to the lens manual When...

Страница 47: ...utofocus mode slide the focus mode switch down Pressing the program re set button will also return the camera to autofocus mode but this will also change all of the programmable functions to their def...

Страница 48: ...posure modes programmed autoexposure P aperture priority autoexposure A shutter priority autoexposure S and manual exposure M Changing Exposure Mode 1 Press the dial function selector button once view...

Страница 49: ...M mode M does not appear in the viewfinder data panel 3 Press the shutter release button partway down to enter the mode you have chosen and return to normal operating mode or wait 4 sec for it to be...

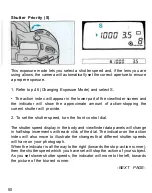
Страница 50: ...To set the aperture turn the rear control dial to the left or right The aperture display in the body and viewfinder data panels will change in 1 2 stop increments with each click of the dial The dept...

Страница 51: ...ed speed is beyond the range of the camera If 8000 blinks set a smaller aperture if 30 blinks set a larger aperture If the metering indicators blink in the viewfinder data panel the lighting is beyond...

Страница 52: ...provide 2 To set the shutter speed turn the front control dial The shutter speed display in the body and viewfinder data panels will change in half stop increments with each click of the dial The ind...

Страница 53: ...nks set a faster shutter speed if the maximum aperture blinks set a slower shutter speed If the metering indicators blink in the viewfinder data panel the light level is beyond the coupling range of t...

Страница 54: ...ill provide an over under or correctly exposed picture 1 Refer to p 46 Changing Exposure Mode and select M 2 To set the shutter speed turn the front control dial to the right for faster shutter speeds...

Страница 55: ...re is set correctly Over exposure Under exposure The light level is beyond the meter s range In manual mode the above displays in the viewfinder data panel will relate information regarding your setti...

Страница 56: ...d 14 Segment Honeycomb Pattern Metering which will provide the correct exposure in almost all situations Spot metering can also be manually selected in which case the center segment in the honeycomb p...

Страница 57: ...meter is not the same distance from the camera as where you want to focus first lock focus on your subject Then position the spot circle over the area to be metered press and hold the AE lock button r...

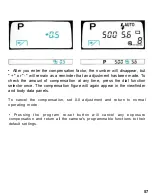
Страница 58: ...2 Turn the rear control dial until the compensation figure you want appears in the viewfinder and body data panels 3 Press the shutter release button partway down to enter the exposure factor and retu...

Страница 59: ...ll the camera s programmable functions to their default settings After you enter the compensation factor the number will disappear but or will remain as a reminder that an adjustment has been made To...

Страница 60: ...iewfinder and press the AE lock button AEL will appear in the viewfinder data panel Hold the button in as you recompose and take the picture If you release the AE lock button before you take the pictu...

Страница 61: ...l the way down to start the timer The AF illuminator will blink twice per second until the shutter releases The self timer can be stopped during countdown by moving the main switch to LOCK To restart...

Страница 62: ...e mode to manual M 3 Turn the front control dial to the right until bulb appears in the body data panel Turn the rear dial to set the aperture 4 Compose your scene and focus the lens If the scene is t...

Страница 63: ...of the exposure The shutter will remain open until you release it To prevent camera shake attach Remote Cord RC 1000 S L Open the card door remove the remote control terminal cover and insert the remo...

Страница 64: ...burst before the exposure in order to reduce red eye in portraits Flash cancel allows you to take pictures using only available light Remote off camera flash control is explained beginning on p 70 CAU...

Страница 65: ...t or rear dial The flash mode indicators will appear in the body data panel in the sequence shown above 3 Press the flash mode button again to enter the mode you have selected Flash cancel in P mode c...

Страница 66: ...icient to provide a correct exposure the flash ready signal will blink The flash can also be forced to fire at any time by pressing and holding the flash pop up button while you take the picture The s...

Страница 67: ...atically in any of these exposure modes Single burst single burst with pre flash flash cancel and remote off camera control can all be selected in any of these exposure modes as well In S mode the shu...

Страница 68: ...EXPOSURE MODE P MODE A MODE S MODE M MODE FLASH POP UP Auto Manual with pop up button BURST Auto UP burst DCV Scan OCR Marinko Orlovac on http orlovac eu 66...

Страница 69: ...th pre flash OFF flash cancel remote off camera flash single burst single with pre flash remote off camera flash AVAILABLE SHUTTER SPEED 1 200 to 30sec set automatically 1 200 sec 1 200 to 30sec set a...

Страница 70: ...crease the background or ambient lighting exposure in a flash picture Flash output will be decreased automatically to maintain a correct exposure of your subject 1 Frame your subject and press and hol...

Страница 71: ...a large aperture is set the shutter speed may not be reduced The flash ready indicator in the viewfinder data panel will blink rapidly if the flash output was sufficient to provide a correct exposure...

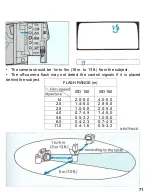
Страница 72: ...erfere with each other The flash must be mounted on the camera when you change the control channel 1 Attach the flash to the camera and turn it on To change the control channel move the control channe...

Страница 73: ...f camera flash may not detect the control signals if it is placed behind the subject FLASH RANGE m 1 4 2 0 2 8 4 0 5 6 8 0 11 0 ISO 100 2 0 5 0 1 4 5 0 1 0 5 0 0 7 4 5 0 5 3 2 0 4 2 3 0 4 1 6 ISO 100...

Страница 74: ...h is charged The flash ready signal in the viewfinder will blink when the built in flash is charged 5 Press the AE lock button to test fire the off camera flash and wait again until both flashes are f...

Страница 75: ...lash to recharge and take the picture Do not release the AE lock button until after you have taken the picture Ratio control In remote mode the built in flash normally only controls the off camera fla...

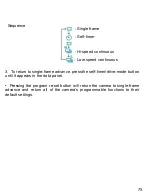
Страница 76: ...hold the shutter release button down low speed continuous mode L will provide up to 2 frames per second When you operate the camera in either low or high speed continuous and autofocus mode the focus...

Страница 77: ...until it appears in the data panel Pressing the program re set button will return the camera to single frame advance and return all of the camera s programmable functions to their default settings 75...

Страница 78: ...your photographs The following features are available only when you are using an xi Series Autozoom lens Auto Stand by Zoom ASZ When Eye Start first activates the camera the lens immediately sets a fo...

Страница 79: ...camera away from your eye If you use power zoom to change ASZ s setting ASZ will not function again until you remove the camera from your eye and wait 30 sec To turn off ASZ 1 Set the main switch to...

Страница 80: ...der Image size lock is limited by the focal length range of the lens you are using If either end of the lens focal length range is reached while image size lock is operating the lens will stop zooming...

Страница 81: ...use continuous film advance use low speed mode In the following situations IMAGE LOCK will flash in the viewfinder screen when you press the lens function button and Image size Lock will not function...

Страница 82: ...film frame up until the moment that you press the shutter release button 1 Press the wide view mode button The camera will automatically set a shorter focal length to give you a wider field of view B...

Страница 83: ...tors 3 Press the shutter release button partway down The lens will zoom to fill the viewfinder with the part of the image that appears inside the film frame indicators 4 Press the shutter release butt...

Страница 84: ...28 105mm lens and the camera in wide view mode when the lens is set at 28mm the view inside the film frame indicators will be the same as a setting of 42mm When you press the shutter release button p...

Страница 85: ...your original focal length Also when you press the shutter release button partway down the lens will zoom forward to 1 5 times the shortest focal length not to the position from which you started For...

Страница 86: ...ortrait situation you may want to use a larger aperture in order to focus only on the main subject and separate the person from their background A small aperture on the other hand would be preferable...

Страница 87: ...however extends the range which will appear in focus Depth of field also depends on subject distance Without changing lens aperture or focal length in the above case if you move to 6 ft from your subj...

Страница 88: ...ing caused by camera shake For lenses longer than f 50mm a general rule to follow is that 1 f is the slowest usable shutter speed while the camera is being hand held For example if you are using a 135...

Страница 89: ...In horizontal mode the brackets follow the Rule of Thirds a common rule in photographic composition which states that the important components of a picture should be placed near to the intersections o...

Страница 90: ...ough one of the one third dividing lines to give your picture more of a dynamic quality When the camera is held vertically the brackets change to reflect changes in the AF area and in composition whic...

Страница 91: ...ch an AF series flash to 7xi When used with the 7xi these units fire whenever a picture is taken regardless of the exposure mode selected In all exposure modes TTL flash control will operate 3 CARDS R...

Страница 92: ...ic depth control Sports action Portrait Closeup Panning Intervalometer Background priority Multipule exposure Exposure bracketing Flash bracketing Data memory Fantasy efect Automatic program shift Mul...

Страница 93: ...ces and lens barrel but not glass surfaces car be cleaned by wiping with a dry or silicone treated cloth Never use organic solvents to clean the camera Never touch the lens or eyepiece surfaces with y...

Страница 94: ...erring it f r o m a cold environment into a heated building condensation may form inside To prevent condensation place the camera in a sealed plastic bag before transferring it from a cold place to a...

Страница 95: ...h set to MZ W i n d i n g m o t o r problem Camera set to manual focus AZ MZ switch set to MZ Lens is not attached correctly Subject difficult to autofocus Creative Expansion Card in use Card not i n...

Страница 96: ...C for TTL flash metering of built in flash or other dedicated flash unit metering modes honeycomb pattern or spot metering range honeycomb pattern EV 0 20 spot metering EV 3 20 ISO 100 50mm f 1 4 lens...

Страница 97: ...perture priority AE modes stepless 1 8000 to 30 sec with nearest half stop displayed Manual speeds In shutter priority AE and manual modes 1 8000 to 30 sec in 1 2 stop increments plus BULB in manual m...

Страница 98: ...tor aperture exposure compensation display AEL indicator Body data panel displays LCD display with indicators for exposure mode wide local focus area flash mode self timer drive mode frame counter fil...

Страница 99: ...QUICK REFERENCE GUIDE When you want to 98...

Страница 100: ...99...

Страница 101: ...100...

Страница 102: ...101...

Страница 103: ...lta Svenska AB Brannkyrkagatan 64 Box 17074 S 10462 Stockholm 17 Sweden Minolta Corporation Head Office 101 Williams Drive Ramsey New Jersey 07446 U S A Los Angeles Branch 11150 Hope Street Cypress CA...

Отзывы: