background image

USER GUIDE 

14 

Press a letter key according to the list below and press the right or left arrow key to 
adjust the image. 

·


[l]uminance – image brightness 

·


[e]qualization – image sharpness 

·


[r]ed delay – explained below 

·


[g]reen delay– explained below 

·


[b]lue delay– explained below 

Notes: 

(a)


When you press one of the above letters, all three keyboard LEDs blink 
indicating that you are in adjustment mode.  

(b)


While pressing the arrow keys, when you reach the adjustment limits the 
keyboard LEDs stop blinking. 

After making an adjustment, you can press another letter key from the above list to 
make a different adjustment.  

Once you have a satisfactory image, press 

Enter

 twice to save and exit the option. 

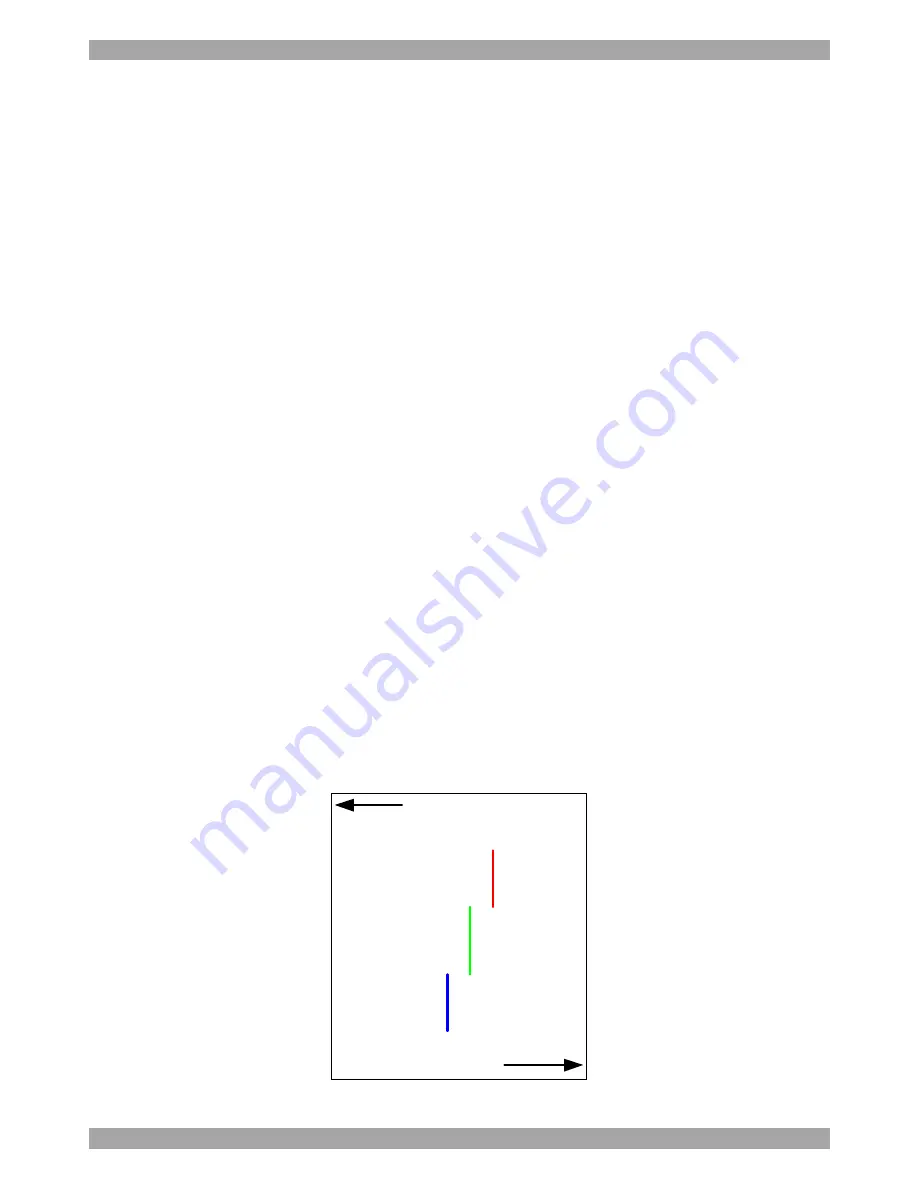
Red, green, blue delay 

When transmitting video over CAT5 cables a horizontal misalignment (skew) 
between the red, green and blue components inevitably occurs. This is because the 
different length of each pair causes the signals to reach the monitor at different 
times. 

To see which signal is slower or faster look at the test card and see which of the 
colors are not aligned. For example in Figure 14, red is the slowest color. You 
would therefore delay green and blue until they align with red.  

Faster

Slower

Red

Green

Blue


Figure 14 RGB signals 

Содержание 1DT50001

Страница 1: ...72 2 535 9666 minicom minicom com North American HQ Linden NJ USA Tel 1 908 486 2100 info usa minicom com European HQ D bendorf Switzerland Tel 41 44 823 8000 info europe minicom com Technical support...

Страница 2: ...ing the Transmitter for an extension application 6 Connecting the Transmitter for a dual control application 7 Connecting the Receiver 9 11 Connecting to the power supply 9 12 Adjusting the picture qu...

Страница 3: ...signed to provide reasonable protection against such interference when operating the equipment in a commercial environment If operation of this equipment in a residential area causes radio frequency i...

Страница 4: ...llows control by local or remote user Full RS 232 data communication up to 57 600 bps Skew compensation for easy video tuning Ideal for digital signage applications 4 System components The KVMS Extend...

Страница 5: ...smitter Link Power Ac tive Locke d MINICOM KVMS Extender Receiver Link Power Activ e Lock ed Computer Transmitter Receiver CAT5 cable 300m 1 000ft KVM Serial KVM Serial KVM Serial Figure 2 KVMS Extend...

Страница 6: ...the front panel of the KVMS Extender Receiver MINICOM KVMS Extender Receiver Link Power Active Locked Figure 5 KVMS Extender Receiver front The LEDs are explained in the table above on page 4 Figure 6...

Страница 7: ...of the Transmitter and Receiver Connecting the Transmitter for an extension application Figure 8 below illustrates both the KVM and Serial connections to the KVMS Extender Transmitter Depending on the...

Страница 8: ...ransmitter Depending on the type of application you have follow the steps now outlined for the KVM and or Serial connections KVM connections 1 Connect a keyboard monitor and mouse to the Transmitter s...

Страница 9: ...to a switched off computer you can connect it to a switched on computer To do so you must connect it in the following order 1 Connect a keyboard monitor and mouse to the Transmitter s Console ports 2...

Страница 10: ...the Transmitter and Receiver and plug into a wall socket 2 Power on the computer The KVMS Extender system transmits the KVM and Serial signals 12 Adjusting the picture quality When necessary you can...

Страница 11: ...itor e g Notepad or Word 3 Press Shift release Shift then press F2 The settings instructions appear see Figure 11 Figure 11 Settings instructions 4 Press F6 to see the current configuration see Figure...

Страница 12: ...both positions 1 Press 0 Text appears showing that you are in the video display mode 2 Press b to have both positions display the video or press c to have only the active station showing the video 3...

Страница 13: ...m Shift to Control or PrintScreen Once changed for every reference in this guide to Shift use the new hotkey 6 Keyboard The system operates with DOS Windows Novell Linux UNIX HP UNIX QNX SGI FreeBSD B...

Страница 14: ...e tuning Press 8 to enter the Video adjustment settings Video Adjustment hotkey Adjust the video quality using the 6 looped preset adjustments Press D until the picture quality is satisfactory Once yo...

Страница 15: ...ment you can press another letter key from the above list to make a different adjustment Once you have a satisfactory image press Enter twice to save and exit the option Red green blue delay When tran...

Страница 16: ...sc The Lock LEDs darken Either position can now take control 15 Upgrading the firmware Periodically Minicom will produce upgrades for both the Transmitter and Receiver firmware The latest upgrades can...

Страница 17: ...ity window appears see Figure 16 Select Transmitter or Receiver here Figure 16 Update Utility window The table below explains the functions of the buttons and boxes Button or Box Function Starts firmw...

Страница 18: ...Download cable is connected the units are powered on and the correct Com port is selected Updating the firmware To update the firmware 1 Check the appropriate box Receiver or Transmitter 2 From the Fi...

Страница 19: ...Below is a summary of the tips found throughout this guide For an extender application Set serial control to be at the remote position Set switching control to be by timeout Set the video display to a...

Страница 20: ...to 40 C 32 F to 104 F Storage temperature 40 C to 70 C 40 F to 158 F Humidity 80 non condensing relative humidity Warranty 3 years Transmitter Receiver Connectors VGA in console HDD15F Keyboard in con...

Страница 21: ...important to help us improve our documentation Please email any comments to ug comments minicom com Please include the following information Guide name part number and version number as appears on th...

Страница 22: ...Kiel Tel 49 431 668 7933 info germany minicom com France Vincennes Tel 33 1 49 57 00 00 info france minicom com Italy Rome Tel 39 06 8209 7902 info italy minicom com England Camberley Tel 44 0 1276 2...

Страница 23: ...USER GUIDE 22...

Отзывы: