OM-363 Page 38
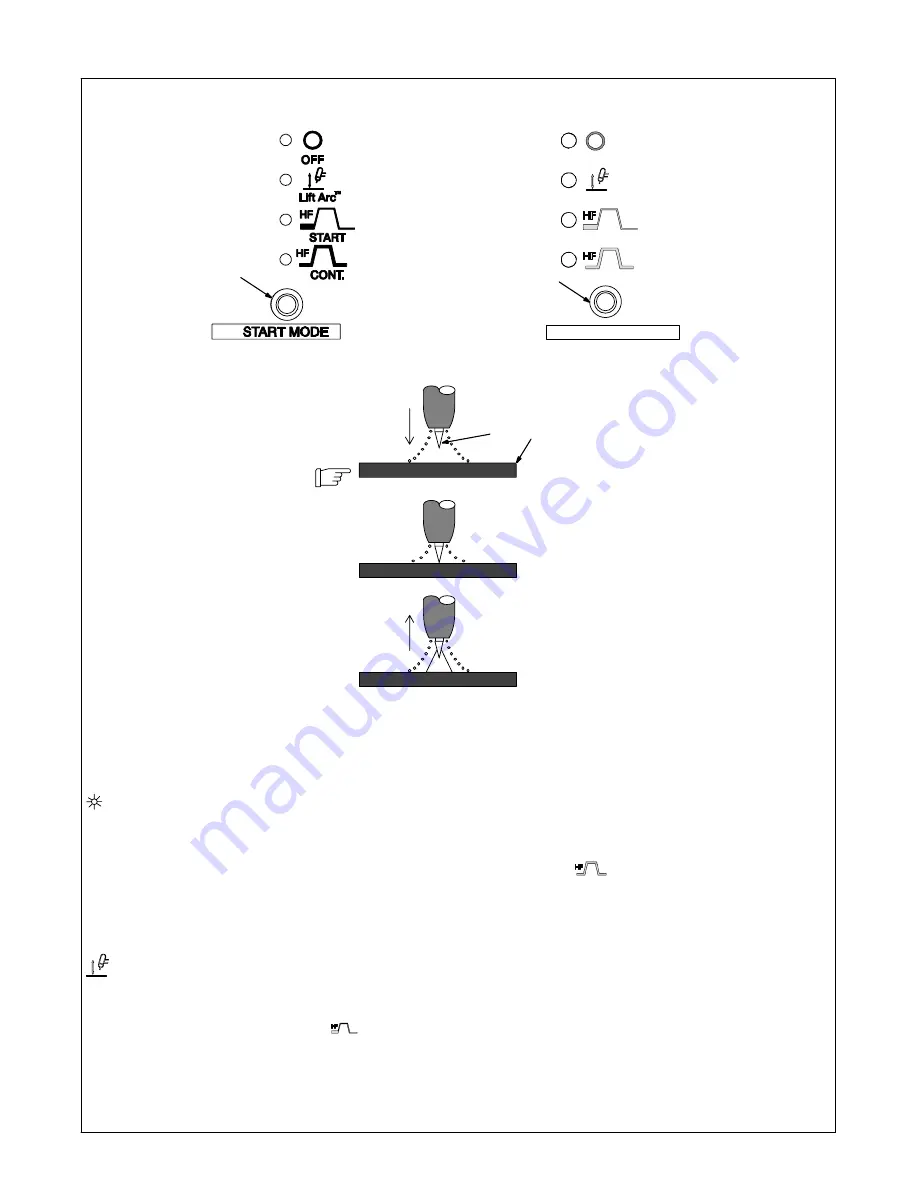
4-9. Start Mode
1
Start Mode
For SMAW welding, press button to toggle
LED to Off position.
For GTAW welding, use control to select
Off for no HF, Lift-Arc
, HF for arc starting
only, or continuous HF.
Application:
When Off is selected, use the scratch
method to start an arc for both the SMAW
and GTAW processes.
When Lift-Arc is selected, start arc as
follows:
2
TIG Electrode
3
Workpiece
Touch tungsten electrode to workpiece at
weld start point, enable output with torch
trigger, foot control, or hand control.
Hold
electrode to workpiece for 1-2 sec-
onds
, and slowly lift electrode. An arc will
form when electrode is lifted.
Shielding gas begins to flow when elec-
trode touches work piece.
Normal open-circuit voltage is not present
before tungsten electrode touches work-
piece, only a low sensing voltage is pres-
ent between electrode and workpiece.
The solid state output contactor does not
energize until after electrode is touching
workpiece. This allows electrode to touch
workpiece without overheating, sticking,
or getting contaminated.
Application:
Lift-Arc is used for the DCEN GTAW pro-
cess when HF Start method is not per-
mitted, or to replace the scratch method.
When HF Start is selected, start arc as
follows:
High frequency turns on to help start arc
when output is enabled. High frequency
turns off when arc is started, and turns on
whenever arc is broken to help restart arc.
Application:
HF Start is used when the DCEN GTAW
process is required.
When HF Continuous is selected, start
arc as follows:
High frequency turns on when output is
energized and remains on for duration of
weld.
Application:
HF Continuous is used when the AC
GTAW process is required.
NOTE:
Lit LED indicates selected mode.
When Output Selector switch position
changes, LED may change position,
based upon last selection.
NOTE:
Some start methods may not be
available for all processes.
2
1
−
2
Seconds
“Touch”
Do NOT Strike Like A Match!
3
Lift-Arc
Start Method
1
(CE Nameplate)
1
Содержание Syncrowave 250 DX
Страница 6: ......
Страница 35: ...ENGLISH OM 363 Page 29 Notes...
Страница 43: ...ENGLISH OM 363 Page 37 CE Nameplate E 2 1 2 3 4...
Страница 47: ...ENGLISH OM 363 Page 41 CE Nameplate 00 4 SEL 1 4 2...
Страница 60: ...OM 363 Page 54 SECTION 7 ELECTRICAL DIAGRAM Figure 7 1 Circuit Diagram For 250 DX Models 231 394 B...
Страница 61: ...ENGLISH OM 363 Page 55 231 395 B Figure 7 2 Circuit Diagram For 350 LX Models...
Страница 62: ...OM 363 Page 56 225 650 A Figure 7 3 Circuit Diagram For Optional Cooler...
Страница 69: ...ENGLISH OM 363 Page 63 Notes...
Страница 80: ...Notes...


