background image


User Manual


12 


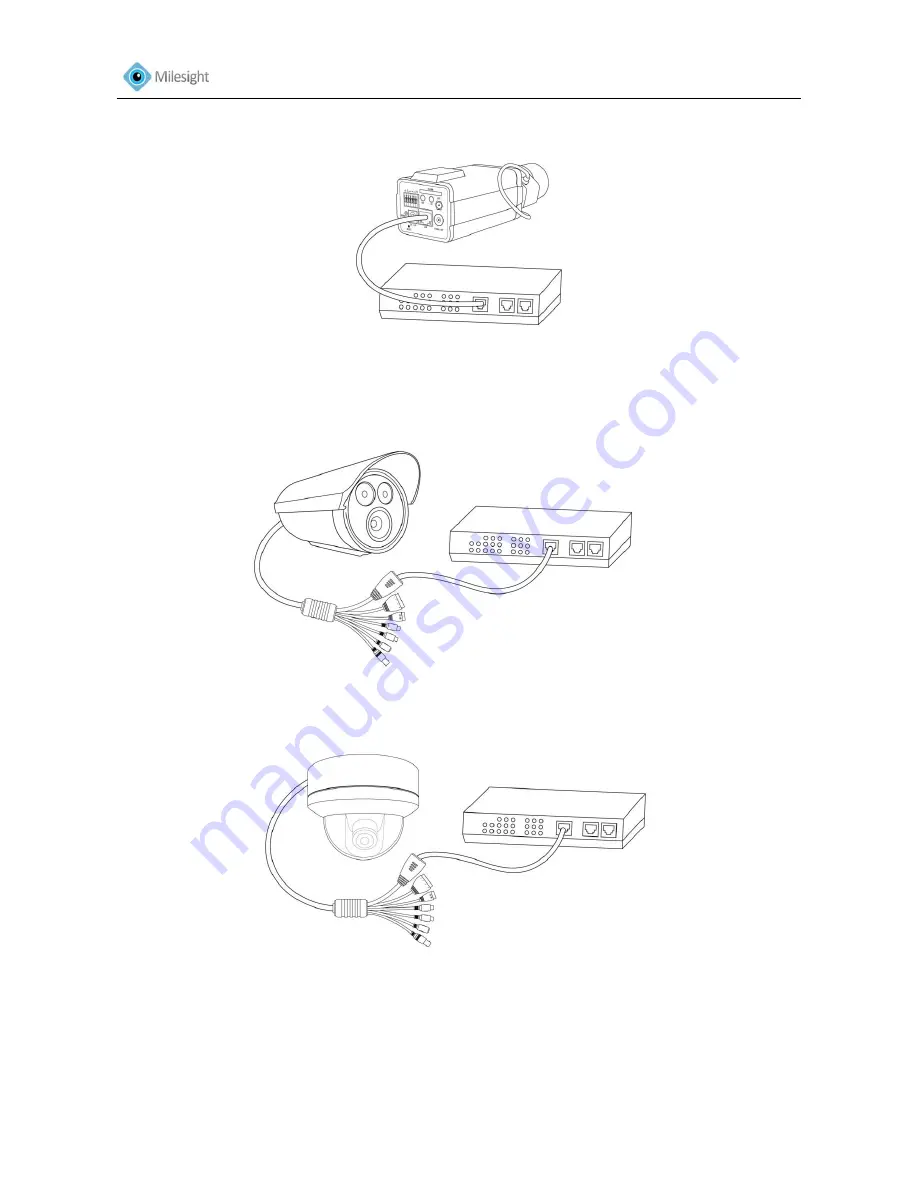
Figure 1-10 Box Camera 


Figure 1-11 Bullet Camera 


Figure 1-12 Dome Camera 

B.


Connect the camera to a non-PoE switch using the PoE injector   

Step 1: Connect the camera to a PoE injector using an Ethernet cable. 
Step 2: Connect the PoE injector to the non-PoE switch using an Ethernet cable. 
Step 3: Connect the PoE injector to a power outlet. 

Содержание MS-C2351-P

Страница 1: ...Version V3 01...

Страница 2: ...S C2351 P MW MS C2451 P MW 2MP MS C3651 P MW MS C3351 P MW 3MP MS C3656 P MW MS C3356 P MW 5MP MS C3658 P MW IR Bullet Camera 1 3MP MS C2661 PM MS C2662 PM MS C2361 PM MS C2362 PM 2MP MS C3661 PM MS C...

Страница 3: ...e Do not touch components such as heat sinks power regulators and processors which may be hot Source with DC 12V or PoE Please make sure the plug is firmly inserted into the power socket When the prod...

Страница 4: ...e availability of shipping containers for future transportation Environmental Protection Please recycle this device in a responsible manner Refer to local environmental regulations for proper recyclin...

Страница 5: ...the Network Camera 18 3 1 Assigning An IP Address 18 3 1 1 Assigning An IP Address Using IPCTools 18 3 1 2 Assign An IP Address Manually 22 3 2 Accessing from the Web Browser 24 3 2 1 Access over IE B...

Страница 6: ...User Manual 5 4 4 System 45 4 5 Maintenance 46 Chapter V Services 48...

Страница 7: ...either work independently in the local or be networked to form a powerful safety monitoring system It is widely used in fields such as finance education industrial civil defense health care for secur...

Страница 8: ...o factory default 3 The network camera provides a general I O terminal block which is used to connect external input output devices Please refer to the following instruction for the connection method...

Страница 9: ...User Manual 8 Figure1 2 2 Bullet Camera Figure 1 3 IR LED Light Sensor LENs Power Connector DC 12V Video Output RS 485 PTZ control Alarm Input Output Ethernet Port Audio Output Audio Input...

Страница 10: ...ck which is used to connect external input output devices Please refer to the following instruction for the connection method Figure 1 4 3 Dome Camera Figure 1 5 Video Output Power Connector DC 12V Au...

Страница 11: ...e connection method Figure 1 6 1 4 Hardware Installation 1 Connect the camera to the network and power using one of the methods listed below 1 Basic connection without PoE Step 1 connect the DC 12V en...

Страница 12: ...era 2 Power over Ethernet PoE connection PoE will be automatically detected when the Ethernet cable is connected The camera can either be connected to a PoE enabled switch or a non PoE switch A Connec...

Страница 13: ...2 Dome Camera B Connect the camera to a non PoE switch using the PoE injector Step 1 Connect the camera to a PoE injector using an Ethernet cable Step 2 Connect the PoE injector to the non PoE switch...

Страница 14: ...era The power LED will light steady red when the camera is connected to a power source 2 Optionally connect external input output devices such as alarm devices 3 Optionally connect an active speaker o...

Страница 15: ...14 1 5 System Requirements OS Windows XP 7 Vista Server 2000 Server 2008 Please use IE browser to operate CPU 1 66GHz or higher Memory 1G MB or higher Graphic memory 128MB or more Internet protocol T...

Страница 16: ...mpatible with its LAN 2 1 1 Connect the camera to the PC directly In this method only the computer connected to the camera will be able to view the camera The camera must be assigned a compatible IP a...

Страница 17: ...e network camera with static IP directly Connecting the network camera via a router Steps 1 Connect the network camera to the router 2 Assign a LAN IP address the subnet mask and the gateway 3 Save th...

Страница 18: ...and 554 ports The steps for port mapping vary depending on different routers Please call the router manufacturer for assistance with port mapping 4 Apply a domain name from a domain name provider 5 Co...

Страница 19: ...ing An IP Address Using IPCTools IPCTools is a software tool which can automatically detect multiple online Milesight network cameras connected in the LAN set IP addresses and manage firmware upgrades...

Страница 20: ...User Manual 19 Figure 3 2 Select single camera Figure 3 3 Select multiple cameras Step 4 Type the User Name and Password if they are not default value...

Страница 21: ...User Manual 20 Figure 3 4 Step 5 Change the IP address or other network values and then click Modify button Figure 3 5 Step 6 Change the IP address successfully...

Страница 22: ...User Manual 21 Figure 3 6 Step 7 By double clicking the selected camera you can access the camera via web browser directly The Internet Explorer window will pop up Figure 3 7...

Страница 23: ...t a Start Control Panel Network and Internet Connection Network Connection Local Area Connection and double click it See Figure 3 8 Figure 3 8 b Click Advanced and then click IP settings IP address Ad...

Страница 24: ...Step 2 Start the IE browser In the address bar enter the default IP address of the camera http 192 168 5 190 Step 3 Enter the user name and password when the login page appears Default user name admi...

Страница 25: ...etwork Settings page appears Shown as Figure 3 11 Figure 3 11 Step 5 Change the IP address or other network values Then click Save button Step 6 The change of default IP address is completed 3 2 Acces...

Страница 26: ...controls please click Click here to download and install controls manually as Figure 3 12 Figure 3 12 Follow the prompts to install the controls when it s finished it will pop out a window as Figure...

Страница 27: ...User Manual 26 Figure 3 14 Step 2 Select Security Trusted sites...

Страница 28: ...User Manual 27 Figure 3 15 Step 3 Enter the IP address of the camera in the blank and click Add...

Страница 29: ...browser you must install IE Tab on your Firefox first Please do as follows Click Tools Add ons and search IE Tab then install As Figure 3 17 Figure 3 17 Restart the Firefox when the installation is do...

Страница 30: ...camera web GUI as with IE browser Note If you change the IP address of the device please add the new URL in the IE Tab Sites Filter After logging on IP camera s web GUI successfully user is allowed t...

Страница 31: ...tivities such as viewing live video searching through recordings and exporting videos and snapshots It s able to integrate with other devices through ONVIF and you can connect up to 64 cameras It is d...

Страница 32: ...ption 1 PTZ Control Navigation key is used to control the direction The rotation key is used for auto rotation 2 ZOOM Adjust the focal length of the lens 3 Focus Adjust focus of the lens 4 PTZ Speed P...

Страница 33: ...d path Default path is C VMS 1 MS_Record Click again to stop recording 11 Saving Path Settings Set the saving path for capture and recording 12 Play Audio Enable Audio Input output It can also be set...

Страница 34: ...kbox to display date on the image Date Position Date display position on the image Date Format The format of date Figure 4 3 Primary Stream Settings Video Codec H 264 MPEG 4 MJPEG available Frame Size...

Страница 35: ...PEG 4 MJPEG available Frame Size The optional resolutions of the secondary stream depend on the Codec of the primary stream and the secondary stream Maximum Frame Rate Maximum refresh frame rate of pe...

Страница 36: ...100 for 50HZ or 1 5 1 120 for 60HZ IR CUT Mode Select Day Night Auto Customize mode Day and night will auto switch under auto mode Figure 4 6 Advanced Settings Local Display Video Off Switch off the V...

Страница 37: ...ere is audio input or play the configured audio when an alarm occurs Figure 4 7 Audio Enable Audio Check the checkbox to enable audio feature Audio Mode Enable audio input output Input Gain Input audi...

Страница 38: ...n port RTSP Port Port to connect Network Camera via RTSP protocol ONVIF PORT Port to connect Network Camera via ONVIF protocol 4 2 5 Wi Fi Figure 4 10 WI FI Settings Enable WI FI Check the checkbox to...

Страница 39: ...me Synchronize with computer time Synchronize the time with your computer NTP server Synchronize the time with configured SNTP server and selected time zone Manual Set the system time Manually 4 3 Adv...

Страница 40: ...count 4 3 2 SMTP Alarm video files can be sent to specific mail account through SMTP server You must configure the SMTP settings correctly before using it Figure 4 13 SMTP User Name The sender s name...

Страница 41: ...log on the FTP sever Password User password FTP Folder Name Path where video will be uploaded to on the FTP server 4 3 4 Alarm Figure 4 15 Alarm Event Enable Alarm Check the checkbox to enable alarm...

Страница 42: ...into the SD card inserted External Output Output a level signal when an alarm is triggered Play Audio Play specific audio file when an alarm is triggered Note External Output and Play Audio functions...

Страница 43: ...ave video files to your desired location Note Files are visible once SD card is inserted Don t insert or plug out SD card when power on Figure 4 18 SD Card Format Format the SD card UnMount Unmount th...

Страница 44: ...o recording Figure 4 19 4 3 7 PTZ Figure 4 20 PTZ Settings Protocol Select the PTZ protocol your camera support Baudrate Select the Baudrate from the drop down menu Baud rate is the number of distinct...

Страница 45: ...add or delete users the default user admin cannot be deleted Operator An operator can manage all configuration pages except the User page Viewer A viewer can t change any settings 4 3 9 Access List F...

Страница 46: ...r type Access or restrict access IPv4 access list The IP address to access or restrict access 4 3 10 Logs The logs contain the information about the time and IP that has accessed the camera through we...

Страница 47: ...be upgraded MAC Address Media Access Control address System Up Time Since The elapsed time since the device was last restarted 4 5 Maintenance The software can be upgraded by the following steps 1 Bro...

Страница 48: ...Version The software version of the camera Firmware File Select the firmware used to upgrade Maintenance Restart the device Click restart button to restart the device immediately Restore settings exc...

Страница 49: ...cal support Distributors and resellers can contact directly with Milesight for technical support Technical Support Mailbox support Milesight com Web http www milesight com Online Problem Submission Sy...

Отзывы: