background image

Adjusting the interior fittings

85

Removing or moving the door
shelves

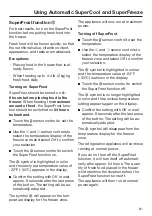
Only move or remove the door
shelves when they are empty.

Hold the shelf on the frame with both
hands and lift it slightly so that it can
be lifted with the catches on both
sides over the guide.

Remove the shelf or place it in the re-
quired position with the catches in
the guides at the same height again.

Make sure that the shelf is straight.

Tip: 

For the purposes of loading and

unloading or cleaning, the clip-in con-
tainers in the shelves can be removed
from their holders completely.

Removing or moving the
shelves

Hold the shelf on both sides and raise
it slightly so that it can be lifted with
the catches over the guide at the
back.

Pull the shelf forward.

Remove the shelf or place it in the re-
quired position, with the catches en-
gaged at the back.

Make sure that the shelf is straight.

Содержание KF 2982 SF

Страница 1: ...Operating and Installation Instructions Fridge freezer Combination To prevent accidents and machine damage read these instructions before installation or use en US CA M Nr 11 508 700 ...

Страница 2: ...6 Before starting 26 Tools required 26 Aligning the installation niche 27 Checking the installation niche 27 Before installation 28 Preparing the installation niche 29 Pushing the appliance into the niche 31 Aligning the refrigeration appliance 33 Securing the appliance in the niche 35 Securing the toe kick board and cover 36 Aligning the appliance doors 37 Limiting the opening angle of the applia...

Страница 3: ...tings to their default settings 70 Switching Vacation mode on or off 72 Switching Sabbath Mode on or off 73 Switching on switching off or resetting the Water Filter Display 74 Switching on switching off or resetting the Display Active AirClean Filter 76 The correct temperature 78 in the fridge zone and in the MasterFresh zone 78 Automatic cold air circulation DynaCool 78 in the Freezer Zone 79 Set...

Страница 4: ... food 97 Home freezing 97 Before placing food in the freezer 98 Placing food in the freezer 99 Making ice cubes 101 Automatic defrosting 103 Cleaning and care 104 Cleaning agents 104 Before cleaning the appliance 105 Interior and accessories 105 Cleaning the door seal 106 Cleaning the ventilation gaps 106 Cleaning the water filter IntensiveClear 2 0 mesh filter see Optional acces sories 107 Replac...

Страница 5: ...Contents 5 Appliance warranty and product registration 128 Declaration of conformity 129 Copyrights and licenses 130 ...

Страница 6: ...e expressly and strongly advises that you read and follow the instructions in the chapter on installing the refrigeration appliance as well as the IMPORTANT SAFETY INSTRUCTIONS Miele cannot be held liable for injury or damage caused by non compliance with these instructions Keep these instructions in a safe place and pass them on to any future owner Risk of injury and damage due to tipping refrige...

Страница 7: ...rous This refrigeration appliance is not suitable for storing and keeping cool medicines blood plasma laboratory preparations or other simi lar substances or products that are subject to the Medical Device Di rective Incorrect use of the refrigeration appliance for such purposes may cause deterioration of the items stored The refrigeration appli ance is also not suitable for use in areas where the...

Страница 8: ...appliance Risk of death Please bear in mind that by removing the dividing panel in the large freezer basket children may be tempted to climb inside The door hinges can cause injury Keep children well away at all times Ensure that any packing material is disposed of safely and kept out of the reach of children DANGER of suffocation ...

Страница 9: ...s not affect the performance of the refrigeration appliance When transporting and installing the refrigeration appliance ensure that no parts of the cooling circuit are damaged Splashes of coolant can damage the eyes In the event of damage Avoid open flames or anything which creates a spark Disconnect the refrigeration appliance from the power supply Ventilate the room where the refrigeration appl...

Страница 10: ...ccessible so that the appliance can be quickly discon nected from the electrical supply in case of an emergency If the power cord supplied is damaged it must only be replaced by an original part to prevent a hazard for the user Miele can only guarantee the safety of the appliance when original Miele parts are used The electrical outlet must be properly grounded Do not connect the appliance to the ...

Страница 11: ...ter connection can cause considerable danger for the user Installation maintenance and repairs installation work on the fresh water connection and all repairs on the ice water outlet must only ever be carried out by a Miele authorized technician Any manufacturer s warranty will be void if the appliance is not re paired by a Miele approved service technician Faulty components must only be replaced ...

Страница 12: ...o nents as this could cause stress cracks or break the plastic Risk of fire and explosion Do not store any explosive materials or products containing flammable propellants e g spray cans in the appliance Electrical components can cause flammable mixes of gases to ignite Risk of explosion Do not operate any electrical equipment e g an electric ice cream maker inside the refrigeration appliance Risk...

Страница 13: ...ored food there is a danger of food poisoning Storage times will depend on several factors including the freshness and quality of the food as well as the temperature at which it is stored Observe the manufacturer s use by dates and storage in structions Use only genuine original Miele parts If parts or accessories from other manufacturers are used the warranty may become invalid Stainless steel ma...

Страница 14: ...ot use sharp edged or pointed objects to remove frost or ice separate frozen foods or remove ice trays Never place electric heaters or candles in the appliance to defrost it These can damage the plastic parts Do not use defrosting sprays or de icers as they could contain substances which could damage the plastic parts or which might cause the build up of gases and pose a danger to health Transport...

Страница 15: ...spose of them separately from the appliance Ensure that the appliance is not stored in the vicinity of gasoline or inflammable gases and liquids during and after disposal Make sure that the coolant pipework is not damaged during dis posal to avoid uncontrolled leakage of oil and coolant see data plate for coolant type Splashes of coolant can cause damage to the eyes Be careful not to damage any pa...

Страница 16: ...lth and to the environment if disposed of with general waste or if handled incorrectly Please do not therefore dispose of your old appliance with general waste Instead please make use of officially designated collection and disposal points to dispose of and recycle electri cal and electronic appliances By law you are solely responsible for deleting any personal data from the appliance prior to dis...

Страница 17: ...ance Do not plug in other appliances be hind the refrigeration appliance If installation near a heat source is un avoidable observe the following mini mum distances between the appliance and the heat source At least 1 1 4 3 cm to electric or gas stoves At least 11 3 4 30 cm to oil or coal based stoves If it is not possible to observe these minimum distances an isolation plate must be installed bet...

Страница 18: ...g and installation instruc tions Installation notes Risk of damage and injury due to the refrigeration appliance tipping over This refrigeration appliance is very heavy and can tip forwards when the appliance door s is are open Keep the appliance door s shut until the refrigeration appliance has been built in and secured in its housing in accordance with these operating and installation instructio...

Страница 19: ...cessary seek the advice of an architect or con struction expert When fully loaded the weight of the re frigeration appliance is approx KF 2982 SF 1223 lbs 555 kg Ventilation Risk of fire and damage due to insufficient ventilation If the refrigeration appliance is not ventilated sufficiently the compres sor will run more frequently and for longer periods This causes increased energy con sumption an...

Страница 20: ...ther you must take into account the thick ness of the cabinet fronts and door handles so that the appliance doors do not collide and become damaged if they are opened at the same time The refrigeration appliances are secured individually in their installation niche us ing the supplied installation material If the partition wall a is narrower than 6 5 16 160 mm you will need the side panel heater f...

Страница 21: ...st also comply with the applicable regulations in the respec tive country The appliance may only be con nected to the plumbed water connec tion by qualified technicians The quality of the incoming water must conform to the requirements for drinking water in the country where the refrigeration appliance is being used Connect the water hose to the fresh water supply and avoid connection to a water s...

Страница 22: ...ections The electrical connection must not be positioned higher than 9 228 mm above the floor The 1 4 6 mm plumbed water connection should not be positioned higher than 2 50 mm above the floor The electrical socket must not be concealed behind the appliance and must be easily accessible in an emergency ...

Страница 23: ...Installation INSTALLATION 23 A B C D A B C D 84 85 3 16 2134 2164 mm 36 915 mm 24 610 mm 3 4 19 mm ...

Страница 24: ...Installation INSTALLATION 24 1 3 16 30 mm 7 8 22 mm 9 5 8 244 mm 4 102 mm 4 102 mm 3 3 8 85 mm Side view ...

Страница 25: ...Installation INSTALLATION 25 Dimensions with appliance doors open opening angle 90 115 3 8 9 5 mm 9 1 4 234 mm A B 20 7 8 530 mm A B Cabinet front Door handle ...

Страница 26: ...ed in its housing in accordance with the operating and installation in structions The appliance is both large and heavy Installation must be carried out by two people The appliance must be installed in ac cordance with local regulations If local regulations are not available the follow ing regulations must be observed in the USA the National Electric Code ANSI NFPA 70 latest edition State and Muni...

Страница 27: ...ncealed behind the appliance and must be easily accessible in an emergency Check the position of the plumbed water connection The faucet must not be concealed behind the appliance and must be easily accessible in an emergency Check the surroundings for possible collisions see Installation Dimen sions with appliance door open Only install the refrigeration appliance in stable solid installation nic...

Страница 28: ...iance tipping over As soon as you unscrew the brack ets that fix the refrigeration appliance to the pallet the appliance is no longer secured Due to its weight and size the refrig eration appliance must be installed by two people Unscrew the fixing brackets With the help of several people as re quired carefully lift the refrigeration appliance from the pallet starting with the back of the applianc...

Страница 29: ...geration appli ance The plastic bags supplied are marked with letters for easy identifica tion When performing the individual as sembly steps observe the letters specified and use the matching plas tic bag with the required installation equipment The anti tip brackets prevent the refrig eration appliance from tipping The anti tip brackets are also used to fix the installation niche securely to the...

Страница 30: ...ust not exceed 5 16 8 mm 2 2 Make sure that the gap between the refrigeration appliance s rear wall and the installation niche does not exceed 2 51 mm Place a wooden wedge behind the anti tip brackets if necessary While holding the anti tip brackets in place mark the necessary drill holes on the rear wall of the installation niche Retaining screws for different uses and types of material are suppl...

Страница 31: ...water connec tions If you are installing several refrigera tion appliances side by side now se cure the appliances to one another see the installation instructions for the side by side installation kit To ensure that the refrigeration appli ance can then be aligned correctly the toe kick ventilation grille must be removed from the appliance toe kick Carefully guide a flat head screw driver through...

Страница 32: ... you install appliances side by side each refrigeration appliance must have its own separate electrical socket Tip Secure the power cord to prevent it becoming caught tie a piece of string to the middle of the power cord and as the refrigeration appliance is being pushed into the niche pull the cord for ward underneath the appliance Carefully push the refrigeration appli ance into the niche If the...

Страница 33: ...front and back of the appliance can all be ad justed from the front of the appliance Risk of damage due to incorrect feet adjustment You may damage the adjustable feet if you use a cordless screwdriver Always adjust the front and rear feet by hand Position the supplied spacers on both sides on the markings next to the adjustable feet at the front of the appliance ...

Страница 34: ...e feet alternating between the left and right feet Unscrew the adjustable feet and on both sides at least until the marking on the toe kick is aligned with the required 1 1 4 32 mm on the spacer The standard dimen sion of 1 1 4 32 mm relates to a niche height of 84 2 134 mm It is important to adjust the feet to a height of at least 1 1 4 32 mm so that the ventilation of the refrigeration appliance...

Страница 35: ...he toe kick is aligned to a maximum of 2 7 16 62 mm max niche height of 85 3 16 2 164 mm Use a level to check the alignment of the appliance Securing the appliance in the niche Use the screws supplied to secure the refrigeration appliance on both sides In a side by side combination only the external panels of the two appli ances can be secured to the cabinet wall ...

Страница 36: ...r appli ance door from the inside Securing the toe kick board and cover Remove the film from the adhesive strips on the toe kick cover pro vided Secure the toe kick cover to the toe kick board Click the toe kick board onto the bottom of the appliance toe kick ...

Страница 37: ...aps to the adja cent cabinet fronts If necessary use the spacers pro vided and place them at the top of the appliance doors on both sides Loosen the screws on the fixing brackets slightly Remove the covers from both sides of the top and bottom appli ance door Slightly loosen the screws in the angle trims on both sides of the top and bottom appliance door ...

Страница 38: ...f the top appliance door Remove the nuts and washers from the threaded bolts of the top and bottom appliance door Align the height and sides of the ap pliance doors using the threaded bolts If necessary also align the depth of the appliance doors via the gaps in the angle trims ...

Страница 39: ...or and adjacent cabinetry fronts again Then re tighten all screws and Place the washers and nuts back on the threaded bolts and tighten the nuts The appliance doors are now secured Reattach covers and Place the covers provided on the fixing brackets Remove the spacers from the ap pliance door ...

Страница 40: ... en able the appliance door to be opened wide If for example the appliance door hits an adjacent wall when it is opened you should limit the opening angle of the appliance door to 90 Open the appliance door Insert the pin into the lower hinge from above This will limit the opening angle of the appliance door to 90 ...

Страница 41: ...s in the country where the appli ance is being installed All appliances and systems used to supply water to the refrigeration appliance must also comply with the applicable regula tions in the respective country The appliance is only suitable for connection to a cold water line which is directly connected to the water supply in order to ensure that water is circulated in the cold water line Avoid ...

Страница 42: ...y this time the installation niche should already have been prepared so that the appliance needs only to be pushed into it When installing the water hose make sure that it is neither kinked nor dam aged Position the appliance slightly in front of the installation niche so that the faucet can still be accessed 2 The water connection of the refrigera tion appliance is ready for connec tion at the re...

Страница 43: ...he power supply This allows coolant and refriger ator oil to settle in accordance with reg ulations Ensure that the voltage of the power supply corresponds with the connection voltage of the appliance A power sup ply of 110 120 V 60 Hz and 10 16 Amp which is protected by a power switch or a fuse is required to operate the appliance The manufacturer recommends operat ing the appliance on a dedicate...

Страница 44: ...t behind this appliance Do not connect the appliance to a stand alone inverter such as those used with an autonomous energy source e g solar power When the appliance is turned on power surges could result in a safety switch off This can damage the electronics The appliance must not be used with so called energy saving devices ei ther These reduce the amount of en ergy supplied to the appliance cau...

Страница 45: ...t source radiator oven Where the ideal room tem perature is approx 68 F 20 C Where the ambient room temperature is above 77 F 25 C Air vents uncovered and dusted regularly Where the ventilation open ings are blocked and full of dust Temperature setting 39 F to 41 F 4 C to 5 C in the refrigerator section The lower the temperature in the appliance the higher the energy consumption Dry compartment in...

Страница 46: ...ppliance as soon as possible Replace any food removed as quickly as possible be fore it warms up too much Allow hot food and drinks to cool down before placing them in the appliance Hot food or food at room temperature raises the tem perature inside the refrigera tion appliance The appli ance will try to cool down and the compressor will run for longer periods Store food well packaged or covered T...

Страница 47: ...7 a Automatic door opening Push2open Pull2open b Display c On Off switch d Interior lighting e Shelves f Holder for the Active AirClean filter g Door shelves in the appliance door h Hanging drawer for storing small food items ...

Страница 48: ...tment with moisture regulator for fruit and vegeta bles k Dry compartment with low temperature for food which goes off quickly l Ice maker m Freezer baskets n Ice cube container o Water filter The dry compartment in the MasterFresh zone fulfills the requirements of a cold storage compartment according to EN ISO 15502 ...

Страница 49: ...et temperature for the refrigerator section c Sensor control for setting the temperature d Display for Miele home connection status only visible when Miele home has been set up e SuperFrost display only visible when the SuperFrost function has been switched on f Temperature display target temperature for the freezer section g Sensor control for adjusting various settings in Settings mode ...

Страница 50: ...eypad Lock Switch on or off see Selecting additional settings Eco Mode Switch on or off see Selecting additional settings Self Test The system restarts and is checked for faults or malfunctions see Selecting additional settings Condensation Pro tection Switch on or off see Selecting additional settings Door Assistant Switch on Push2Open or Pull2Open or switch off see Selecting additional settings ...

Страница 51: ...witch on or off see Selecting additional settings Water Filter Display Switch on or off or reset see Selecting additional settings Display Active Air Clean Filter Switch on or off or reset see Selecting additional settings Symbols in settings mode Scroll in settings mode or select a setting Change a setting e g display brightness OK Confirm a setting Exit the menu level ...

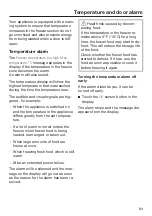
Страница 52: ... stainless steel look ensures a uniform stainless steel appearance Optional accessories A range of useful Miele accessories and care products are available for your ap pliance Active AirClean filters See Accessories supplied for a de scription Water filter IntensiveClear 2 0 mesh filter The IntensiveClear 2 0 mesh filter filters supply water for making ice cubes If an external water filter is atta...

Страница 53: ...Accessories 53 Accessories are available to order via the Miele Webstore from Miele di rectly see back cover for contact de tails or from your Miele dealer ...

Страница 54: ...r could get trapped and sustain dam age There is also a risk of damage to the cabinet front of the right fridge zone door Fold up the door pillar before you close the left fridge zone door Cleaning Please refer to the relevant instruc tions in Cleaning and care Clean the inside of the appliance and the accessories Choosing the right Door Assistant Push2Open Pull2Open The Door Assistant helps you t...

Страница 55: ... text in or above the temperature display can only be displayed Settings mode In Settings mode you can select different refrigeration appliance func tions and alter their settings to some extent see Selecting additional set tings Touch the sensor control to open Settings mode Use the and sensor controls to select the function for which you wish to adjust the settings Confirm your selection with OK...

Страница 56: ...e Temperature Unit C degrees Celsius or F degrees Fahrenheit Set up Miele home Select Continue if you wish to set up Miele home now to do this follow the instructions under Selecting ad ditional settings Miele home Select Skip if you would prefer to set up Miele home later Use the and sensor controls to select the right setting and select OK to confirm your selection Touch the sensor control if yo...

Страница 57: ...The message disappears from the dis play and the alarm tone stops However the message may reappear on the display after a brief delay As soon as the selected temperature has been reached in the freezer zone the message will disappear completely from the display and the alarm tone will stop To enable the temperature to get suf ficiently cold inside the refrigeration appliance allow the appliance to...

Страница 58: ...et in the water supply line approx 3 hours before switching off the appliance to avoid the build up of bacteria caused by stagnant water Empty the ice cube container Clean the refrigeration appliance Replace the water filter Intensive Clear 2 0 charcoal filter or clean the water filter IntensiveClear 2 0 mesh filter Leave the door ajar to air the refriger ation appliance and avoid odors building u...

Страница 59: ...ntentional adjustments in Set tings mode In Settings mode use the and sensor controls to select Keypad Lock and select OK to confirm your selection Use the and sensor controls to switch the sensor lock On or Off and select OK to confirm your selection The keypad lock will not be activated until you close the appliance door Nothing will appear on the display to in dicate that the keypad lock is swi...

Страница 60: ...Only the changed temperatures in the display indicate that Eco Mode is switched on Tip You can also switch off the Eco Mode function by directly adjusting the temperature see The correct tem perature Setting the temperature Health risk caused by decom posing food Storing food at a temperature higher than 0 F 18 C in the freezer zone for an extended period of time may impair the storage life and qu...

Страница 61: ... the display if the Self Test does not discover any faults or mal functions If the Self Test does discover any faults or malfunctions they are indi cated as error messages on the dis play An alarm will also sound If you find the alarm disruptive you can switch it off in advance by touch ing the sensor control Make a note of the error message s displayed Contact Miele Service and inform them of the...

Страница 62: ...wo Door Assistants Push2Open and Pull2Open The default Door Assistant is Push2Open The Push2Open Door Assistant is suit able for cabinet fronts without handles The door will then open automatically when you gently press against it The Pull2Open Door Assistant is suitable for cabinet fronts with handles The ap pliance door can be opened easily with little force Risk of damage if the appliance door ...

Страница 63: ...t OK to confirm your selection Use the and sensor controls to select Push2Open and select OK to confirm your selection Touch the sensor control to return to the previous menu level Adjusting the intensity You can also adjust the intensity of the Push2Open function The lower the set intensity the less force required when you push against the appliance door In Settings mode use the and sensor contro...

Страница 64: ... OK to confirm your selection Use the and sensor controls to select Pull2Open and select OK to confirm your selection Touch the sensor control to return to the previous menu level Adjusting the intensity You can also adjust the intensity of the Pull2Open function The lower the set in tensity the less force required when you pull the appliance door In Settings mode use the and sensor controls to se...

Страница 65: ...ance to your WiFi network will increase en ergy consumption even when the ap pliance is switched off Make sure that the signal of your WiFi network is sufficiently strong in the place where you want to set up your refrigeration appliance Availability of the WiFi connection The WiFi connection shares a frequency range with other appliances including microwave ovens and remote control toys This can ...

Страница 66: ...f your serial number is 78000001 for example your password will be 78000001 In Settings mode use the and sensor controls to select Miele home and select OK to confirm your selection Set up will appear on the display Confirm your selection with OK Use the and sensor controls to select via the App and select OK to confirm your selection Open the Miele mobile app and fol low the instructions in the a...

Страница 67: ...process with OK again If the WLAN connection is active will appear on the display Deactivating Miele home In Settings mode use the and sensor controls to select Miele home and select OK to confirm your selection Use the and sensor controls to select Deactivate and select OK to confirm your selection Deactivation successful will appear on the display Confirm the message with OK Your refrigeration a...

Страница 68: ...ls to select Miele home and select OK to confirm your selection Use the and sensor controls to select Set up again and select OK to confirm your selection Reset configuration will appear on the display Use the and sensor controls to select Yes or No and select OK to confirm your selection Resetting the network configuration Reset the refrigeration appliance s set tings to the default settings when...

Страница 69: ...tting will show on the display In Settings mode use the and sensor controls to select Demo Mode and select OK to confirm your selection Press OK for 4 seconds to deactivate will appear on the display Follow the instructions on the display The countdown Demo Mode will deacti vate in seconds appears on the display Demo Mode deactivated The appliance will cool down will appear on the display Confirm ...

Страница 70: ...network configuration so that all personal data is deleted from the refrigeration appliance This will also ensure that a previous owner is no longer able to access the refrigeration appliance In Settings mode use the and sensor controls to select Factory Default and select OK to confirm your selection Use the and sensor controls to select Reset and select OK to confirm your selection After a brief...

Страница 71: ...ne Average value 4 of 7 segments F C Temperature Unit Fahrenheit Keypad Lock Switched off Eco Mode Switched off Condensation Protection Switched off Door Assistant Push2open Miele home Switched off Vacation Switched off Dispenser Unit Switched on Sabbath Mode Switched off Water Filter Display Switched on Display Active AirClean Filter Switched on Temperature in the fridge zone 39 F 4 C Temperature...

Страница 72: ...so saving energy If the Automatic SuperCool function is turned on this will be turned off when Vacation mode is selected Please note that the temperature in the dry compartment in the Master Fresh zone also increases accord ingly when Vacation mode is switched on The freezer zone remains switched on at the previously set temperature and the SuperFrost function can still be selected Ice cube produc...

Страница 73: ...ear from the temperature display for the fridge zone Switching Sabbath Mode on or off The refrigeration appliance has a Sab bath Mode to support the observance of religious customs When Sabbath Mode is switched on you cannot make any settings on your refrigeration appliance Ensure that the appliance door is properly closed as visual and audible alarms are switched off in Sabbath Mode In Settings m...

Страница 74: ...g the Water Filter Dis play Depending on the quantity of ice cubes produced the Water Filter Display will re mind you approx every 6 months that the IntensiveClear 2 0 charcoal filter needs to be changed Replace the water filter will appear on the display See Water filter Replacing the water filter for instructions on how to replace the IntensiveClear 2 0 charcoal filter The first time the Intensi...

Страница 75: ...lso use an IntensiveClear 2 0 mesh filter in place of the Intensive Clear 2 0 charcoal filter see Acces sories Optional accessories In Settings mode use the and sensor controls to select the Water Filter Display and select OK to confirm your selection Use the and sensor controls to select Off and select OK to confirm your selection The Water Filter Display has been switched off Resetting the Water...

Страница 76: ...play Active Air Clean Filter If the Display Active AirClean Filter has been switched off once it must be switched on again if required In Settings mode use the and sensor controls to select the Display Active AirClean Filter and select OK to confirm your selection Use the and sensor controls to select On and select OK to confirm your selection The Display Active AirClean Filter has been switched o...

Страница 77: ... you do not reset the display it ap pears again and again In Settings mode use the and sensor controls to select the Display Active AirClean Filter and select OK to confirm your selection Use the and sensor controls to select Reset and select OK to confirm your selection The Change Active AirClean Filter message disappears from the display The Display Active AirClean Filter to re place the Active ...

Страница 78: ...limate range Do not use in ambient temperatures for which it is not designed in the fridge zone and in the MasterFresh zone We recommend a temperature of 39 F 4 C in the fridge zone The temperature in the dry compart ment of the MasterFresh zone is regu lated automatically and is maintained just above 0 C 32 F at a fridge zone temperature of 4 C 37 F Please note that if the temperature in the frid...

Страница 79: ...ng your finger on the sensor control changes the temperature continu ously Confirm the temperature setting with OK or wait approx 8 seconds af ter the last touch of the sensor This temperature will be automatically adopted Tip The newly set temperature can also be confirmed and adopted by closing the appliance door The temperature display always shows the required temperature If you have adjusted ...

Страница 80: ...play for the fridge zone The appliance will now run at maximum power Switching off Automatic SuperCool Touch the sensor control to set the temperature Use the and sensor controls to select the temperature display of the fridge zone and select OK to confirm your selection The symbol is highlighted in color and the temperature value of 35 F 2 C is shown on the display Touch the sensor control to swi...

Страница 81: ...ast press of the button The setting will be au tomatically adopted The symbol will appear on the tem perature display for the freezer zone The appliance will now run at maximum power Turning off SuperFrost Touch the sensor control to set the temperature Use the and sensor controls to select the temperature display of the freezer zone and select OK to confirm your selection The symbol is highlighte...

Страница 82: ...SuperCool and SuperFreeze 82 Tip To save energy you should manu ally switch off the SuperFrost function once the freezer reaches a constant temperature of 0 F 18 C or colder Monitor the temperature in the freezer zone ...

Страница 83: ...era ture If a lot of warm room air enters the freezer when frozen food is being loaded rearranged or taken out When large amounts of food are frozen at once When freezing fresh food which is still warm After an extended power failure The alarm will be silenced and the mes sage on the display will go out as soon as the reason for the alarm has been re solved Health risk caused by decom posing food ...

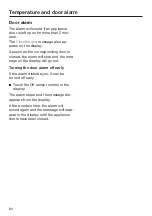
Страница 84: ... door is closed the alarm will stop and the mes sage on the display will go out Turning the door alarm off early If the alarm disturbs you it can be turned off early Touch the OK sensor control in the display The alarm stops and the message dis appears from the display After a certain time the alarm will sound again and the message will reap pear in the display until the appliance doors have been ...

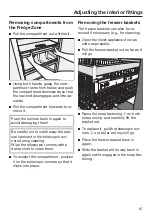
Страница 85: ...catches in the guides at the same height again Make sure that the shelf is straight Tip For the purposes of loading and unloading or cleaning the clip in con tainers in the shelves can be removed from their holders completely Removing or moving the shelves Hold the shelf on both sides and raise it slightly so that it can be lifted with the catches over the guide at the back Pull the shelf forward ...

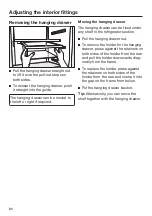
Страница 86: ...ing drawer can be fixed under any shelf in the refrigerator section Pull the hanging drawer out To remove the holder for the hanging drawer press against the retainers on both sides of the holder from the rear and pull the holder downwards diag onally from the frame To replace the holder press against the retainers on both sides of the holder from the rear and clamp it into the gap on the frame fr...

Страница 87: ...ing cleaning Wipe the telescopic runners with a damp cloth to clean them To reinsert the compartment position it on the telescopic runners so that it clicks into place Removing the freezer baskets The freezer baskets can also be re moved if necessary e g for cleaning Open the lower appliance door as wide as possible Pull the freezer basket out as far as it will go 1 Raise the snap fastening on bot...

Страница 88: ...osition and position the dividing panel into the brackets so that you hear it click into place Insert the pegs into the brackets and use a suitable object to turn the slots in the pegs into a vertical position Push the freezer basket all the way back in Removing the ice cube tray The ice cube tray can be removed for cleaning Open the lower appliance door as wide as possible Tilt the ice cube tray ...

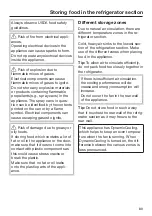
Страница 89: ...act with plastic components as this could cause stress cracks or break the plastic Make sure that no fat or oil leaks onto the plastic parts of the appli ance Different storage zones Due to natural air circulation there are different temperature zones in the re frigerator section Cold heavy air sinks to the lowest sec tion of the refrigeration section Make use of the different zones when placing f...

Страница 90: ...d goods containing eggs or cream fresh dough cake mixtures pizza dough or pie dough raw milk cheese and other raw milk products pre packed vegetables and other fresh food with a best before date that requires storage at a temperature of at least 39 F 4 C Tip This compartment is ideal for all home cooked meals as any micro organisms that may still be present can not multiply Food which is not suita...

Страница 91: ...at food stored in the fridge zone is in packaging or covered prop erly some exceptions apply in the Mas terFresh zone This will prevent food smells from affecting other food food from drying out and also any cross contamination of bacteria This is par ticularly important when storing meat products Make sure that foods such as raw meat and fish in particular do not come into contact with other food...

Страница 92: ... midity controlled compart ment Max load of the dry compart ment KF 28x2 Vi SF 23 lb 10 5 kg 31 lb 14 kg KF 29x2 Vi SF 30 lb 13 5 kg 40 lb 18 kg Humidity controlled compartment with moisture adjustment The moisture released by food in stor age is kept within the humidity con trolled compartment drawer The closer the air humidity in the humidity con trolled compartment is to the humidity content of...

Страница 93: ...s of fruits and vegeta bles in the humidity controlled com partment The moisture regulator closes the vents in the compartment com pletely so that all of the moisture present is retained Tip If the humidity level is too high and a lot of moisture has collected in the compartment select the setting If the quantity of food being stored in this compartment is small the moisture level may be too low I...

Страница 94: ...still be present can not multiply The dry compartment is ideal for storing perishable foods such as dairy products such as yogurt cheese cream etc deli salads meat poultry and sausage fresh fish and shellfish Any type of food can in fact be stored in this compartment as long as it is packaged Please note that foods rich in protein deteriorate faster than others Shellfish for example deteriorates f...

Страница 95: ...od loose in the humidity controlled compartment A high humidity level in the humidity controlled compartment is achieved by the moisture present in the food being stored If the humidity level is not high enough e g too little food is being stored it can be increased by placing a damp sponge in the drawer If you think that the temperature in the dry compartment is too high or too low adjust the tem...

Страница 96: ...en you freeze fresh food Fresh food should be frozen as quickly as possible so that the nutritional value of the food its vitamin content appear ance and flavor are maintained Food which takes a long time to freeze will lose more water from its cells which then shrink During the defrosting process only some of this water is re absorbed by the cells What this means in practice is that the food lose...

Страница 97: ...game fish veg etables herbs fresh fruit dairy prod ucts baked goods leftovers egg yolks egg whites and a range of pre cooked meals The following types of food are not suitable for freezing lettuce radishes sour cream may onnaise whole eggs in their shells onions whole raw apples and pears To retain color taste aroma and vi tamin C vegetables should be blanched before they are frozen To do so place...

Страница 98: ...age bags Plastic shopping bags Remove as much air as possible from the packaging before sealing Close the packaging tightly with rubber bands bag clips string or bag ties or freezer tape Tip Freezer bags and poly tubing may also be sealed using home heat sealing kits Label the packaging with the con tents and the date of freezing Before placing food in the freezer When freezing more than 4 4 lb 2 ...

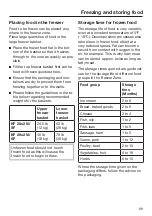
Страница 99: ...b 18 kg 79 lb 36 kg Unfrozen food should not touch frozen food as this will cause the frozen food to begin to thaw Storage time for frozen food The storage life of food is very variable even at a constant temperature of 0 F 18 C Decomposition processes also take place in frozen food albeit at a very reduced speed Fat can become rancid from contact with oxygen in the air for example This is why lea...

Страница 100: ...fish can be placed directly into a hot skillet Meat and poultry e g hamburgers chicken fish should not come into con tact with other foods while defrosting Catch the defrosting liquid and dispose of it carefully Fruit can be thawed at room tempera ture either in the packaging or in a cov ered bowl Most vegetables can be cooked while still frozen Just put straight into boiling water or hot grease T...

Страница 101: ...rop out of the ice maker into the ice cube container Ice cube production is halted automati cally as soon as the ice cube container is full The ice maker can make up to approx 3 lb 1 3 kg of ice cubes in 24 hours The amount of ice cubes made by the appliance depends on the temperature in the freezer zone The lower the temperature the more ice cubes are produced After the setting up the appliance f...

Страница 102: ...ubes Close the faucet in the water supply line approx 3 hours before switching off the appliance to avoid the build up of bacteria caused by stagnant water In Settings mode use the and sensor controls to select the Dis penser Unit and select OK to confirm your selection Use the and sensor controls to select Off and select OK to confirm your selection ...

Страница 103: ...ck wall of the refrigerator section and the MasterFresh drawer while in use You do not need to remove this as it will defrost and evaporate automati cally with the warmth generated by the appliance Freezer Zone The appliance is equipped with a NoFrost system The freezer defrosts automatically The moisture generated in the appli ance collects on the condenser and is automatically defrosted and evap...

Страница 104: ... information which is required in the event of a service call Cleaning agents To avoid damaging the surfaces of your appliance do not use cleaning agents containing soda am monia acids or chloride cleaning agents containing lime scale remover abrasive cleaning agents such as scouring powder scouring liquid or pumice stones cleaning agents containing solvents stainless steel cleaning agents dishwas...

Страница 105: ...arm water and liquid dish soap Rinse all parts by hand Do not wash in a dishwasher After cleaning wipe with clean water and dry with a soft cloth Leave the door open to air the appli ance sufficiently for a short while and to prevent odor buildup Aluminum frames The frames to the shelves inside the ap pliance and the door shelves are par tially made from aluminum Aluminum is a dynamic material The...

Страница 106: ...or the sur faces See the information on Cleaning agents at the beginning of this sec tion Clean the surfaces with a clean sponge and a solution of warm water and liquid dish soap A clean damp microfiber cloth without cleaning agent can also be used for cleaning After cleaning wipe with clean water and dry with a soft cloth Cleaning the door seal Risk of damage as a result of in correct cleaning If...

Страница 107: ...r to clean the water filter Turn the cap of the filter cartridge counterclockwise until it is in the hori zontal position 1 and slide it out of the filter opening 2 Pull the mesh out of the back of the filter cartridge 3 Rinse the mesh under running luke warm water Turn the mesh over un der the running water to clean it on all sides 4 Reinsert the mesh into the back of the filter cartridge 4 Slide...

Страница 108: ...e Water Filter Display Replacing the Active AirClean filters The Active AirClean filters in the refrig erator section need to be replaced ap prox every 6 months Change Active AirClean Filter will appear on the display Confirm the message with OK To remove the holder for the Active AirClean filters press against the re tainers on both sides of the holder from the rear and pull the holder downwards ...

Страница 109: ...d from Miele Service your local dealer or via the Miele website After cleaning Replace all shelves and accessories in the fridge zone Switch the refrigeration appliance back on Place food in the fridge zone and close the appliance doors Switch on the SuperFrost function for a while so that the freezer zone can cool down quickly Once the freezer zone has reached the required temperature place the f...

Страница 110: ... accessories After inserting a new water filter In tensiveClear 2 0 mesh filter and In tensiveClear 2 0 charcoal filter dis pose of all ice cubes produced in the next 24 hours following the change If you have not used the appliance or the ice maker much in the last few weeks or months or if the ice cubes smell unpleasant replace the Inten siveClear 2 0 charcoal filter or clean the IntensiveClear 2...

Страница 111: ...e old filter cartridge 3 and remove the cap 4 Clip the cap onto the new filter car tridge 5 Empty the old filter cartridge Tip The old filter cartridge can be dis posed of with household trash 6 Slide the filter cartridge as far as it will go into the filter opening 6 mak ing sure the cap is horizontal 7 Turn the cap of the filter cartridge clockwise until it is in the vertical po sition 7 Risk of...

Страница 112: ...cting additional settings Resetting the Water Filter Display After inserting a new water filter dis pose of all ice cubes produced in the next 24 hours following the change Using an external water filter If an external water filter is attached to your household water supply use an In tensiveClear 2 0 mesh filter in place of an IntensiveClear 2 0 charcoal filter ...

Страница 113: ...nt Max Qermissible Qroduct water concentration Chlorine Uaste and Pdor 2 0 mg L 10 97 2 50 N A hloramine 3 0 mg L 10 97 2 N A 0 5 mg L 1articulate Class I particles 0 5 to 1 μm at least 10 000 particles mL 99 9 85 N A trazine 0 009 mg L 10 94 4 N A 0 003 mg L enzene 0 015 mg L 10 96 8 N A 0 005 mg L arbofuran 0 08 mg L 10 98 8 N A 0 04 mg L p ichlorobenzene 0 225 mg L 10 99 8 N A 0 075 mg L Lead p...

Страница 114: ... water that is microbiologically unsafe or of unknown quality without ad equate disinfection before or after the system Systems certified for cyst reduction may be used on disinfected water that may contain filterable cyst Notice Adsorption media will not be regenerated and used Systems must be installed and operated in accordance with manufacturer s recommended procedures and guidelines The system ...

Страница 115: ... and certified by WQA against NSF ANSI 372 for lead free compliance Miele Cie KG Carl Miele Straße 29 D 33332 Gütersloh Lead free certificate This product is tested and certified by WQA against NSF ANSI 372 for lead free compliance Miele Cie KG Carl Miele Strasse 29 D 33332 Gütersloh ...

Страница 116: ...r appliance will be checked for any faults or malfunctions Any errors identified during the Self Test are shown on the display Perform a Self Test see Additional settings sec tion Performing a Self Test Contact Miele Service and inform them of the error message s on the display The appliance is not getting cold and the in terior lighting does not come on when the ap pliance door is opened The appl...

Страница 117: ...e doors After a while the temperature will return to normal by itself If a thick layer of ice has formed it will decrease the cooling capacity and increase the energy consump tion Defrost the appliance and clean it The room is too warm The higher the room tempera ture the longer the compressor has to run See Installation location The appliance was not properly installed in the niche See Installati...

Страница 118: ...ncreases the compressor run time Food has frozen to gether or to the wall The food packaging was not dry when loaded in the freezer Use a blunt instrument such as a spoon handle to carefully pry them apart An alarm sounds The appliance doors have been open for longer than approx 2 minutes Close the appliance doors No alarm sounds de spite the appliance door being open You have switched off the aud...

Страница 119: ...h2Open function is activated in the case of a handle free cabinet front the right Fridge Zone door must be opened first before the left Fridge Zone door can be opened The storage life of the food stored in the dry compartment of the MasterFresh zone is re duced The temperature in the dry compartment of the Mas terFresh zone is possibly too high The temperature in the dry compartment is controlled ...

Страница 120: ...door pill feel warm Not a fault The left hand appliance door features in tegrated heating Switching the heating on prevents condensation on the door pillar and on the door seals If required you can switch off the heating see Switching Condensation Protection on and off in Selecting additional settings ...

Страница 121: ...ure in the freezer zone rose Depending on the temperature displayed you should check whether food in the freezer has started to thaw or has defrosted If it has cook it before freezing it again In the event of a power failure check whether there are any ice cubes in the ice cube container and dispose of these Otherwise the ice cubes will freeze together and can damage the ice cube con tainer when t...

Страница 122: ...too high low Observe the connection data under Electrical connections Contact Miele Service if necessary To turn the alarm off touch the symbol The error message does not disappear from the dis play until the error has been rectified is shown in the dis play The machine does not get cold but the machine controls are working Demo Mode is switched on Demo mode allows the appliance to be presented in...

Страница 123: ...water intake Check that the water supply has been vented There is a kink in the water hose Check the water hose and replace it if necessary The temperature in the freezer zone is too high Select a lower temperature The appliance door has been opened too frequently causing the compressor to turn on more often and the ice maker has iced up Only open the appliance door when necessary and for as short...

Страница 124: ...ter needs to be re placed or cleaned The water pressure is too low Check whether the water pressure is between 29 psi and 116 psi 2 bar and 8 bar The temperature in the freezer zone is too high Select a lower temperature The ice cubes have an unpleasant odor or fla vor The ice cube container is in constant use and needs to be cleaned regularly Check if the ice cube container is dirty and clean it ...

Страница 125: ...tely Check the water line for damage Contact Miele Customer Service Check whether the water connection pressure is too high If the water connection pressure is too high this can cause leaks see Installation Plumbed water con nection Check that the water connection is between 29 psi and 116 psi 2 bar and 8 bar Check if an incorrect valve has been installed ...

Страница 126: ...gs mode There is a fault Risk of electric shock due to exposed live electrical components When removing the lighting cover there is a risk of coming into contact with live electrical compo nents Do not remove the lighting cover The LED lighting may only be repaired or replaced by Miele Service Risk of injury from LED lighting This lighting corresponds to risk group RG 2 If the cover is defective t...

Страница 127: ...rd when materials expand inside the appliance Please bear in mind that a certain amount of noise is unavoidable from the com pressor and the coolant circulating through the system Noises Cause and solution Rattling clinking The appliance is uneven Realign the appliance using a level by raising or lowering the adjustable feet underneath the appliance or placing something underneath it The appliance...

Страница 128: ...omer Service can be found at the end of this document Please quote the model identifier and serial number of your appliance SN when contacting Miele Customer Ser vice Both pieces of information can be found on the data plate You will find the data plate inside your appliance Appliance warranty and prod uct registration You can register your product and or view the manufacturer s warranty terms and...

Страница 129: ...Declaration of conformity 129 Frequency range 2 412 GHz 2 462 GHz Maximum trans mitting power 100 mW ...

Страница 130: ...Version 2 or the GNU Lesser General Public License Version 2 1 For a period of at least 3 years from the date of purchase or delivery of the device appliance respectively Miele offers to provide you or third parties with a machine readable copy of the source code of the Open Source components contained in the device appliance and licensed un der the terms of the GNU General Public License Version ...

Страница 131: ... Service Canada Importer Miele Limited Headquarters and Miele Centre 800 843 7231 609 419 4298 Customer Service Support Phone Fax service mieleusa com 161 Four Valley Drive Vaughan ON L4K 4V8 www miele ca 888 99 MIELE 64353 888 586 8056 Customer Care Centre Phone customercare miele ca 800 565 6435 905 532 2272 International Headquarters Miele Cie KG Carl Miele Straße 29 33332 Gütersloh Germany ...

Страница 132: ...M Nr 11 508 700 02 en US CA KF 2982 SF ...

Отзывы: