DCA-8000
Midtronics Inc. 7000 Monroe Street Willowbrook, IL 60527
www.midtronics.com
Page
1
Quick Start Guide
167-000900EN-A
March 2019
Quick Start Guide
March 2019
167-000900EN-A
DCA-8000
Subaru
IMPORTANT
:
Assemble the charger cart and mount
the charger on it before setting up the DCA-8000.
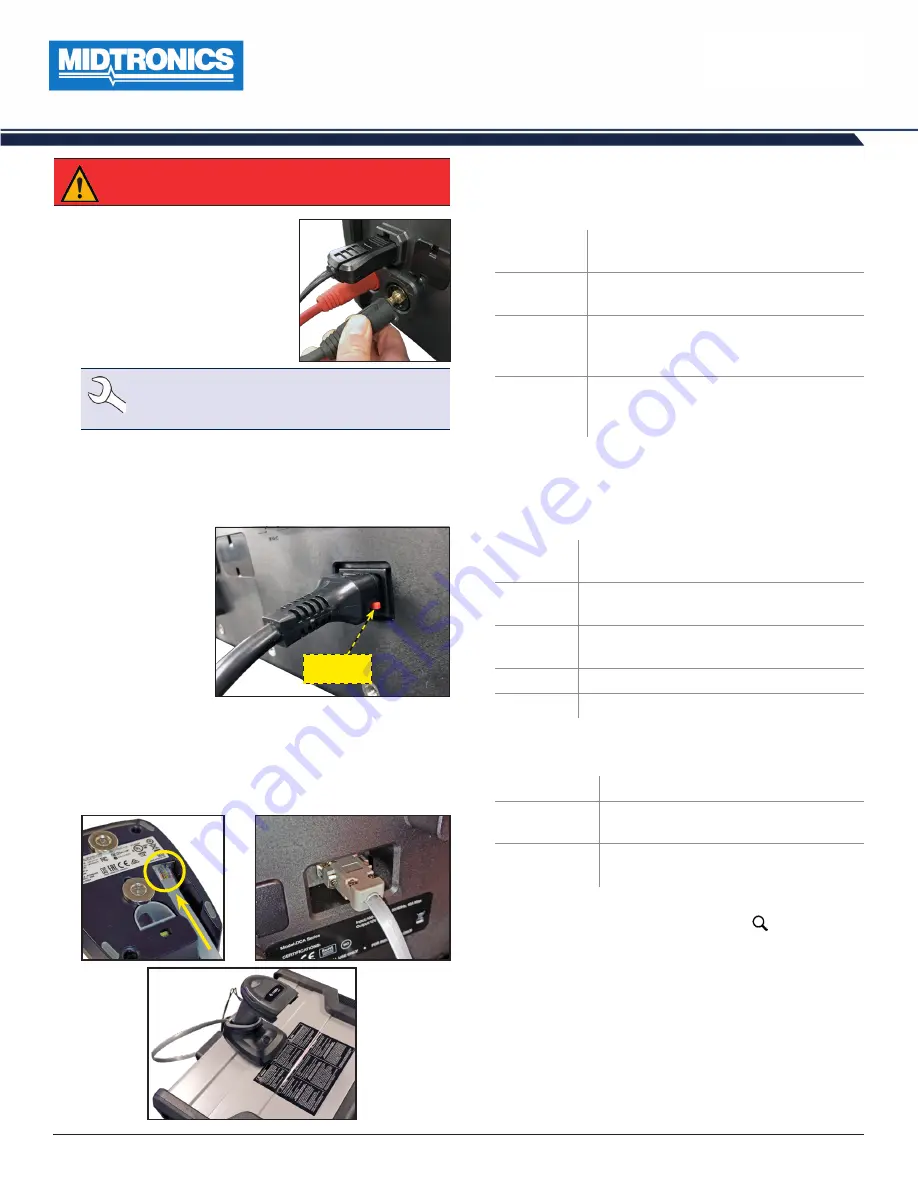
Charging Cables
1. Insert the communication cable.
2. Insert and rotate the charge ca-
ble quick connectors clockwise
180° to lock them onto the Quick
Connector Locking Post on the
charger.
NOTE
: Pre twist the charge cables counter clock-
wise before installing in order to avoid putting
excess strain on the cables.
3. The connection process is complete when all three cables
are connected to the charger.
Locking Power Cord
Insert until the connector
locks in place.
To release/remove the
power cord from the
charger’s power socket,
pull back on the red
tab on the side of the
connector.
Pull Back To
Release
Wireless Barcode Scanner Cable
Insert the RJ50 connector in the bottom of the scanner base.
Then use the screws on the DB9 connector to secure the cable
from the dock to the charger.
Initial Setup
1. Upon initial power-up, the Language Settings screen is dis-
played. Tap
Next
to continue.
System
Language
Select the Controller default language
displayed on the screen.
Test Result
Language
Select the Controller default language for
all displayed tests and test results.
Language
Select the default standard language for
the analyzer to use for all tests and results
sent via email.
Language
Select the default standard language for
the analyzer to use for all tests and results
printed using a networked printer.
2. A Consent to collect data screen is displayed. Tap the Con-
sent check box and then tap
Next
to continue.
3. The Date/Time Settings are displayed. Tap
Next
to continue
after making any adjustments.
Select Time
Format
:
12-hour or 24-hour format
Select Date
Format
:
DD/MM/YYYY, MM/DD/YYYY, or
YYYY/MM/DD
Select Time
Zone
:
Time zone offset from Greenwich
Mean Time
Set Date
:
Set the current date
Set Time
:
Set the current time in the selected time zone
4. The Test Settings are displayed. Tap
Next
to continue after
making any adjustments.
Battery Rating
Default: CCA (Cold Cranking Amps)
Temperature
Units
Select Fahrenheit or Celsius
Decimal
Separator
Select decimal point or comma
5. The Location Selection screen (Admin Only) is displayed.
Scroll to find the correct location or tap to search for a
specfic location. Tap Next to continue.
6. The Configured WiFi Networks screen is displayed. By de-
fault “subtronics01” is displayed. Tap
Next
to continue.


